
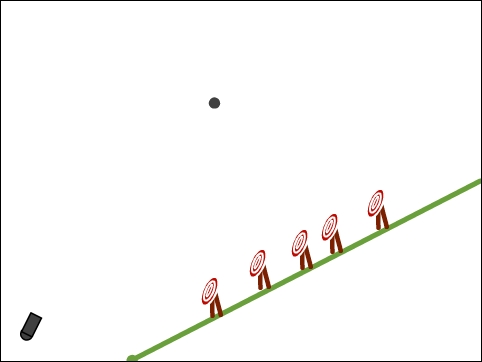
As the final stage of this project we will create a hill for the targets to sit on. The landscape will have a diagonal slope; we have to change the parabola trajectory to shoot at different points on the hill. The finished game will look like the following screenshot:
We could manually draw landscapes as sprites. But if we want to create many different levels, it could take a lot of work. Instead, we will make a drawing tool to create the hill.
First, create a copy of the cannonball by right-clicking on the sprite in the Sprites view and choosing duplicate, shown as follows:

Click on the i button on the copied sprite and change its name to
drawing tool.Throw away the scripts in the copied sprite. Those are only useful for the cannonball, not for the drawing tool.
Switch to the Costumes tab and change the color of the drawing tool to dark green using the color swatches. This is mostly to make it visually different from the cannonball, so that we don't confuse the two.

Go back to the Script tab so that we can create a new script for the drawing tool.
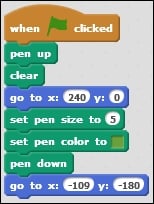
We start the script again with a when <green flag> clicked block.
Attach a pen up block to make sure the tool doesn't draw anything while moving to its starting point.
Add a clear block. This might not look useful now, but like with the hide and show commands in the target sprite script, this will help clear the screen once we want to restart the game.
Move the tool to its starting point with a go to x: () y: () block.
Fill in
240after x and0after y, so the tool starts at the right edge of the stage.Next, set the pen size to
5using a set pen size to block. Again you might want to create a thinner or thicker line.Choose a green color for a natural-looking hill in the set pen color to … block.
Place the drawing tool on the stage with a pen down block. We are now ready to start drawing the landscape.
Then, we move the pen diagonally to the bottom edge with a go to x:
-100y:-180block. Because the pen is down, it will draw a line between its start and end point.
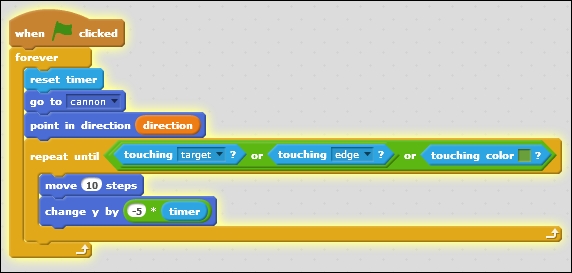
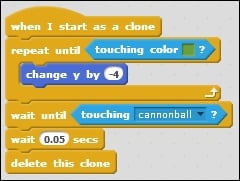
To make full use of our newly drawn landscape, we have to set the targets down on them. But how do we do that on such an uneven surface? The solution is to slowly move the targets down and use another collision test to decide when the targets have reached the landscape and should stop moving. We add the following script to the target sprite:
The steps to perform this test are as follows:
Click on the target sprite so you can view its scripts.
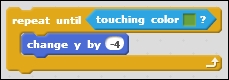
Add a repeat until () block at the start of the clone script.
Inside the repeat until loop place a change y by () block and fill in a negative number to make the targets move down.
I filled in the number
-4for a fairly slow speed. You may take bigger steps, but then the targets could end up being stuck partly through the landscape. Not a big issue, but it might not look as nice.To stop the targets from moving when they reach the landscape, add a touching color ()? condition to the repeat until () block.
Click on the color box and then point and click on the green line that you've drawn.
Computers are very precise about color. Keep this in mind if your color collision doesn't work. Most likely, the actual color of the object will be slightly different from the color that you checked for. You can't see it with the naked eye, but the computer can tell the difference based on the color number. The finished script should look like the following screenshot:
As a final step, change y:
0 to y:
180 in the other target sprite script. This will place the target at the top of the stage and make sure that it doesn't end up inside or underneath the landscape.
Now that we have another object on the stage, that is, the landscape, there is one more thing we have to do to finish the game. When the cannonball hits the ground, it should stop instead of moving straight through the landscape. This is similar to the addition we added after including the targets. Now we only need to add another collision check for the cannonball to respond to.
The following are the steps for this collision check:
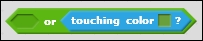
Get another () or () operator block.
We will check for hitting the green landscape color, just like we just did with the targets.
In the other slot, we will place the entire condition check, like we made earlier. So our latest () or () block will become the outermost block in the construction.
Place the entire construction back in the repeat until () slot and we're done.
The cannonball will now respond to hitting the stage edge, a target, and the landscape.