
In this recipe, we will see how to create a mesh-light material to be assigned to any mesh object and used as source light to light the scene.
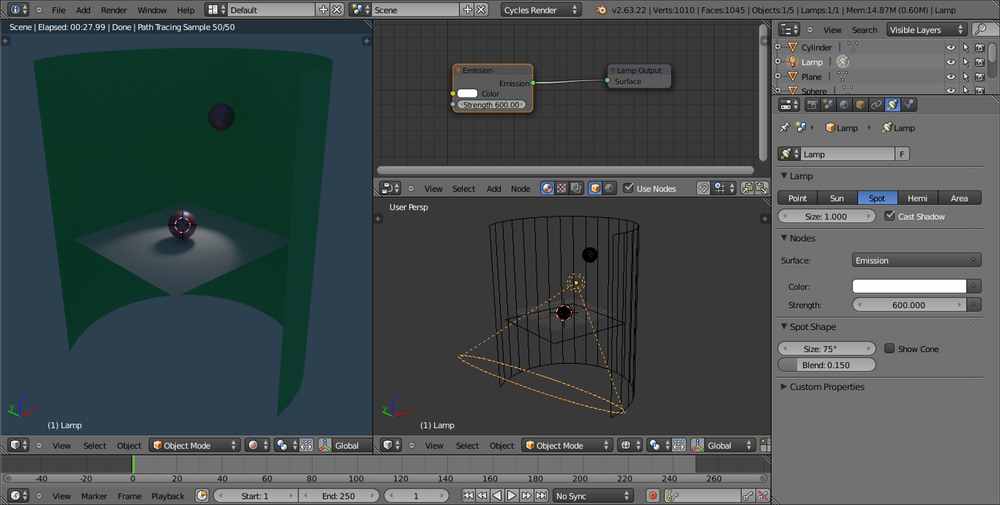
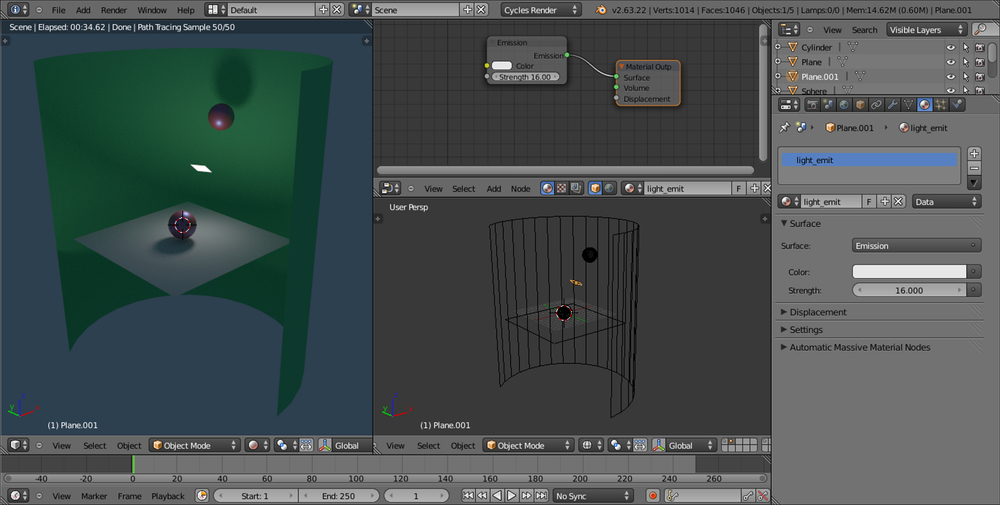
Until now we have used the default lamp (a Point light) already present in the scene for lighting the scene. By enabling the node system for the lamp, we have seen that the lamp uses a material created by connecting an Emission node to the Lamp Output node.
The good news is that, exactly because it's a node material, we can assign an Emission shader also to a mesh. For example, to a plane conveniently located, scaled, and rotated to point to the scene. Such a light emitting mesh is called a Mesh-light. Being a mesh, the Emission shader node output must be connected to the Surface input socket of a Material Output node instead of the Lamp Output node.
The light emission, coming from a surface and not from a point, is a lot more diffuse and softer than a lamp. A mesh-light can be any mesh of any shape and, therefore, can be easily used as an object taking part in the scene and being, at the same time, the real light source of the rendering—for example, a table lamp, or a neon sign, or a television screen. As a pure light-emitting plane, it's usually used as a sort of photographic diffuser. Two or three mesh-lights strategically placed can realistically simulate a photo studio situation.
Starting from the
start_07.blendfile, click on the eye lamp icon in the Outliner to enable it again.Right-click the lamp in the 3D view and press Shift + S to bring up the Snap menu. Left-click on the Cursor to Selected item.
Press Shift + A with the mouse pointer in the 3D view and add a plane to the scene at the cursor's location.
Come out of edit mode (press Tab). Shift select the lamp; now you have both the just added plane and the lamp selected, and the latter is the active one.
Press Crtl + C to bring up the Copy Attributes menu and select the Copy Rotation item.
Rename this plane to Emitter.
Right-click the lamp in the 3D view and press X to delete it.
Put the mouse pointer in the 3D view and press 0 from the numpad to go to Camera view.
From the Viewport Shading menu in the window header, select the Rendered mode:

Save the file as
start_09.blend.
Select the Emitter plane and click on the little cube icon on the header of the Node Editor window.
Click on the New button in the header and rename the material as Emitter.
In the Properties panel, go to the Material window and under the Surface tab, click on the Surface button to switch the Diffuse BSDF shader with an Emission shader. Leave the default color unchanged (RGB 0.800) and set the Strength slider to 35.000.
Save the file.

In the 3D view, scale the Emitter plane five times bigger (press S, digit 5, and hit Enter), then set the Strength slider to 3.500.
Save the file as
start_10.blend.
Now let's scale the Emitter plane a lot smaller (press S, digit 0.05, and hit Enter) and set the Strength slider to 350.000.
Save the file as
start_11.blend.
From step 5 to step 7, we saw how a mesh-light can be scaled bigger or smaller to obtain a softer (in the first case) or a sharper (in the second case) shadow. The Strength value must be adjusted for the light intensity to remain consistent, or the mesh-light must be moved closer or more distant from the scene.
Scaling the mesh-light basically is the same as setting the size value for a lamp. For lamps, the softness of the shadows can be set by the Size value on the left of the Cast Shadow option in the Lamp window under the Properties panel (by default, the Size value is set to 1.000). At a value of 0.000, the shadow is at its maximum crispness, or sharpness. By increasing the Size value, the softness of the shadow increases too.
Differently from the mesh-light, varying the Size value of a lamp doesn't require us to adjust the Strength value to keep the same light intensity.
In several cases, you would want the emitters to not appear in your render. There are node arrangements to accomplish this (by using the Light Path node in a very similar way to the Setting the World material recipe we have seen before), but the easiest way to do this is as follows:
Start with the last saved blend (
start_11.blend) with the 3D window on the left also set to the Rendered mode, to see the scene out of the Camera view (so the Emitter plane is rendered too).With the Emitter plane still selected, go to the Object window under the Properties panel.
Look in the Ray Visibility tab (usually, at the bottom of the Properties window), where there are five items: Camera, Diffuse, Glossy, Transmission, and Shadows with corresponding checked boxes.
Uncheck the Camera item and watch the Emitter plane disappear in the rendered 3D window, but the scene still lit by it, as shown in the following screenshot:

By checking any one of the items, the corresponding property won't take part in the rendering. In our case, by unchecking the Camera box, the mesh won't be rendered, although still emitting light. Be careful that, at this moment, the Emitter plane is not renderable but, because all the other items in the tab are still checked, it can be reflected, and if this is the case, can cast its own shadow on the other objects.
Now reselect the spheroid (remember that, unless you have renamed it, its name in the Outliner still shows as Cube). Next, from the Ray Visibility tab in the Object window under the Properties panel, uncheck the Camera item as well.
Now the spheroid has disappeared, but it's still casting its shadow on the plane, as shown in the following screenshot:

Now uncheck the Camera and the Shadow checkboxes. In this case, the spheroid is visible again but is not casting any shadow, as shown here:

Save the file as
start_12.blend. Let's try tweaking this a little.Check the Shadow box for the spheroid and select the bottom plane.
In the Material window under the Properties panel, switch the Diffuse BSDF shader with a Glossy BSDF shader. The bottom plane is now acting as a perfect mirror, reflecting the spheroid and the
.hdrimage, which we had formerly set in the World material.Go back to the Object window and reselect the spheroid. In the Ray Visibility tab, uncheck the Glossy item and watch the spheroid still rendered but no more reflected by the mirroring plane, as shown here:

Save the file as
start_13.blend.
The Ray Visibility trick we've just seen, of course, is not needed for lamps, because a lamp cannot be rendered in any case. At the moment, only Point, Spot, Area, and Sun lamps are supported inside Cycles; Hemi lamps are rendered as Sun lamps.
Both lamps and mesh-lights can use textures to, for example, project colored lights on the scene, but only a mesh-light can be unwrapped and UV mapped with an image map.
More, it seems that mesh-lights work better than lamps in Cycles, that is, the light casting and diffusion looks better and more realistic with an emitting plane. It's not clear if this is just a technical lamp limitation or if it will be improved in the future.
One advantage lamps have on mesh-lights is that they are easily made unidirectional, that is, apart from Point lamps, they cast light in only one direction, as shown in the following screenshot:
In the preceding screenshot, you can see that only the plane and the sphere in front are lit by the Spot lamp. With a mesh-light plane replacing the Spot lamp, instead, both the sphere and the cylindrical green wall behind are lit, as shown here:
So what if we want to only light the object in one direction (plane and sphere in front) with a mesh-light? Is there a way to make a light-emitting plane to emit it only from one side and not the opposite one? Yes, of course, there is:
Open the
1301OS_01_meshlight.blendfile, which has a prepared scene similar to the one used for the preceding screenshots, and set the bottom 3D window to the Rendered mode by clicking on the Viewport Shading button in the header and selecting the upper item.Left-click the Emitter item in the Outliner and put the mouse pointer in the Node Editor window. Add a Mix Shader node (press Shift + A and go to Shader | Mix Shader) and move it to the link connecting the Emission node to the Material Output node to paste it in between.
Add a Geometry node (press Shift + A and go to Input | Geometry) and connect its Backfacing output to the Fac input socket of the Mix Shader node.
Switch the Emission node output from the first Shader input socket of the Mix Shader node to the second one, as shown in the following screenshot:

Save the file as
1301OS_01_meshlight_final.blend.
The plane is now emitting light only in one direction.
We have already seen that in a Mix Shader node the first (upper) green Shader input socket is considered equal to a 0 value, while the second one to a 1 value. So, the Backfacing output of the Geometry node is stating Cycles to make the plane emit light only in the face-normal direction, and to keep black and non-emitting (just like a blank shader) the opposite "backfacing" side of the plane.
By switching the Emission node connection to the first Mix Shader input sockets, it's obviously possible to invert the direction of the light emission.