

Raspbmc can be easily installed from Windows, Linux, or Mac OS X. With the help of a computer, you can install the Raspbmc installer on to the card. You will need an Internet connection on your computer for this. This installer will then configure the Raspberry Pi by grabbing the latest version of Raspbmc. The part where the user installs Raspbmc onto the SD card using a computer card can also be referred to as imaging.
The installer for Raspbmc can be obtained from http://www.raspbmc.com/download. As instructions for downloading and running the installer are already available on this page, the instructions given in this chapter will be condensed.
Note
You should double-check you are installing Raspbmc to the right device before imaging. You can reduce the likelihood of imaging the wrong device by temporarily removing devices that you do not want to image, such as USB sticks.
Installation on Windows can be done by running the application from the Raspbmc website as follows:
Installing Raspbmc from Windows is a simple process. Upon running the program, you will see a screen similar to the following one:
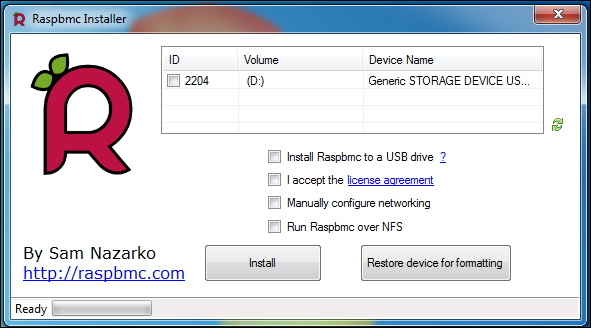
If your SD card is not already listed in the grid, verify whether it is inserted and click on the refresh icon. If you wish to configure advanced options, such as installing to a USB drive, or wireless networking settings, tick the appropriate boxes.
Simply check the SD card that you would like to image, accept the license agreement, and click on the Install button. This process will take up to five minutes, as your computer downloads the latest Raspbmc setup image and writes it to your SD card.
When this process is finished, you will be given a confirmation similar to the following one:

An easy-to-use installer is also provided for other platforms. Let's see how to use the installer for Mac OS X:
The installer for Mac OS X and Linux is written in Python, and running it as per the instructions on the web page should lead you to a screen similar to the one shown in the following screenshot:
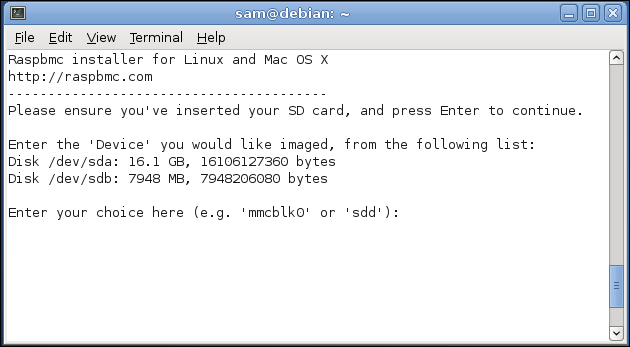
Simply follow the instructions to select the correct device to image. The script will then download the setup image and write this to your SD card. When this is done, the device will be safely removed, so it is safe to remove it. Similar to the Windows installer, there will be an option to configure network settings or USB/NFS installs.
In the rare instance that the installers do not work on your system, this web page also has an image that can be downloaded if the user wishes to image the card with their own software. Select the Network Image option for downloading. If you do not have a network connection on your Raspberry Pi, you should choose the Standalone Image option.
For Windows, an alternative to the Raspbmc installer is Win32DiskImager or the USB Image tool. For UNIX systems, the following command would suffice, assuming that the filename of the compressed image was installer.img.gz:
gunzip –c installer.img.gz | sudo dd of=/dev/sdb
Prefixing the dd command with sudo may not be necessary if you are running it as the root user. Your device may not be /dev/sdb; you can verify the device's path with ls /dev.