

In this recipe we will learn how to use a color texture inside a material. We will also learn a really interesting technique to make the material more realistic and "live".
As you will have probably noticed our key holder has the shape of the Blender logo. Of course we cannot have just the shape, we need to add proper colorization!
To effectively use a color texture, we need to follow these steps:
First of all let's add the colors of the Blender logo to it. In the node editor add a new Image Texture node and a Texture Coordinate node. Also, for these textures we will use the UV coordinates.
Now link the Color output of the Image Texture node to the Color input of the Translucent BSDF node. It is already much better! Now we have a nice Blender logo! Some could say that we could even stop here, but let's tweak this material even further.
It would be nice to have a bit of dirt in the occluded parts of the the key holder. To obtain this kind of effect, we will be using vertex paint.
First of all let's paint the vertices of our key holder. From the lower header of the viewport, select from the Mode menu, Vertex Paint. Now our key holder will have a shadeless white color in the viewport. From the lower viewport header, in the Paint menu select Dirty Vertex Color. Looking at the viewport we can now see that the color of the key holder has changed. This function will give a black and white color to the surface of the object following things such as occlusion and topology. We could say that our key holder is a bit dirty, and this is what we wanted.
Let's see how we can use this color in our material. Go back to object mode. If we go to the Object Data menu, we will see that in the Vertex Color panel a new entry has been added. This is the color information we created a while ago. Change the name to
KeyHolderDirt, and copy it (you can use Ctrl + C as in the desktop environment). Now let's go to the node editor and add an Attribute node. We can find this inside the Input section of the Add menu. Now paste within the Attribute node field the name of the vertex color with Ctrl + V and we are ready to go. The Color output of this node will now work as a texture with the information of the vertex Color.Now let's add a Mix Color node, which can be found in the Color section of the Add menu. Take the output of the Image Texture node which was plugged in to the Translucent BSDF color input and plug it into the first Color socket of the Color Mix node. In the second socket we will plug the Color output of the Attribute node. Finally, let's change the mixing mode of the Mix node to Multiply, change the factor to
0.300, and plug the Color output to the Translucent node's Color input.As a last touch, let's add a Gamma node (go to Add | Color) and place it between the Mix node's Color output and the Translucent BSDF node's Color input. We will use this node to lighten the overall color a bit as now it is too dark. Change the Gamma value to
0.600.Our rubber key holder is ready!
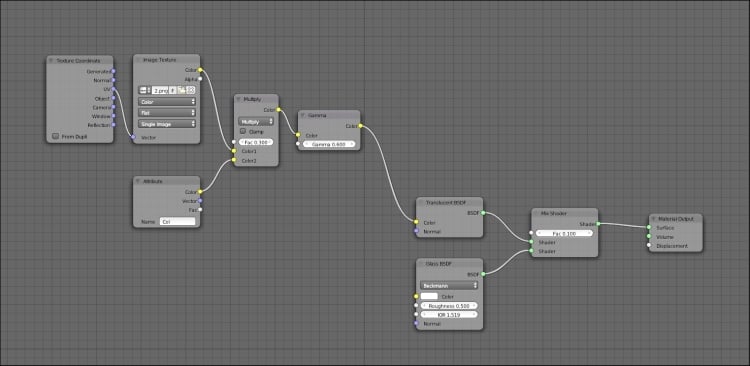
This is how the final node setup should look like, in the following screenshot:
Before we move on to the next recipe, let's add a fast material to both the chain and the keyring. It can be the same material for both. Add a new material and name it KeyHolderChain. Now let's move for a while to the key material. In the node editor select just the two BSDFs and the relative Mix node and press Ctrl + C. Now go again to the KeyHolderChain material and in the node editor erase the default Diffuse BSDF node. Press Ctrl + V and the node that we copied before will be pasted into the node editor. We will just have to link the Mix output to the Material output and we are ready to go.
The first part of the creation of this material follows a workflow that we already saw in the previous recipes. However, we mixed two new BSDFs. While we will have a whole chapter to talk about the Glass BSDF, let's have a look at how the Translucent BSDF works.
As we saw, a BSDF is useful to scatter light within an object. The amount of light scattered by the object depends on the color we set in the node. A totally white color will give the highest amount of light scattered through the object, while a black color means no light scattered at all.
When we used the texture and the vertex color as the input for the Translucent BSDF node's color, we not only changed the amount of light scattered, but we also changed the color of the light that scattered through the key holder.
Another important thing we learned in this material is that BSDFs have to be mixed in a different way than colors. While for BSDF we need a Mix Shader node, for the colors we have to use a normal Mix node, exactly like the one that we use in the compositing node editor. You can easily see the difference of the two nodes by the colors of the inputs and outputs. Moreover, the Color Mix node has several ways of mixing the colors.
Vertex painting is a technique used in computer graphics to assign color information directly on the vertices of a mesh. It can be used simply to give color over a surface or as a map to achieve different effects when setting up, for instance, a material.
Tip
When you are creating a complex material, it is a good idea to check some passages with a much simpler setup. For example, if we need to check the color of some texture or the effect given by some node, we can use a temporary diffuse node. Plugging, for instance, a texture inside the color input of a Diffuse BSDF and the diffuse output directly in the Material Output node will give us a good idea of what is going on.
In the following link there is a really nice add-on which will allow us to create worn edges using the vertex paint within Blender:
http://oscurart.blogspot.com.ar/2013/05/blender-addon-worn-edges-bordes.html