
Moodle is developed in Linux using Apache, MySQL, and PHP (known as the LAMP platform). If you have a choice, this is the preferred environment to use. There is ongoing debate whether PostgreSQL is the more suitable database option, but we will stick with MySQL as this is the system most administrators are familiar with. Also, some organizations are bound to Microsoft SQL or Oracle. If this is the case, please refer to the respective installation guide as this is beyond the scope of this book.
Go to https://download.moodle.org/ and select Latest release in the Standard Moodle section:

By the time of reading, a newer version is likely to be available. If you wish to go with the 3.0 version this book has been written for, select Other supported releases on the right; otherwise, feel free to go with the latest stable build; most content in this book will still be applicable.
There are five types of builds available on Moodle's download site:
Latest release: For the current version of Moodle, there are two releases—the latest stable build and the latest official release. The latest stable version is created weekly (every Wednesday) and is the best choice for a new server. The latest official release contains the stable build as well as new fixes, but the version will not have gone through the weekly code review and might contain unresolved issues.
Other supported releases: Older versions than the current one are maintained by the Moodle development team and bug fixes are back-ported for 12 months after release. Sometimes, the newly-added functionality is back-ported. Version 3.1 will be a long-term support release and will be supported for 3 years.
Security-only-supported releases: For one further release, critical fixes that will impact on security or data loss will be provided, but no other bug fixes will be back-ported.
Legacy releases: For older versions, the last build is made available. However, these are not maintained any further.
Development release: Moodle also offers you the option to download beta releases of the software (if available) and also the latest development release. These should only be downloaded for testing or development purposes, never in production environments!
Each version is made available in the two compressed formats: TGZ (use the tar command to uncompress) and ZIP (requires unzip). You can either download them by clicking on the respective link or, if you have (secure) shell access, retrieve the file directly by using the wget command:
wget http://download.moodle.org/moodle/moodle-latest.zip
If you make use of Moodle Shell (MOOSH), which is described in more detail in Chapter 14, Moodle Admin Tools, you can use the following command to download the latest stable branch of Moodle:
moosh download-moodle
Once you have moved the file to the location where you want to install it on your web server (dirroot), extract the file using the unzip command (or tar xvfz if you downloaded the TGZ version). In a hosted environment, you might have to use the uncompressing method provided by the web administration interface (cPanel, Plesk, or any bespoke system):
unzip moodle-latest.zip
tar xvfz moodle-latest.tgz
If you place the entire folder in your web server documents directory, the site will be located at www.yourwebserver.com/moodle. To access your site from www.yourwebserver.com, copy the contents directly into the main web server's documents directory.
Once this has been successfully done, you have to create the database that Moodle uses to store its data.
Moodle requires a database where it can store its information. While it is possible to share an existing database, it is highly recommended to create a separate database for Moodle. This can either be done via a web interface, as provided for hosted servers, or via the Unix command line.
Most hosting providers provide a dedicated web interface to carry out basic database operations. Alternatively, you can use phpMyAdmin, an open source software that allows you to manage MySQL databases over the Web. It is part of most Linux distributions and many control panels, such as CPanel or Plesk. (phpMyAdmin is often configured not to allow new databases to be created. If this is the case, you have to create the database from the database manager in your control panel.)
Once you have started phpMyAdmin, go to the Databases section and create a new database using the UTF collation (utf8_general_ci collation). You don't need to create any tables; Moodle will be populating the database during the installation process.
While you can use an existing database user account, it is good practice to create a dedicated user for the Moodle database. This step is carried out in the Privileges section.
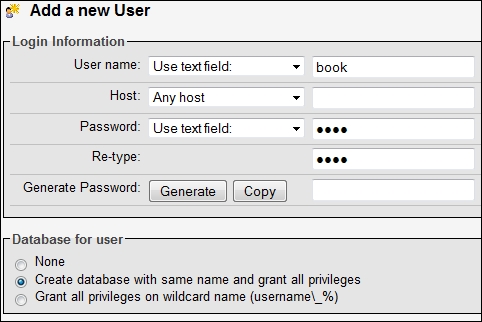
phpMyAdmin allows you to perform both steps—creating a database and adding a new user—in a single action, as shown in the following screenshot. We will create a user, book, and also check the Create database with same name and grant all privileges option:
If you don't have access to a web interface to create MySQL databases and user accounts or if you prefer to use a Linux shell, you can perform these steps via the command line:
Start the database command line tool by entering
mysql -root -pand enter the password at the prompt.Create a database here (called
moodle) by enteringCREATE DATABASE moodle;(all MySQL commands have to be completed with a semicolon).Set the default character and collation order to UTF8 by entering
ALTER DATABASE moodle DEFAULT CHARACTER SET utf8 COLLATE utf8_unicode_ ci;.Create a user and password (here
user@localhostandpassword, respectively) and grant database access permissions by enteringGRANT SELEC T, INSERT, UPDATE, DELETE, CREATE, CREATE TEMPORARY TABLES, DROP, INDEX, ALTER ON moodle.* TO user@localhost IDENTIFIED BY 'password';.Exit the MySQL command tool by entering
QUIT.
It is necessary to reload the grant tables using the following command line:
mysqladmin -u root -p reload
You have now completed the database setup. All we have to do now is to create Moodle's data directory before we are ready to start the installation of Moodle itself.
Moodle stores most of its information in the database you have just created. However, any uploaded files such as assignments or pictures are stored in a separate directory. This data directory in Moodle is usually referred to as moodledata.
Later on, the Moodle installer will attempt to create this directory but, in some setups, this is not possible due to security restrictions. To be on the safe side, it is better to create moodledata manually or via a web-based file manager, as provided by some systems:
Tip
It is crucial to create moodledata on your server where it cannot be accessed publicly, that is, outside your web directory.
Create the directory by entering
mkdir moodledata. This is where all the uploaded files by course authors and learners will be stored, so make sure this is dimensioned properly. You might also consider to create this in a separate partition.Change permissions recursively by entering
chmod –R 0770 moodledata(if you use0777, then everybody on the server will have access to the files).Change the user and group of the directory to that of your web server (usually
apacheorwww-data and nobodyorwww-data, respectively) by enteringchown –R apache:nobody moodledata.
If you don't have permission to create the data directory in a secure location, create the .htaccess file in your home directory containing the following two lines:
order deny,allow
deny from all
This will prevent files from being accessed without the user having permissions to do so.
The installer script performs two main actions—populating the database and creating the configuration file, config.php. The Moodle installer is initiated by entering the URL of wwwroot (the location where you copied Moodle) into your web browser; Moodle will recognize that it hasn't been installed yet and start the process automatically.
The Moodle installer has to set a session cookie. If your browser has been configured to trigger a warning, make sure you accept that cookie.
The first screen lets you choose the language to be used during installation. This is not the locale used for Moodle, only the language for the installation:

The following screenshot displays the expected values for Web address of the site (wwwroot), Moodle directory (dirroot) and Data directory (dataroot); you might have to modify the data directory entry if the location of your moodledata differs:

If dataroot cannot be located or does not have the correct permissions, an error message with details will be displayed. The same applies if dataroot is accessible directly via the Web and is hence, not secure.
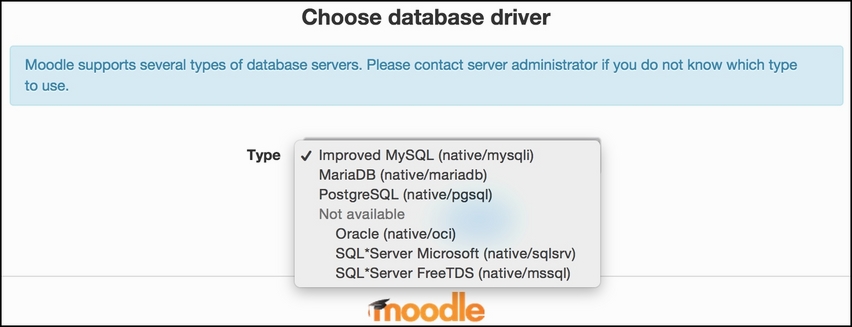
In the following screenshot, you have to select which database you wish to use. On my system, only the drivers for MySQL, MariaDB, and PostgresSQL are installed. To use other database systems such as Oracle or MS SQL Server, the respective driver has to be installed first.
This interface is using the configuration details previously established. The following screenshot will look slightly different if you have chosen a different database driver to the native MySQL:

|
Setting |
Description |
|---|---|
|
Database host |
The default is localhost ( |
|
Database name Database user Database password |
This is the database name, user name, and password you enter when you run the |
|
Tables prefix |
All the tables the Moodle installer is going to create will be prefixed with |
|
Database port |
This is the port of the database in your setup. It is usually empty or 3306. |
|
Unix socket |
If selected, the connection takes place through the file system as opposed to TCP/IP. A Unix socket file connection is marginally faster than TCP/IP, but it can only be used when connecting to a server on the same computer. |
Once you see the following screen, you will know the Moodle configuration file, config.php, has been successfully created. If the creation of the configuration file fails (usually because of incorrect permissions), the installer will display the content of the configuration file. You will have to copy the text from the screen and paste it to config.php in your dirroot.

Before Moodle can proceed with the installation, you have to agree to the GPL license agreement. You find the full license text at https://docs.moodle.org/dev/License.
Once you have accepted the license agreement, the Moodle installer checks to see whether certain components are installed. Not all the modules are compulsory—see the Moodle prerequisites section in this chapter and notice on screen. The installer also verifies the key PHP settings. If any of the tests are not passed, it is important that you go back to the Software requirements section to resolve any problems and restart the installation process after the issues have been fixed. Otherwise, some features may not work or the installer will not continue, depending on the importance of the module.
Two common issues that arise when using MySQL are the prerequisite to use the InnoDB Barracuda file format and file-per-table mode. In both cases entries have to be added to the [mysqld] section in /etc/mysql/my.cnf (innodb_file_format=Barracuda and innodb_file_per_table, respectively).

Once this screen has been confirmed, the Moodle installer will create all the tables in the database. This process might take a few minutes.
Once the table creation and population has been concluded, you will see the screen to set up the administrator account. The default Username is admin, which should be changed for security reasons. The self-explanatory fields you have to fill in are New password, First name, Surname, Email address, City/town, and Select a country. All other fields are explained in great detail in Chapter 5, User Management.

The last screen of the installation script asks you to enter some front page settings, namely, the Full site name, Short name for site and Front page description. These front page settings can be modified later (see Chapter 7, Moodle Look and Feel). Additionally, the installer allows you to turn on Self registration. Leave this disabled for now, until you have covered Chapter 5, User Management.
Once this information has been entered and the screen has been confirmed, you are ready to start using Moodle. However, it is recommended to finalize the installation and to set up the execution of the Moodle maintenance script.
To make sure that Moodle is running without problems, go to Notifications in the Site administration menu in the Settings block:
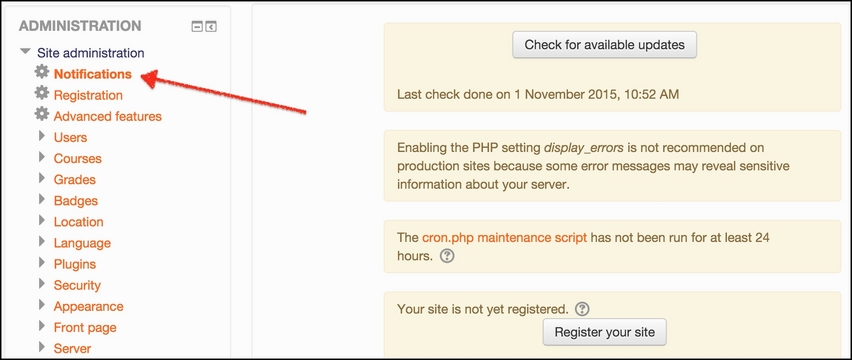
In the case of my installation, there are two issues—a PHP setting has a value that is not recommended (I have to change this in the php.ini file) and the so-called cron maintenance script has not run for at least 24 hours. We will solve that mystery after we have registered our site. Other messages might appear in the Notifications area, and you should resolve them in due course.
Moodle provides some statistics about its usage on https://moodle.net/stats/. To be included in these figures, you have to register your Moodle site. Registration(below the Notification link) with https://moodle.org/ (MOOCH) is optional and free, and you decide what information will be made public. Even if you opt out of providing any usage patterns for your site, it is still highly recommended to register, as you will get occasional notices, for example, advanced security alerts:

The settings for the registration screen are as follows:
|
Field |
Description |
|---|---|
|
Name |
The name of your site, as you just specified in the front page settings. |
|
Privacy |
You have these options:
|
|
Description | |
|
Language |
This is the language your site is published in. |
|
Postal address/Country |
Enter your address and select the country in which your organization is located. |
|
Geolocation |
This is the latitude and longitude of your location. |
|
Administrator |
Enter your name. |
|
Phone/Email address |
Enter your contact phone number and e-mail address. |
|
Contact form |
By default, Moodle creates a form for other Moodle users to contact you—this can be turned off. |
|
Email notifications |
By default, Moodle e-mails you important information, such as upgrades and security issues. |
|
Site Url, Moodle version, Moodle release and More information |
This is the data sent to https://moodle.org/ on a regular basis. This information will not be displayed to the public and will only be used for statistical purposes. |
Moodle has to perform a number of background tasks on a regular basis. The script that performs these tasks is known as a cron script, and is executed by the cron process. An entire page has been dedicated to this in the Moodle documentation; you can find it at https://docs.moodle.org/en/Cron. It is important that you set up the cron process; otherwise, any timed Moodle features, such as scheduled backups, sending forum notifications, statistics processing, and so on, will not work.
The script, cron.php, is located in the admin directory and can be triggered manually through a web browser (unless your security settings have been changed). Once executed, the output from the script (http://yoursite/admin/cron.php) is shown on screen and you have to navigate back to your Moodle system manually.
Most control panels allow you to set up scheduled tasks via a cron job management tool. Bear in mind that this is not part of Moodle but a part of your hosting package. The following screenshot is from the widely used Plesk system, which executes the script every five minutes:

There are a number of ways to call the cron script. The most popular option in a Linux environment is wget –q –O /dev/null http://<yoursite>/admin/cron.php (see Command in the preceding screenshot). However, if this does not suit your setup, check out https://docs.moodle.org/en/Cron for alternatives.
The interface shown earlier creates an entry in crontab, a file located in the /etc directory that contains all the system-wide cron entries. This file can also be edited manually using crontab -e, but be careful to get the syntax right!
This concludes the installation process for Moodle in a LAMP environment. If you have come across any problems that have not been covered in these instructions or if your setup differs from the one described, go to https://docs.moodle.org/en/Installing_Moodle, where more installation details are provided and exceptions are covered in great detail.