
You're now going to set up the camera view and sun lighting. You might have noticed that there are very few actual camera buttons in SketchUp. This is because SketchUp is all about "what you see is what you get". If you see it on the screen, this is what you'll see in your render. All the complex camera stuff is taken care of in the background, and the right settings will be exported to the renderer without you or me having to worry about it. We will look at how to set up scenes for maximum impact in Chapter 3, Composing the Scene.
The following are the steps to set up a view interactively:
Rotate and zoom in on the view so that you're more or less looking at the scene, as shown in the following screenshot.
Navigate to Camera | Walk.

Type in your eye height in mm (say,
1200). The camera changes to a view from this eye level. A lower viewpoint will make the room look a bit bigger.Navigate to Camera | Look Around to move your head around and compose the view you want, and use Walk to move in or out of the scene by holding the left-mouse button and moving the mouse up or down.
Now that you're happy with the view you have created, you need to save it so that it can't be changed by accident or while doing further modeling tasks. You do this by creating a scene that will be imported into the rendering software as a camera view:
Navigate to Window | Scenes.
Press the "Plus" icon in the pop-up window. A new scene is created, and a tab called Scene 1 will appear at the top of the main viewing window.
Rotate your view now with the middle-mouse button, then click on the tab. You are taken back to the view that was used when you created the scene. Scenes retain their view settings as part of their options.
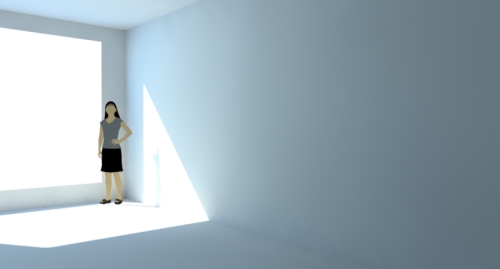
We want to get some direct sunlight in through the window to bounce off the wall and floor. Within SketchUp, the "sun" only lights up areas that are not obstructed, and there is a sharp contrast between light and dark. In the renderer, the sunlight will bounce into the whole room. There is more on lighting in Chapter 8, Photorealistic Rendering. You can change the lighting and shadows in a scene by changing the Sun's position via date and time as explained in the following steps:
Navigate to Window | Shadows to activate the Shadow Settings panel, as shown in the following screenshot:

Click the icon in the top-left corner of the panel to switch on the display of shadows.
Move the sliders around for Time and Date until you get the effect that is similar to the previous screenshot.
When you have found a nice setting, click on the Update icon from the Scenes panel and confirm to update all the settings in the popup window. Shadow settings are part of the scene information, and by updating the scene now, you can return to your settings later just by clicking on the scene tab.
You now have all the lighting you need for a daytime indoor scene. The following screenshot is what you would get if you did a quick test render in Thea Render. As you can see, the whole room is lit by the sun, just as it would be in real life: