

Now that you have your system all up and working, you're going to do something that seems a bit counterintuitive; instead of using the system you've got, you're going to install a new operating system on card so your board will boot and run this different operating system. The reason will become clear in the next section.
The default operating system on the internal memory is a version of Linux called Ångström. Now Linux, unlike Windows, Android or iOS, is not tightly controlled by a single company. It is a group effort, mostly open source, and while it is available for free, it grows and develops a bit more chaotically.
Thus a number of "distributions" have emerged, each built on a similar kernel, or core set of capabilities. These core capabilities are all based on the Linux specification. However, they are packaged slightly differently, and developed, supported, and packaged by different organizations. Ångström is one of these versions; Ubuntu is another. There are others as well, but these are the two main choices for the distribution that you will put on your card.
I choose to use the Ubuntu distribution of Linux on my BeagleBone Black for a couple of reasons. First, Ubuntu is arguably the most popular distribution of Linux, which makes it a good choice because of the community support it offers. Also, I personally like this distribution of Linux when I need to run Linux on my own personal computer. It provides a complete set of features, is well organized, and generally supports the latest sets of HW and SW. Having the same version on both my personal computer and my BeagleBone Black makes it easier for me to use both as they operate, at least to a certain degree, the same way. I can also try some things on my computer before trying them on the BeagleBone Black. I've also found that Ubuntu has excellent support for new HW, and this can be very important for your projects.
Others tend to favor the Ångström distribution, the support for this distribution is growing and it can sometimes be a bit simpler to access and work with. There are also other choices, such as Arch and there are some who are working on a distribution of Android for the BeagleBone Black. But for this book we are going to install and run a version of Ubuntu on your BeagleBone Black.
There are two approaches to getting Ubuntu onto your board. The board is getting popular enough that you can buy an SD card that already has Ubuntu installed, or you can download it onto your personal computer and then install it on the card. I'll assume you don't need any directions if you want to purchase a card—simply do an Internet search for companies selling such a product.
If you are going to download a distribution, you need to decide if you are going to use a Windows computer to download and create an SD card, or a Linux machine. I'll give brief directions for both here.
First, you'll need to download an image. This part of the process is similar for either Windows or Linux. Open a browser window. You can go to one of the several sites that have an image you can put on your card. My personal favorite is http://elinux.org/Beagleboard:Ubuntu_On_BeagleBone_Black. They keep pointers to a number of different images and directions on how to install them. My personal favorite is the 12.04 version of Ubuntu. It is new enough to support everything you need, but old enough to be stable. Select the image and download the file.
If you're using Windows, you'll need to unzip the file using an archiving program like 7-Zip. If you don't have this on your computer, follow the directions on the beaglebone.org Getting Started web page. This will leave you with a file that has the .img extension, a file that can be imaged on your card.
Now that you have the image, you need a program that can write the image to the card. I use the Image Writer for Windows program. Again, if you don't have this program, follow the directions on the beaglebone.org Getting Started web page. Plug your card into the PC, run this program, select the correct card and image, then select Write. This will take some time, but when completed eject the card from the PC.
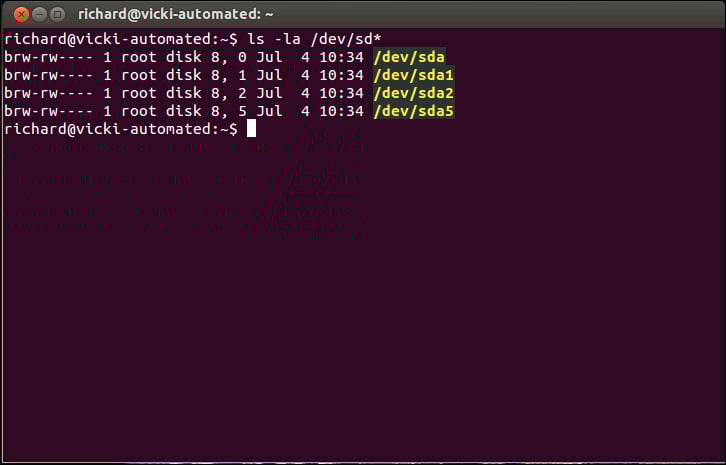
If you are using Linux, you'll need to un-archive the file and then write it to the card. You can do this all with one command. However, you do need to find the /dev device label for your card. You can do this with the ls -la /dev/sd* command. If you run this before you plug in your card, you might see something like this:
After plugging in your card, you might see something like this:
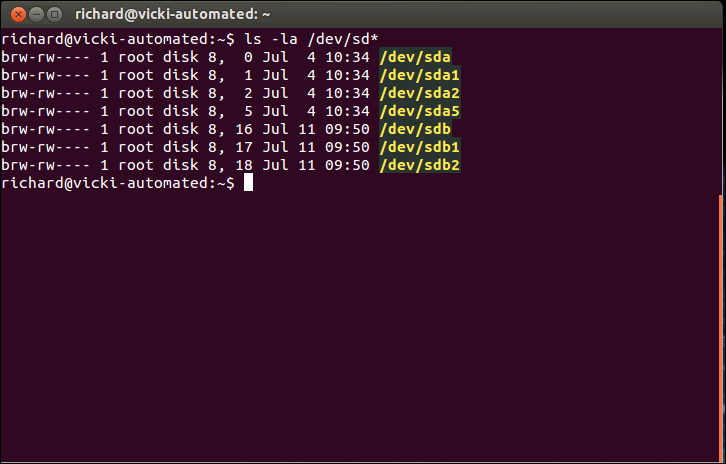
Notice your card is at sdb. Now go to the directory where you downloaded the archived image file and issue the following command:
xz -cd ubuntu-precise-12.04.2-armhf-3.8.13-bone20.img.xz > /dev/sdX
where ubuntu-precise-12.04.2-armhf-3.8.13-bone20.img.xz will be replaced with the image file that you downloaded, and /dev/sdX will be replaced with your card ID, in this example /dev/sdb. Eject the card and you are ready to plug it into the board and boot.
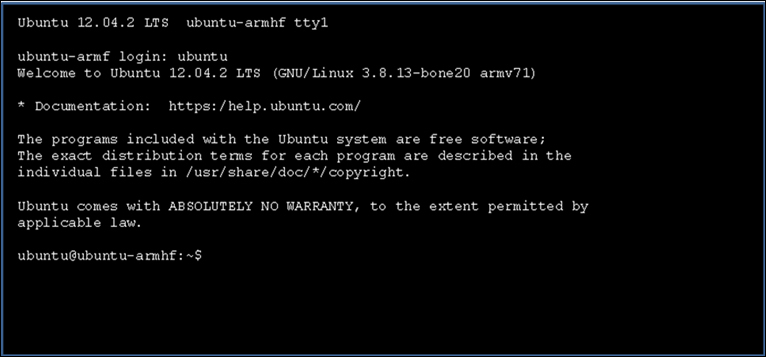
Make sure your BeagleBone Black is unplugged and install the micro SD card into the slot. Then apply power. After the boot, you should get a screen that looks like this:

You can now log in to the system. You'll need to use the username and password of the image you downloaded (unfortunately, they are not the same for all images, but you should be able to easily find these in the same place you found your image). For my distribution the default username is ubuntu and the password is also ubuntu. Note that the password will not show up while you type it in. Remember this username and password, you'll need to use it throughout the examples in this book. Entering those will bring you to this state:
You should now be logged in and ready to start issuing commands.
Now, two questions arise: do you need an external computer during the creation of your projects? and what sort of computer do you need? The answer to the first question is a resounding yes. Most of your projects are going to be self-contained robots with very limited communication capabilities. You will be using an external computer to issue commands and see what is going on inside your BeagleBone Black. The answer to the second is a bit more difficult. Because you are working in Linux, most notably Ubuntu on your BeagleBone Black, there are some advantages to having an Ubuntu system available as your remote system. You'll be able to try some things on your computer before trying them in your embedded system. You'll also be working with similar commands for both, which will help your learning curve.
However, bulk of the personal computers today run some sort of Windows operating system, so that is what will be normally available. You can do almost all that you need to do as far as issuing commands and displaying information with a Windows machine, so either way will work. I'll try to give examples for both, as long as it is practical.
There is one more choice, the choice I actually prefer. I have access to both systems on my PC. Previously this was done by a process called dual booting, where both systems were installed on the computer and the user chose which system they wanted to run during boot-up. Changing systems in this kind of configuration was time consuming, however, and it used up a lot of disk space. There is a better way.
On my Windows machine, I have a virtual Ubuntu machine running under a free program from Oracle called VirtualBox. This program lets me run a virtual Ubuntu machine hosted by my Windows operating system. That way I can try things in Ubuntu, yet keep all the functionality of my Windows machine. I'm not going to explain how to install this; there is plenty of help on the Web. Just search for Ubuntu and VirtualBox. There are several websites that offer easy, step-by-step instructions. One of my favorites is http://www.psychocats.net/ubuntu/.