Book Image

3D Printing Designs: Fun and Functional Projects

By : Joe Larson
Book Image

3D Printing Designs: Fun and Functional Projects

By: Joe Larson

Overview of this book

3D printing has revolutionized the way that global industries conceptualize and design products for mass consumption. Considered as the next “trillion-dollar” business, every industry is in the race to equip its personnel with techniques to prototype and simplify complex manufacturing process. This book will take you through some simple to complex and effective principles of designing 3D printed objects using Blender. There is a comprehensive coverage of projects such as a 3D print-ready octopus pencil holder, which will teach you how to add basic geometric shapes, and use techniques such as extruding and subdividing to transform these shapes into complex meshes. Furthermore, you’ll learn to use various techniques to derive measurements for an object, model these objects using Blender, organize the parts into layers, and later combine them to create the desired object with the help of a 3D printable SD card holder ring design project. The final project will help you master the techniques of designing simple to complex puzzles models for 3D printing. Through the course of the book, we'll explore various robust sculpting methods supported by Blender to create objects. You’ll move, rotate, and scale the object, and manipulate the view. You’ll edit objects with actions such as bends or curves, similar to drawing or building up a clay structure of different shapes and sizes. By the end of the book, you will have gained thorough practical hands-on experience to be able to create a real-world 3D printable object of your choice.
Table of Contents (14 chapters)
3D Printing Designs: Fun and Functional Projects
Credits
About the Author
About the Reviewer
www.PacktPub.com
Preface
Index

Sharpening the details


At this point, the general shape of the face is set, but there can be more detail added. Keep in mind that with 3D printing, there is such a thing as too much detail, since some of it won't come through. Then again, details tend to be the most impressive part, so spending some time sharpening some edges may be of benefit. Here's how:

  1. In the Tool Shelf, under Symmetry/Lock, click on the X button under Mirror so that it is highlighted in order to toggle mirroring back on.

  2. Switch to the Crease tool (Shift + C).

  3. Make sure the Add button in the Tool Shelf is highlighted. If not, click on it so it is highlighted.

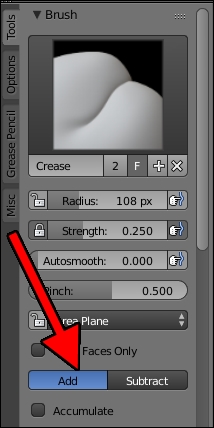
  4. Adjust the view and change the Radius (F) until the brush is big enough to cover the bridge of the cheek.

  5. Draw a line following the bridge of the cheek to sharpen it a bit.

  6. Draw in a line around the eyebrows and down the bridge of the nose.

  7. While holding down Ctrl, draw a line following the curve of the mouth.

  8. Adjust the view to zoom in on one eye.

  9. While holding down Ctrl...