Book Image

Raspberry Pi Robotic Projects - Third Edition

By : Richard Grimmett, Jon Witts
Book Image

Raspberry Pi Robotic Projects - Third Edition

By: Richard Grimmett, Jon Witts

Overview of this book

This book will allow you to take full advantage of Raspberry Pi Zero and Raspberry Pi 3 by building both simple and complex robotic projects. The book takes a mission-critical approach to show you how to build amazing robots and helps you decide which board to use for which type of robot. The book puts a special emphasis on designing mobile (or movable) robots using the Raspberry Pi Zero. The projects will show inexpensive, yet powerful, ways to take full advantage. It will teach you how to program Raspberry Pi, control the movement of your robot, and add features to your robots.
Table of Contents (13 chapters)
Raspberry Pi Robotic Projects - Third Edition
Credits
About the Author
About the Reviewer
www.PacktPub.com
Preface

Hooking up a keyboard, mouse, and display


The next step is to connect a keyboard, mouse, and display to the Raspberry Pi 3. For the Raspberry Pi 3, this is very straightforward: simply plug the USB connectors of the keyboard and mouse into one of the four USB connectors on the Raspberry Pi 3.

Now, you'll also need a display. There are a number of different video standards; here is an image of some of the most common ones, for reference:

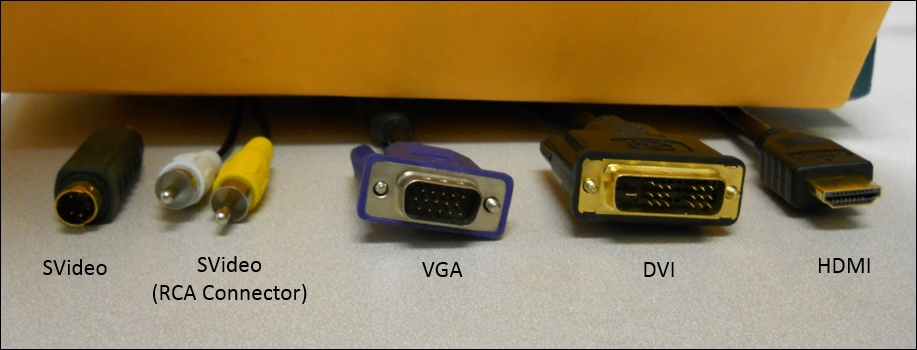
There is an HDMI connector on the Raspberry Pi 3. You can connect directly to an HDMI display using an HDMI cable. If your display has a DVI connector, you can purchase an HDMI to DVI cable.

You are almost ready to plug in the Raspberry Pi 3. Even though your hardware configuration is complete, you'll still need to complete the next section to power on the device. So, let's figure out how to install an operating system.