Book Image

Internet of Things with ESP8266

By : Marco Schwartz
Book Image

Internet of Things with ESP8266

By: Marco Schwartz

Overview of this book

The Internet of Things (IoT) is the network of objects such as physical things embedded with electronics, software, sensors, and connectivity, enabling data exchange. ESP8266 is a low cost WiFi microcontroller chip that has the ability to empower IoT and helps the exchange of information among various connected objects. ESP8266 consists of networkable microcontroller modules, and with this low cost chip, IoT is booming. This book will help deepen your knowledge of the ESP8266 WiFi chip platform and get you building exciting projects. Kick-starting with an introduction to the ESP8266 chip, we will demonstrate how to build a simple LED using the ESP8266. You will then learn how to read, send, and monitor data from the cloud. Next, you’ll see how to control your devices remotely from anywhere in the world. Furthermore, you’ll get to know how to use the ESP8266 to interact with web services such as Twitter and Facebook. In order to make several ESP8266s interact and exchange data without the need for human intervention, you will be introduced to the concept of machine-to-machine communication. The latter part of the book focuses more on projects, including a door lock controlled from the cloud, building a physical Bitcoin ticker, and doing wireless gardening. You’ll learn how to build a cloud-based ESP8266 home automation system and a cloud-controlled ESP8266 robot. Finally, you’ll discover how to build your own cloud platform to control ESP8266 devices. With this book, you will be able to create and program Internet of Things projects using the ESP8266 WiFi chip.
Table of Contents (20 chapters)
Internet of Things with ESP8266
Credits
About the Author
About the Reviewer
www.PacktPub.com
Preface
Index

Posting temperature and humidity data to Twitter


In this second project of the chapter, we are going to see how to actually post measured data on your Twitter account.

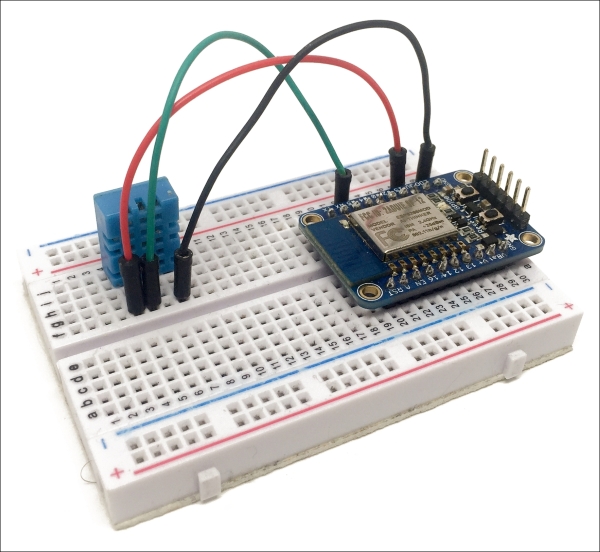
We first need to configure the ESP8266 module, which means building the hardware with the DHT11 sensor.

Simply place the ESP8266 board on your breadboard, and then place the DHT11 sensor next to it. Connect the first pin of the DHT11 sensor to the VCC pin of the ESP8266, the second pin to pin 5 of the ESP board, and finally the last pin of the sensor to one GND pin of the ESP board.

This the final result:

  1. Now, we need to register an application with Twitter before we can create new tweets with our data. To do that, go over to:

    https://apps.twitter.com/

    You will be asked to log in with your Twitter account. Then, you can see your existing apps if you have some:

  2. Click on the CreateNew App button, and give it a name and a default URL (this doesn't matter):

    Once it's created, you will be able to access important parameters, such as...