Book Image

Practical Internet of Things with JavaScript

By : Arvind Ravulavaru
Book Image

Practical Internet of Things with JavaScript

By: Arvind Ravulavaru

Overview of this book

In this world of technology upgrades, IoT is currently leading with its promise to make the world a more smarter and efficient place. This book will show you how to build simple IoT solutions that will help you to understand how this technology works. We would not only explore the IoT solution stack, but we will also see how to do it with the world’s most misunderstood programming language - JavaScript. Using Raspberry Pi 3 and JavaScript (ES5/ES6) as the base to build all the projects, you will begin with learning about the fundamentals of IoT and then build a standard framework for developing all the applications covered in this book. You will then move on to build a weather station with temperature, humidity and moisture sensors and further integrate Alexa with it. Further, you will build a smart wearable for understanding the concept of fall detection. You will then extend it with the 'If This Then That' (IFTTT) rules engine to send an email on fall detection. Finally, you will be working with the Raspberry Pi 3 camera module and surveillance with a bit of facial detection using Amazon Rekognition platform. At the end of the book, you will not only be able to build standalone exciting IoT applications but also learn how you can extend your projects to another level.
Table of Contents (17 chapters)
Title Page
Credits
About the Author
About the Reviewer
www.PacktPub.com
Customer Feedback
Dedication
Preface

Testing an end-to-end flow using DHT11 and LED


Before we start working on the desktop and mobile app, we will implement an end-to-end data flow for the Raspberry Pi to the web app and back.

The example that we will work on implements an actuator and a sensor use case. We will connect an LED to the Raspberry Pi and turn the LED on/off from the web app, and we will also connect a DHT11 temperature sensor to the Raspberry Pi and view its values in real time on the web app.

We will get started with the Raspberry Pi, implement the required logic there; next, work with the API engine, make the required changes, and finally the web app to represent the data.

Setting up and updating the Raspberry Pi

First, we will set up the circuit, as follows:

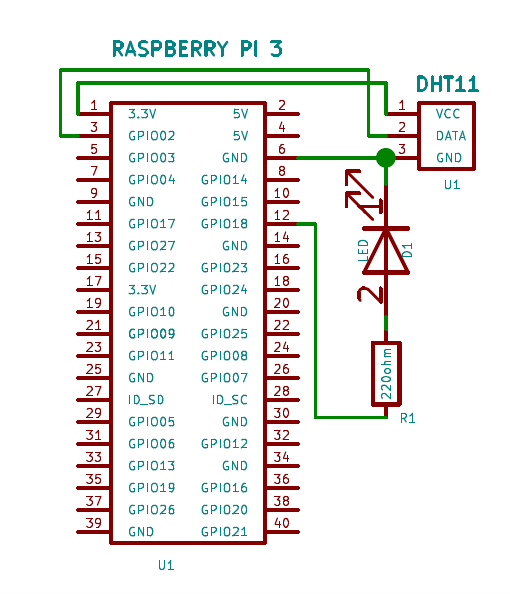
Now, we will make the following connections:

Source pin

Component pin

Raspberry Pi pin 1 - 3.3V

Breadboard + railing

Raspberry Pi pin 6 - Ground

Breadboard - railing

Raspberry Pi pin 3 - GPIO 2

Temperature sensor signal pin

Raspberry Pi pin 12 - GPIO 18

LED anode pin

LED...