
Let’s learn how to configure an HTML block for our course page.

We made a side block of our own! At the moment, it only has a couple of words in it (and a smiley in my case). Later in this chapter, you'll add an image and we'll make it the 'Welcome' block for our new course. I like to use HTML blocks with images to brighten up the page—younger students appreciate this. You can even set them up so that you can click on the image to get to a particular web site, which is both attractive and useful.
As we did this, we came across the editing box—known as the HTML editor for the first time, into which we can type text and add images. We're going to investigate it further now as we venture into the middle section—the main focus of our students' learning.
Note
HTML is just a term meaning, web site code, an HTML block is one where we can add text that Moodle interprets as code, and displays as we wish. Likewise, in the HTML editor we can type the words as we want them to appear, and Moodle will code them (with HTML) to make that happen. We don't need to understand HTML in order to get Moodle to work for us.
It is finally time to get to grips with the middle section—the one we shall be focusing on in the next few chapters. So far, our Rivers and Flooding course has got four empty topic sections. Our next task is to get them ready for action—ready for the materials that we will create and upload, from Chapters 2 onwards.
If you look at the following screenshot, you will see that at the top it says Topic Outline. We cannot easily change these words, but we can use the blank space at the top to provide a short description of what our course is about, and we can add headings to each of the four sections.
Remember that to do anything on this page now, we need to have editing turned on (via the button on the upper right) and then, in order to type directly into Moodle, we have to click on the pen or hand or paper icon that we had came across in the HTML block. You can see one above the news forum, and one next to the numbered sections:
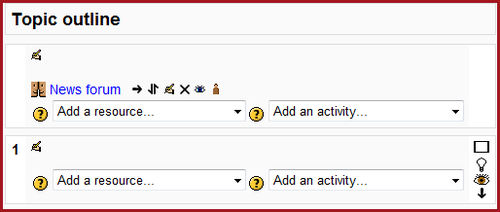
Clicking on the very top one, above the News forum, sends us to a page—Summary of Topic 0. It would be the same if we had clicked on any of the numbered topics (or weeks, if you've chosen them). It would say Summary of week/topic and provide a text box in the HTML editor.
We enter our descriptions/headings directly into this box. You will recognize some of the icons from many popular word processing programs, and if you move your cursor over a particular icon, it will give you a hint as to what it does. Younger children like bright colors in a large font, so I'm going to make my headings 'Big' and 'Red':

Go along the two layers of icons and find out what they do. Type in some text and experiment! Some are pretty self-explanatory. The following table explains a few of the icons you might find useful, but that are less obvious. The numbers in the table refer to the icons in the following screenshot:

|
Icon |
What it does |
|---|---|
|
1 |
Improves the look of your text if you paste it in directly from Micrsoft Word |
|
2 |
Lets you cancel what you just did and revert to an earlier stage |
|
3 |
Lets you create a link to a web site outside of Moodle |
|
4 |
Lets you insert an image into the text area |
|
5 |
Lets you create a table, to improve the layout of your text area |
|
6 |
Allows you to add smileys |
|
7 |
Lets you go into the HTML code area (some uses for us later!) |
|
8 |
Enlarges the text box to make it easier to see and type |
Once you've typed in your text and adapted it according to your requirements, scroll down and click Save changes. Only then will your efforts be visible on the main course page. Until that moment, you can change whatever you wish.
We have just given a heading to Topic 0—the top section of our course. If you click on the editing icon for each of the other four topics, you can do exactly the same with them. Remember to change the colour, font style, and size (if you wish) from the rather uninteresting default style. Either go for it and add your own titles to the sections of your course, or practise with the ones we're going to use in our ongoing example. They are:
Famous Rivers of the World
How does a river flow?
Why do rivers flood?
Flooding case studies
We now have headings for each of our topic sections. The page looks more personal and brighter already! A few photographs would enhance it though; we'll put some on the page in a moment.
Soon, it will be time for us to add our teaching materials and activities for students. Perhaps, it might be a sensible time now to find out exactly where all of our materials (including photos) will be stored.