Book Image

Moodle 1.9 for Teaching 7-14 Year Olds: Beginner's Guide

Book Image

Moodle 1.9 for Teaching 7-14 Year Olds: Beginner's Guide

Overview of this book

Moodle is a very popular e-learning tool in universities and high schools. But what does it have to offer younger students who want a fun, interesting, interactive, and informative learning experience? Moodle empowers teachers to achieve all this and more and this book will show you how! This book will show complete beginners in Moodle with no technical background how to make the most of its features to enhance the learning and teaching of children aged around 7-14. This is a practical book for teachers, written by a teacher with two decades of practical experience, latterly in using Moodle to motivate younger students. Its aim is to give you some hints and advice on how to get your Moodle courses up and running with useful content that your students will actually want to go and learn from on a regular basis. We will assume that you have an installation of Moodle managed by somebody else, so you are responsible only for creating and delivering course content. Throughout the book we will be building a course from scratch, adaptable for ages 7 to 14 on Rivers and Flooding It could be any topic, as Moodle lends itself to all subjects and ages.
Table of Contents (14 chapters)
Moodle 1.9 for Teaching 7-14 Year Olds
Credits
About the author
About the reviewers
Preface

Time for action-making a 'click here' link to a web site


There are two ways in which we can link to other web sites in Moodle. For now, we're going to use the HTML editor and make a link in one of our topic summaries.

  1. 1. Turn on editing, and then click on the editing icon in one of the topic summaries

  2. 2. Type in some text.

  3. 3. Select the text that you want the students to click on to go to your chosen web site (It doesn't have to say click here—it can say anything you want).

  4. 4.Click on the chain icon, as shown in the following screenshot.

  5. 5. In the box that is displayed next, type in (or copy and paste) the URL of the web site that you want them to visit, next to URL. (If you copy and paste, make sure that you only have one http:// at the start.)

  6. 6. Next to Title, enter the name of the site, which will be seen when students hover their cursor over the link.

  7. 7. Make sure that Target specifies New window.

  8. 8. Click on OK.

  9. 9. Back in the HTML editor, scroll down and click on Save Changes (don't worry about anchors- these are used to send you to various parts of your course, but at this stage we don't really need them).

What just happened?

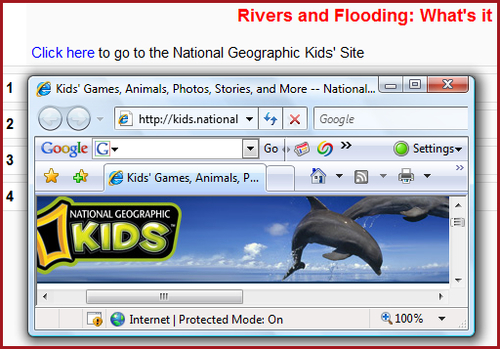
Selecting some text (for example, click here) and clicking on the chain icon enabled us to link directly to a useful site for our students. Choosing New Window means that the site will open in a pop-up window. The children can close it with the X and will still have Moodle open on their screen. If you test it out yourselves, you'll see what I mean. The linked site can be resized and moved around, without losing Moodle.

Another neat feature for us to take advantage of!