Book Image

Moodle 1.9 for Teaching 7-14 Year Olds: Beginner's Guide

Book Image

Moodle 1.9 for Teaching 7-14 Year Olds: Beginner's Guide

Overview of this book

Moodle is a very popular e-learning tool in universities and high schools. But what does it have to offer younger students who want a fun, interesting, interactive, and informative learning experience? Moodle empowers teachers to achieve all this and more and this book will show you how! This book will show complete beginners in Moodle with no technical background how to make the most of its features to enhance the learning and teaching of children aged around 7-14. This is a practical book for teachers, written by a teacher with two decades of practical experience, latterly in using Moodle to motivate younger students. Its aim is to give you some hints and advice on how to get your Moodle courses up and running with useful content that your students will actually want to go and learn from on a regular basis. We will assume that you have an installation of Moodle managed by somebody else, so you are responsible only for creating and delivering course content. Throughout the book we will be building a course from scratch, adaptable for ages 7 to 14 on Rivers and Flooding It could be any topic, as Moodle lends itself to all subjects and ages.
Table of Contents (14 chapters)
Moodle 1.9 for Teaching 7-14 Year Olds
Credits
About the author
About the reviewers
Preface

Time for action-getting a whole folder of work into Moodle in one go


To view the slideshows, we need to upload the folder containing them from the hard drive of our computer into Moodle.

  1. 1. Find the folder that you want to upload, right-click on it, and select Compressed (zipped) Folder within the Send To option.

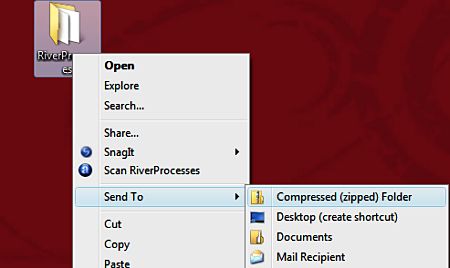
  2. 2. You'll get another folder with the same name, but in ZIP format.

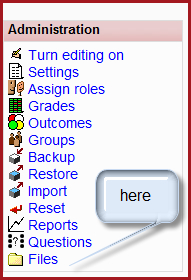
  3. 3. Go to your Moodle course page, and in the Administration box, click Files.

    Note

    We're back in the course files storage area—recollect Chapter 1, and you'll remember that this is another way in, if you ever need one! You can upload anything straight into here, and then provide a link to a file or web site.

  4. 4. As we have done before, click on Upload and upload the zipped folder (it ends in
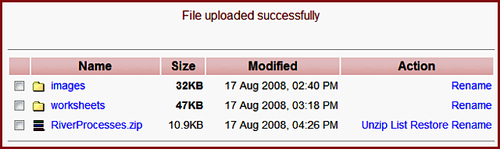
 .zip).

  5. 5. Now click on Unzip, which is displayed to the right of your folder name (as shown in the following screenshot), and the folder will be restored to its normal size.

What just happened?

We put a bunch of slideshows about...