Book Image

Moodle 1.9 for Teaching 7-14 Year Olds: Beginner's Guide

Book Image

Moodle 1.9 for Teaching 7-14 Year Olds: Beginner's Guide

Overview of this book

Moodle is a very popular e-learning tool in universities and high schools. But what does it have to offer younger students who want a fun, interesting, interactive, and informative learning experience? Moodle empowers teachers to achieve all this and more and this book will show you how! This book will show complete beginners in Moodle with no technical background how to make the most of its features to enhance the learning and teaching of children aged around 7-14. This is a practical book for teachers, written by a teacher with two decades of practical experience, latterly in using Moodle to motivate younger students. Its aim is to give you some hints and advice on how to get your Moodle courses up and running with useful content that your students will actually want to go and learn from on a regular basis. We will assume that you have an installation of Moodle managed by somebody else, so you are responsible only for creating and delivering course content. Throughout the book we will be building a course from scratch, adaptable for ages 7 to 14 on Rivers and Flooding It could be any topic, as Moodle lends itself to all subjects and ages.
Table of Contents (14 chapters)
Moodle 1.9 for Teaching 7-14 Year Olds
Credits
About the author
About the reviewers
Preface

Time for action-typing our flooding worksheet straight into Moodle


We have already learned how to create worksheets and upload a folder containing them into Moodle. Let's now try to create the worksheets in Moodle, directly.

  1. 1. With editing turned on, go to Add a resource, and click on Compose a web page.

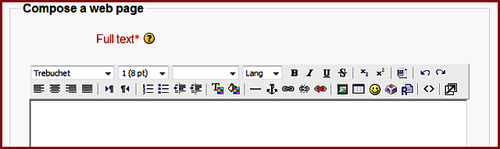
  2. 2. In the Name field, type the text that the students will have to click on to access the page. Then, scroll down to compose a web page, as shown in the following screenshot:

  3. 3. Type in the instructions, as you would have done it in Microsoft Word, or a similar software application.

  4. 4. Use the toolbar in the HTML editor to change the font size, color, and add images, according to your choice.

  5. 5. Make sure that the Window option is set to New window.

  6. 6. Click on Save and return to course.

Wasn't that easy? We got the outcome in just four steps, in comparison to the 17 steps that were needed when we first uploaded and displayed our River Thames worksheet. Our outcome of the Flooding worksheet will...