Book Image

Moodle 1.9 for Teaching 7-14 Year Olds: Beginner's Guide

Book Image

Moodle 1.9 for Teaching 7-14 Year Olds: Beginner's Guide

Overview of this book

Moodle is a very popular e-learning tool in universities and high schools. But what does it have to offer younger students who want a fun, interesting, interactive, and informative learning experience? Moodle empowers teachers to achieve all this and more and this book will show you how! This book will show complete beginners in Moodle with no technical background how to make the most of its features to enhance the learning and teaching of children aged around 7-14. This is a practical book for teachers, written by a teacher with two decades of practical experience, latterly in using Moodle to motivate younger students. Its aim is to give you some hints and advice on how to get your Moodle courses up and running with useful content that your students will actually want to go and learn from on a regular basis. We will assume that you have an installation of Moodle managed by somebody else, so you are responsible only for creating and delivering course content. Throughout the book we will be building a course from scratch, adaptable for ages 7 to 14 on Rivers and Flooding It could be any topic, as Moodle lends itself to all subjects and ages.
Table of Contents (14 chapters)
Moodle 1.9 for Teaching 7-14 Year Olds
Credits
About the author
About the reviewers
Preface

Time for action-getting our class to work together on an online story


Let's make things more interesting! Let's ask the students to post an imaginative story.

  1. 1. With editing turned on, select the Wiki option within the Add an activity option.

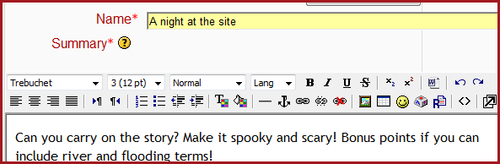
  2. 2. In the Name field, provide a suitable title for your wiki, and in the Description field, enter a short explanation of what you want the students to add.

  3. 3. For the Type option, choose Groups (we'll take a closer look at the other options, later).

  4. 4. Don't worry about the settings that you don't understand. For now, just click on Save and Display.

  5. 5. On the screen that is displayed next, enter the beginning of the story (or anything you want them to continue with).

    Note

    You can add extra pages to a wiki by adding square brackets around the name of the page. The next time that you save it, it will link to the new page. We're just going to have our story on one page, for the sake of simplicity.

What just happened?

The students now have, thanks to our...