
We are now going to manipulate, resize, and save the new versions of the combined pictures for the exercise using Inkscape.
1. Open the vector graphic file in Inkscape (
C:\School\image010101.svg).2. Click on the blackboard picture to select it. Eight double-headed arrows will appear in a rectangle around the selection, as shown in the following image:
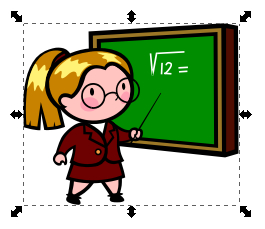
3. Drag-and-drop one of the diagonal double-headed arrows and scale the image both in the horizontal (X) and vertical (Y) directions. You can do it holding the Ctrl key down in order to maintain the original aspect ratio.
4. Next, click on the eraser picture to select it and enlarge it to match the blackboard's size.
5. Drag-and-drop the eraser to move it below the blackboard, as shown in the next screenshot:

6. Select File | Save, to save the changes made to the original Inkscape SVG file.
7. Select File | Export Bitmap. A dialog box showing many export options will appear. Enter
30on the first dpi (Dots Per Inch) textbox.8. Click on the Drawing button, and then on Export. Inkscape will export the drawing in PNG (Portable Network Graphics) format. The exported bitmap graphics with a big blackboard and a big eraser will be saved in
C:\School\image010101.png.9. Next, open the other vector graphic file in Inkscape (
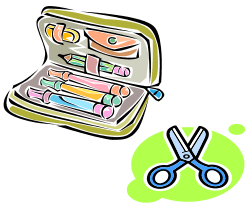
C:\School\image010102.svg).10. Repeat the aforementioned steps (2 to 7) to export a new bitmap graphic with a big case and a pair of big scissors, as shown in the next screenshot. The exported bitmap graphic will be
C:\School\image010102.png.

14. Select File | Save As, to save the new manipulated vector graphic with a new name. Enter
image010103as the new name and click on the Save button.15. Select File | Export Bitmap. A dialog box showing many export options will appear. Click on the Drawing button, and then on Export. Inkscape will export the edited drawing in PNG format. The exported bitmap graphics file with a small case and a pair of small scissors will be
C:\School\image010103.png.16. Next open the previously manipulated vector graphic file in Inkscape (
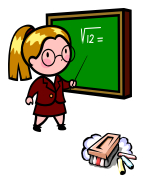
C:\School\image010101.svg).17. Repeat the aforementioned steps (11 to 15) to edit the vector graphic and export a new bitmap with a small blackboard and a small eraser, as shown in the next image. Use
image010104as the new Inkscape file. Thus, the new exported bitmap graphic will beC:\School\image010104.png.
We edited the two pairs of 2D scalable clipart pictures using Inkscape. As we had used vector graphics to create the drawings, we could change their size without losing quality and we exported the resulting images to the PNG format.
Note
PNG is an open, extensible image format with lossless compression. Both Moodle and Hot Potatoes work great with PNG images. We didn't use the JPEG (Joint Photographic Experts Group) format for these graphics, because it uses a lossy compression method, which removes some information from the image. As the exported images are small in size, we can use the PNG format.
We now have the following four bitmap graphics ready to be used in our matching composite pictures exercise:
image010101.png:A big blackboard and a big eraserimage010102.png:A big case and a pair of big scissorsimage010103.png:A small case and a pair of small scissorsimage010104.png:A small blackboard and a small eraser