Book Image

Moodle 2.0 First Look

Book Image

Moodle 2.0 First Look

Overview of this book

Moodle is currently the world's most popular E-learning platform. The long-awaited second version of Moodle is now available and brings with it greatly improved functionality. If you are planning to upgrade your site to Moodle 2.0 and want to be up-to-date with the latest developments, then this book is for you.This book takes an in-depth look at all of the major new features in Moodle 2.0 and how it differs from previous Moodle versions. It highlights changes to the standard installation and explains the new features with clear screenshots, so you can quickly take full advantage of Moodle 2.0. It also assists you in upgrading your site to Moodle 2.0, and will give you the confidence to make the move up to Moodle 2.0, either as an administrator or a course teacher.With its step-by-step introduction to the new features of Moodle 2.0, this book will leave you confident and keen to get your own courses up and running on Moodle 2.0. It will take you on a journey from basic navigation to advanced administration, looking at the changes in resource management and activity setup along the way. It will show you new ways tutors and students can control the pace of their learning and introduce you to the numerous possibilities for global sharing and collaborating now available in Moodle 2.0
Table of Contents (14 chapters)
Moodle 2.0 First Look
Credits
About the Author
About the Reviewers
Preface
Index

Teachers managing blocks in courses


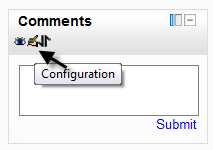
With his editing turned on, Stuart can configure, move, or hide the Comments block but he cannot delete it as it was set up by the admin of the category.

However, he can easily add (and subsequently delete) his preferred blocks to his course as teachers have always have been able to in Moodle. What is different in Moodle 2.0 is that these blocks can be displayed on all pages of the course and/or privately in the teacher's course admin pages too.

Stuart wants to set up the messaging block so that students can message each other and himself whatever activity they happen to be doing at the time. Here's how he does it:

  1. With the editing turned on, select the messaging block from the add block drop-down menu.

  2. Click the configuration (hand/pen) icon and set up the block as shown in the next screenshot:

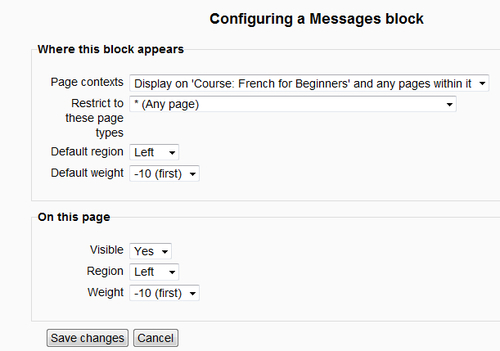
  3. Page contexts: The drop down offered him the following options:

    He chose to have the messaging block appear on all pages in the course.

  4. Restrict to these page types...