Book Image

Moodle 2.0 First Look

Book Image

Moodle 2.0 First Look

Overview of this book

Moodle is currently the world's most popular E-learning platform. The long-awaited second version of Moodle is now available and brings with it greatly improved functionality. If you are planning to upgrade your site to Moodle 2.0 and want to be up-to-date with the latest developments, then this book is for you.This book takes an in-depth look at all of the major new features in Moodle 2.0 and how it differs from previous Moodle versions. It highlights changes to the standard installation and explains the new features with clear screenshots, so you can quickly take full advantage of Moodle 2.0. It also assists you in upgrading your site to Moodle 2.0, and will give you the confidence to make the move up to Moodle 2.0, either as an administrator or a course teacher.With its step-by-step introduction to the new features of Moodle 2.0, this book will leave you confident and keen to get your own courses up and running on Moodle 2.0. It will take you on a journey from basic navigation to advanced administration, looking at the changes in resource management and activity setup along the way. It will show you new ways tutors and students can control the pace of their learning and introduce you to the numerous possibilities for global sharing and collaborating now available in Moodle 2.0
Table of Contents (14 chapters)
Moodle 2.0 First Look
Credits
About the Author
About the Reviewers
Preface
Index

Using the Comments block


As a teacher, adding a Comments block to the main course page is straightforward:

  1. Turn on the editing.

  2. Click the Add a block drop-down list.

  3. Select Comments.

  4. The Comments block appears.

  5. Click on the configuration (hand/pen) icon to specify where exactly to position it:

Note

We saw in Chapter 2, Finding our way around (Navigation and Blocks), how the new block handling system gives us far more control over the positioning of blocks in a course.

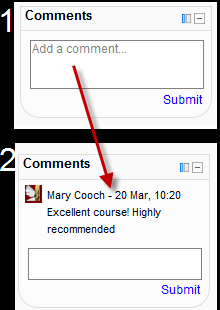
Any user of the course is able to type into the box and make a remark. Clicking on Submit (like with the blog) will send and save the comment. The following screenshot shows the before and after of adding a comment:

Deleting comments on the course page

The permissions here are slightly different from those inside a blog:

  • A student can delete their own comments

  • The teacher of the course can delete any/all of the comments

  • The administrator can (of course) delete any/all of the comments