
The Calligraphy tool comes with a lot of options to change the resulting shape as if we are changing how we use the calligraphic pen or we are using a different brush to create our objects. This recipe will introduce us to those options.
The following steps will show how to use the Calligraphy tool:
1. Select the Calligraphy tool (Ctrl + F6 or C) and create a wavy calligraphic object. Notice how the options from the toolbar affected the shape.
2. Increase the Width: to 70 and Thinning: to 85 and create another wavy object with a similar hand stroke like in step one.
3. Set Width: to 30 and Thinning: to 0 and create another similar shape but this time change the pen width by pressing the Left Arrow and Right Arrow in turns. Draw slowly to enhance the effect.
4. Create another wavy object but this time alternate between Home and End keys while drawing. This will abruptly change the pen width from minimum to maximum.
5. Set the Width: to 40 and alternate between the Up Arrow and Down Arrow keys while drawing. This will change the pen angle as we draw.
6. Set the Angle: back to 30, set Fixation: to 0, and Caps: to 3, and create another wavy object. Notice how the ends are capped.
7. Set the Tremor: to 40 and create another wavy object. Notice the irregular edges.
8. Set the Tremor: to 0 and Wiggle: to 80 and create another wavy object. Notice how the object shape doesn't strictly comply to our mouse movement.
9. Set Wiggle: to 0 and Mass: to 45 and create another object. Notice how drawing it feels slow. We have enough time to move the mouse in the desired direction creating smooth transitions.

The Calligraphy tool can't be experienced fully without a hardware graphics tablet. If you have one, plug it in, configure it using the Input Devices... option under the File menu and have fun creating new and elaborate calligraphic shapes.
Holding Alt while creating calligraphic paths will work as an eraser on selected objects. This can be convenient when we need to quickly edit objects by trimming parts away because we can use all the calligraphy options or presets. Here is a very quick drawing of a star with the edges and insides treated with Wiggly preset while holding Alt to delete:

Calligraphy tool comes with a set of presets we can use to achieve different calligraphy effects out of the box. Try them out and examine the toolbar settings to get an even better idea of how different settings can be combined.
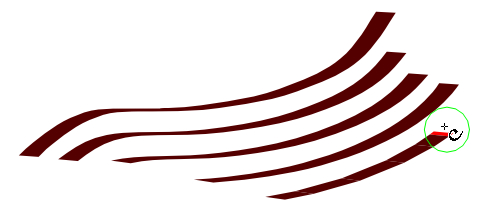
The Calligraphy tool can also be used to create hatchings; these are parallel, equidistant lines used to create patterns like those found in engravings. Select the path you want to track and hold the Ctrl key while tracking and moving to the next line to keep the path distances equal:
By default when a calligraphy object is created it remains selected, so if we want to change the color of the next object we first need to deselect the one we just created (Esc). If the workflow you like to use with the Calligraphy tool includes changing the object colors before the object is created, then deselect the option Select new path under Tools | Calligraphy in the Inkscape Preferences (Shift + Ctrl + P).