
In this recipe we will see how to completely hide parts of a drawing in a non-destructive manner.
The following steps will show you how to clip an object:
1. Select the Star tool (Shift + F9 or *) and create an upright star by dragging upwards while holding Ctrl key. This is the object we want to clip.
2. Select the Ellipse tool (F5 or E) and create a circle by holding Ctrl while dragging. Make the circle a bit smaller than the star and position it above the star. The circle will be our clipping object.
3. Select both of our objects (Ctrl + A) and clip them by using the Object | Clip | Set command. Notice how the circle disappears from the drawing and parts of the star previously not covered by the circle are hidden. Check the Status bar notification area tips and you will see the star is labeled as clipped.

4. Select the Star tool (Shift + F9 or *) and move the star handles to change the shape of the object. Notice how the same circle area remains visible while the rest is hidden no matter how we edit the star.
5. Select the Node tool (F2 or N) and enable the Show clipping path(s) of selected object(s) toolbar
 button You will now see the outline of the clipping object in green.
6. Edit the clipping circle by using the ellipse handles. Notice how this reveals or hides different parts of the star object.
Although the clipped object looks like some of its parts have been cut off, they are actually only hidden and can be edited even while being clipped. To "unclip" an object use the Object | Clip | Release option.
Note
Clipping object color
The clipping object color isn't relevant, as only the shape determines what is hidden or revealed, but it is helpful to color it differently from the rest of the drawing so it's easier for us to predict what the final result might look like.
Clipping is handy in many situations. For example, it can be used to rapidly produce galleries of banners or portraits using a common, irregularly shaped frame as the clipping object.
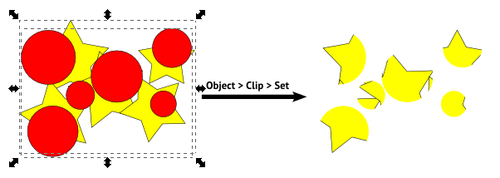
We only used simple one object clippings in this recipe but clipping also works with groups, either as clipped or clipping objects. The following is an example where we clipped a group of stars with a group of circles:
Note
Clipping and automatic grouping
There is a very useful option in Inkscape Preferences (Shift + Ctrl + P) under Clippaths and masks to automatically group the object(s) we want to clip. If we set it to Enclose every clipped/masked object in its own group all objects will get their own independent clipping objects; if you edit one object's clipping path, the others will remain unchanged. If we choose Put all clipped/masked objects into one group, editing the clipping path will affect the whole group of objects as if it was a single object.
Grouping a single object before clipping can be very useful when we need to position the object differently with respect to its clipping object, as we can enter the group and move the object around without moving the clipping object or unclipping.