Book Image

Moodle 2 for Teaching 7-14 Year Olds Beginner's Guide

By : Mary Cooch
Book Image

Moodle 2 for Teaching 7-14 Year Olds Beginner's Guide

By: Mary Cooch

Overview of this book

Moodle is a very popular e-learning tool in universities and high schools. But what does it have to offer younger students who want a fun, interesting, interactive, and informative learning experience? Moodle empowers teachers to achieve all this and more and this book will show you how!Moodle 2 For Teaching 7-14 Year Olds will show complete beginners in Moodle with no technical background how to make the most of its features to enhance the learning and teaching of children aged around 7-14. The book focuses on the unique needs of young learners to create a fun, interesting, interactive, and informative learning environment your students will want to go to day after day.This is a practical book for teachers, written by a teacher with two decades of practical experience, latterly in using Moodle to motivate younger students. Learn how to put your lessons online in minutes; how to set creative homework that Moodle will mark for you and how to get your students working together to build up their knowledge. Throughout the book we will build a course from scratch, adaptable for ages 7 to 14, on Rivers and Flooding. You can adapt this to any topic, as Moodle lends itself to all subjects and ages.
Table of Contents (15 chapters)
Moodle 2 for Teaching 7-14 Year Olds
Credits
About the Author
About the Reviewers
www.PacktPub.com
Preface

Time for action — getting a whole folder of work into Moodle in one go


To view the slideshows, we need to upload the folder containing them from the hard drive of our computer into Moodle.

  1. 1. Find the folder that you want to upload, right-click on it, and select Compressed (zipped) folder within the Send to option.

  2. 2. You'll get another folder with the same name, but in a ZIP format.

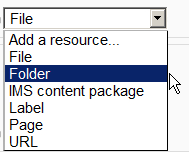
  3. 3. Go to your Moodle course page, turn on the editing as before, and in the section where you want to show this folder, click the Add a resource... drop-down menu and click on Folder:

  4. 4. As we have done before, add Name (which makes the link that the children click on) and Description, checking the box if you want that description to show on the course page.

  5. 5. Now, click on Add as we did before to get to File picker.

  6. 6. Browse for and upload the folder which ends in .zip (The original one just won't work!) It will look like the following screenshot. Note the little icon to the right of the name. I have highlighted...