

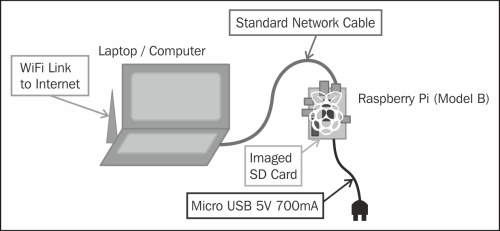
It is possible to connect the Raspberry Pi LAN port directly to a laptop or computer using a single network cable. This will create a local network link between the computers, allowing all the things you can do if connected to a normal network without the need for a hub or router, including the connection to the Internet, if Internet Connection Sharing (ICS) is used as follows:
ICS allows the Raspberry Pi to connect to the Internet through another computer. However, some additional configuration is required for the computers in order to communicate across the link, as the Raspberry Pi does not automatically allocate its own IP address.
We will use the ICS to share a connection from another network link, such as a built-in Wi-Fi on a laptop. Alternatively, we can use a direct network link (refer to the Direct network link section under the There's more… section) if the Internet is not required or if the computer only has a single network adapter.
Note
Although this setup should work for most of the computers, some setups are more difficult than the others. For additional information, see www.pihardware.com/guides/direct-network-connection.
It is likely that this functionality will be included as a part of the NOOBS/Raspbian images eventually.
You will need the Raspberry Pi with power and a standard network cable.
Note
The Raspberry Pi Model B LAN chip includes Auto-MDIX (Automatic Medium-Dependent Interface Crossover). Removing the need to use a special crossover cable (a special network cable wired so the transmit lines connect to receive lines for direct network links), the chip will decide and change the setup as required automatically.
It may also be helpful to have a keyboard and monitor available to perform additional testing, particularly, if this is the first time you have tried this.
To ensure that you can restore your network settings back to their original values, you should check whether it has a fixed IP address or the network is configured automatically.
To check the network settings on Windows 7 and Vista, perform the following steps:
Open Network and Sharing Center from the Control Panel and click on Change adapter settings on the left-hand side.
To check the network settings on Windows XP, open Network Connections from the Control Panel.
Find the item that relates to your wired network adapter (by default, this is usually called Local Area Connection as shown in the following screenshot):

Locating your wired network connection
Right-click on its icon and click on Properties. A dialog-box will appear as shown in the following screenshot:

Selecting the TCP/IP properties and checking the settings
Select the item called Internet Protocol (TCP/IP) or Internet Protocol Version 4 (TCP/IPv4) if there are two versions (the other is Version 6), and click on the Properties button.
You can confirm if your network is set using automatic settings or by using a specific IP address (if so, take note of this address and the remaining details as you may want to revert the settings at a later point).
To check the network settings on Linux, perform the following steps:
Open up the Network Settings dialog box, and select Configure Interface. Refer to the following screenshot:

Linux Network Settings dialog box
Ensure that if any settings are manually set, you take note of them so that you can restore them later if you want.
To check the network settings on Mac OS X, perform the following steps:
Open System Preferences and click on Networks. You can then confirm if the IP address is allocated automatically (using DHCP) or not.
Ensure that if any settings are manually set you take note of them so you can restore them later if you want to. Refer to the following screenshot:
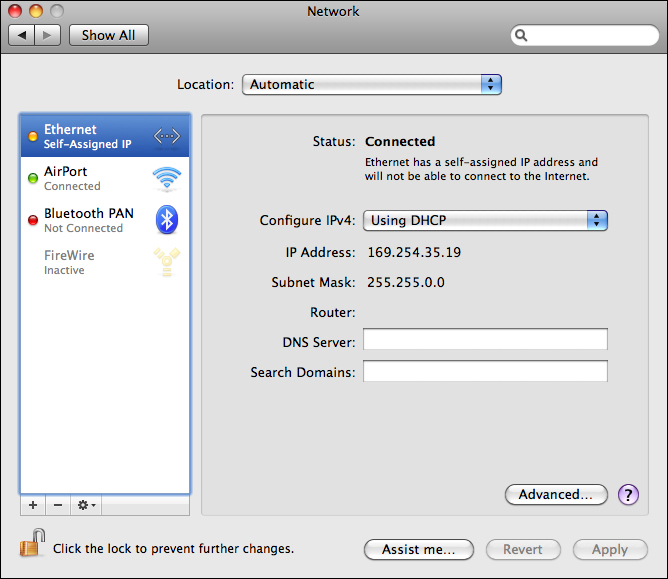
OS X Network Settings dialog box
If you just need to access or control the Raspberry Pi without an Internet connection, refer to the Direct network link section on the There's more…section.
First, we need to enable ICS on our network devices. In this case, we will be sharing the Internet, which is available on Wireless Network Connection through Local Area Connection to the Raspberry Pi.
For Windows, perform the following steps:
Return to the list of network adapters, right-click on the connection that links to the Internet (in this case, the Wireless Network Connection option) and click on Properties as shown in the following screenshot:

Locating your wired network connection
At the top of the window, select the second tab (in Windows XP, it is called Advanced; in Windows 7, it is called Sharing) as shown in the following screenshot:

Selecting the TCP/IP properties and noting the allocated IP address
In the Internet Connection Sharing section, check the box for Allow other network users to connect through this computer's Internet connection and use the drop-down box to select the Home networking connection: option as Local Area Connection. Click on OK and confirm if you previously had a fixed IP address set for Local Area Connection.
Go back into the Properties dialog box of Local Area Connection and view the Internet Protocol settings as before.
Take note of the new IP address that has been allocated to the adapter by ICS.
For Mac OS X to enable the ICS, perform the following steps:
Click on System Preferences and click on Sharing.
Click on Internet Sharing and select the connection from which we want to share the Internet (in this case, it will be the Wi-Fi AirPort). Then select the connection that we will connect the Raspberry Pi to (in this case, Ethernet).
Take note of the new IP address that has been allocated to the adapter by ICS.
For Linux to enable the ICS, perform the following steps:
From the System menu, click on Preferences and then Network Connections. Select the connection we want to share (in this case, Wireless) and click on Edit or Configure. In the IPv4 Settings tab, change the Method option to Shared to other computers.
Take note of the new IP address that has been allocated to the adapter by ICS.
The IP address of the network adapter will be the Gateway IP address to be used on the Raspberry Pi, and we must also provide the Raspberry Pi with an IP address that matches the IP address (except the last number). For instance, if the computer's wired connection now has 192.168.137.1, we can set the Raspberry Pi's IP address to 192.168.137.10 and set the Gateway IP to 192.168.137.1.
Next, we will set the required settings on the Raspberry Pi. We need to edit the cmdline.txt file, which we can do directly on the Raspberry Pi or on the computer (this is useful if there isn't a monitor or keyboard attached to the Raspberry Pi).
To edit directly on the Raspberry Pi, perform the following steps:
Use the following command to edit
/boot/cmdline.txt:sudo nano /boot/cmdline.txtWhen the changes have been made, save and exit by pressing Ctrl + X, Y, and Enter.
To edit on another computer, perform the following steps:
Shut down the Raspberry Pi before removing the SD card.
Take the SD card out of the Raspberry Pi and insert into an SD card reader.
Note
If you have used NOOBS to set up your SD card, you will be unable to access the
BOOTpartition directly on a Windows computer. Windows is only able to access the first partition on the SD card (which in the case of NOOBS is theRECOVERYpartition). Therefore, in order to edit thecmdline.txtfile on a Windows computer, it is necessary to use a Linux Live CD or create a Linux Virtual Machine.If the SD card has been prepared manually (refer to the Preparing an SD card manually section), you will be able to access and edit it directly from Windows.
Mac OS X should allow you to access both the
BOOTandRECOVERYpartitions.Locate the SD card in the file manager, find the
cmdline.txtfile, and open it to edit (on Linux, it will be in the first partition; on Windows, it will be the only visible partition on the device).Ensure that you safely eject the SD card, selecting the drive and ejecting or unmounting it when you have made the change.
The file will contain something similar to the following command line (all on a single line):
dwc_otg.lpm_enable=0 console=ttyAMA0,115200 kgdboc=ttyAMA0,115200 console=tty1 root=/dev/mmcblk0p2 rootfstype=ext4 elevator=deadline rootwait
To set the Raspberry Pi's IP address (for example, 192.168.137.10) and the Gateway IP address (for example, 192.168.137.1) when it next powers up, we add the following command line to the end of the same line using ip= option:
dwc_otg.lpm_enable=0 console=ttyAMA0,115200 kgdboc=ttyAMA0,115200 console=tty1 root=/dev/mmcblk0p2 rootfstype=ext4 elevator=deadline rootwait ip=192.168.137.10::192.168.137.1
We are now ready to test the new connection as follows:
Connect the network cable to the Raspberry Pi and the computer's network port, and then power up the Raspberry Pi, ensuring that you have reinserted the SD card if you previously removed it. To reboot the Raspberry Pi if you edited the file on there, use
sudo rebootto restart it.Allow a minute or two for the Raspberry Pi to fully power up. We can now test the connection.
From the connected laptop or computer, test the connection by pinging with the IP address you have set for the Raspberry Pi, for example,
192.168.137.10, as shown in the following command (on Linux or OS X, add-c 4to limit to four messages or press Ctrl + C to exit):ping 192.168.137.10
Hopefully, you will find you have a working connection and receive replies from the Raspberry Pi.
If you have a keyboard and screen connected to the Raspberry Pi, you can perform the following steps:
You can ping the computer in return (for example,
192.168.137.1) from the Raspberry Pi terminal as follows:ping 192.168.137.1 -c 4You can test the link to the Internet by using
pingto connect to a well-known website as follows, assuming you do not access the Internet through a proxy server:ping www.raspberrypi.org -c 4
If all goes well, you will have full Internet available through your computer to the Raspberry Pi, allowing you to browse the web as well as update and install new software.
If the connection fails, perform the following steps:
Repeat the process, ensuring that the first three sets of numbers match with the Raspberry Pi and the network adapter IP addresses.
You can also check that when the Raspberry Pi powers up, the correct IP address is being set using the following command:
hostname -IThis should be the address that was set in the
cmdline.txtfile.If not, check the file; it should not have odd characters or symbols and should contain only one line. This is particularly important if you edited the file using Windows, as Linux files use a slightly different format.
Note
If you end up using Windows to edit lots of files from the Raspberry Pi, it is worth installing an editor such as Notepad++ (http://notepad-plus-plus.org), which supports these differences.
Check your firewall settings to ensure it is not blocking internal network connections.
Just remember that this address may be different on different networks and computers, so if you have problems, confirm that the IP address has not changed on the shared adapter.
When we enable ICS on the primary computer, the operating system will automatically allocate a new IP address to the computer. Once we determine what the new IP address is, we can ensure that the Raspberry Pi is set to a compatible IP address and the primary computer IP address is used as the Gateway IP address.
Finally, we check whether the computer can communicate over the direct network link to the Raspberry Pi, back the other way, and also through to the Internet.
If you do not require the Internet on the Raspberry Pi, or your computer only has a single network adapter, we can still connect the computers together through a direct network link. The advantage of this method is that the same IP address should work on most of the computers as long as the adapter you connect to is set to automatic. Refer to the following diagram:
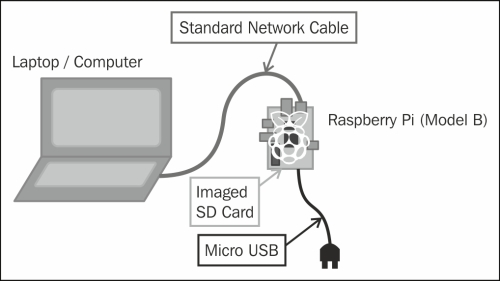
Connecting and using the Raspberry Pi with just a network cable, a standard imaged SD card, and power
For a network link to work between two computers, they need to be using the same address range. The allowable address range is determined by the subnet mask (for example, 255.255.0.0 or 255.255.255.0 would mean all IP addresses should be the same except for the last two or just the last number in the IP address; otherwise, they will be filtered).
To use a direct link without enabling ICS, check the IP settings of the adapter you are going to connect to and determine if it is automatically allocated or fixed to a specific IP address.
Most PCs connected directly to another computer will allocate an IP address in the range 169.254.X.X (with a subnet mask of 255.255.0.0). For the Raspberry Pi to be able to communicate through the direct link, it needs to have a fixed IP address in the same address range 169.254.X.X. Again, we can set this in the cmdline.txt file (for example, 169.254.1.10) as follows:
dwc_otg.lpm_enable=0 console=ttyAMA0,115200 kgdboc=ttyAMA0,115200 console=tty1 root=/dev/mmcblk0p2 rootfstype=ext4 elevator=deadline rootwait ip=169.254.1.10
The 169.254.X.X address is particularly useful, since this setting should work on most computers where the adapter settings are set to automatic. If you use this often, you can make a copy of cmdline.txt and swap them over when you wish to change the settings.
Note
In the later releases of the Raspberry Pi distributions, it is expected that the Raspberry Pi will detect this situation and like other computers, automatically allocate itself an IP address in the 169.254.X.X range. This would avoid the need to change any settings, and the direct network link will be available automatically, assuming both sides are set to automatic DHCP settings.
If set to a fixed IP address (for example, 192.168.1.50), simply pick one that matches except the last number and set the ip= setting command in cmdline.txt accordingly (for example, 192.168.1.10, as shown in the following command line). This time we don't need to set the Gateway IP address:
dwc_otg.lpm_enable=0 console=ttyAMA0,115200 kgdboc=ttyAMA0,115200 console=tty1 root=/dev/mmcblk0p2 rootfstype=ext4 elevator=deadline rootwait ip=192.168.1.10
If you don't have a keyboard or screen connected to the Raspberry Pi, you can use this network link to remotely access the Raspberry Pi just as you would on a normal network (just use the new IP address you have set for the connection). Refer to the Connecting remotely to the Raspberry Pi over the network using VNC and Connecting remotely to the Raspberry Pi over the network using SSH (and X11 Forwarding) recipes.