
When we are modeling in AutoCAD, the ability to control object properties is essential. After some hours spent on a new 3D model, we can have hundreds of objects that overlap and obscure the model's visibility. Here are the most important properties.
If a correct layers application is fundamental in 2D, in 3D it assumes extreme importance. Each type of 3D object should be in a proper layer, thus allowing us to control its properties:
Name: A good piece of advice is to not mix 2D with 3D objects in the same layers. So, layers for 3D objects must be easily identified, for instance, by adding a 3D prefix.
Freeze/Thaw: In 3D, the density of screen information can be huge. So freezing and unfreezing layers is a permanent process. It's better to freeze the layers than to turn off because objects on frozen layers are not processed (for instance, regenerating or counting for
ZOOMExtents), thus accelerating the 3D process.Lock/Unlock: It's quite annoying to notice that at an advanced phase of our project, our walls moved and caused several errors. If we need that information visible, the best way to avoid these errors is to lock layers.
Color: A good and logical color palette assigned to our layers can improve our understanding while modeling.
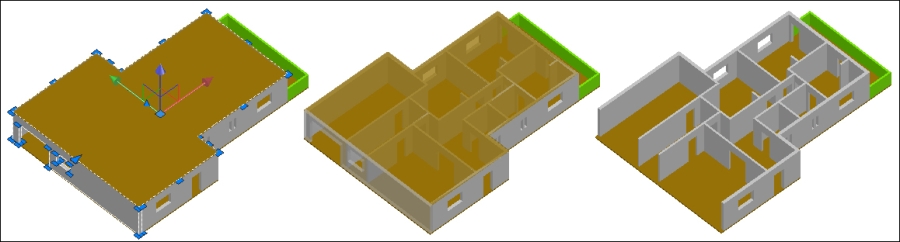
Transparency: If we want to see through walls or other objects at the creation process, we may give a value between 0 and 90 percent to the layers transparency.
Last but not least, the best and the easiest process to assign rendering materials to objects is by layer, so another good point is to apply a correct and detailed layer scheme.
Transparency, as a property for layers or for objects, has been available since Version 2011. Besides its utility for layers, it can also be applied directly to objects. For instance, we may have a layer called 3D-SLAB and just want to see through the upper slab. We can change the objects' transparency with PROPERTIES (Ctrl + 1).
To see transparencies in the drawing area, the TPY button (on the status bar) must be on.
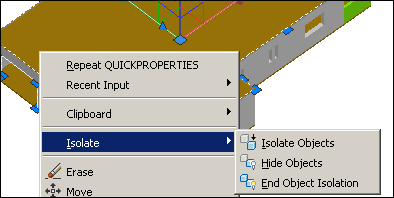
Another recent improvement in AutoCAD is the ability to hide or to isolate objects without changing layer properties.
We select the objects to hide or to isolate (all objects not selected are hidden) and right-click on them. On the cursor menu, we choose Isolate and then:
There is a small lamp icon on the status bar, the second icon from the right. If the lamp is red, it means that there are hidden objects; if it is yellow, all objects are visible:
Shown on the following image is the application of transparency and hide objects to the left wall and the upper slab: