
So far, we've covered the basics on how to use Google Drive including navigating the user interface, creating new documents, and uploading files. As you start to use Google Drive day-to-day, you'll see there is much more you can do with it. This section will teach you about some of the most common tasks and important features in Google Drive.
Google Drive is your place to access and organize your files in the cloud. Just like with your regular computer, you can open and edit your files. You can also create a "filing system" where everything is kept in a system of organized folders.
Viewing, editing, or downloading your files in Google Drive is only a click away. Here's a quick overview:
Open a file: To open a file, simply click on its name. The file will open in a new browser tab. Depending on the type of file, you can edit it (in the case of a Google file), or you can get a preview of it using the built-in viewer program.
Open a file with a specific application: If you have add-on applications installed that can work with a particular file, you can choose to use the application to open a particular file. Right-click on the file, and choose Open with from the Context menu. Then choose the application you want to use to open the file. The file will open in a new browser tab using the selected application. For more information, refer to the Using third-party add-on applications section given later in this section.
Download files or folders: You can download any file in Google Drive by selecting one or more files, right-clicking, and choosing the Download option. For Google Docs, Sheets, and Slides files, you'll be asked to choose what format to download the file in (PDF, Microsoft Excel, and so on). For other files, choosing this option will download the actual file. You can also download entire folders. And if you'd like to automatically keep an always-current copy of the files in Google Drive on your hard drive, you can do that, too (refer to the Using the Google Drive sync program section given later in this section).
The Google Drive Viewer is a built-in program that offers a rich preview when opening files that are not Google documents, spreadsheets, or presentations. For example, images, videos, and PDF files will all be opened with the Google Drive Viewer.
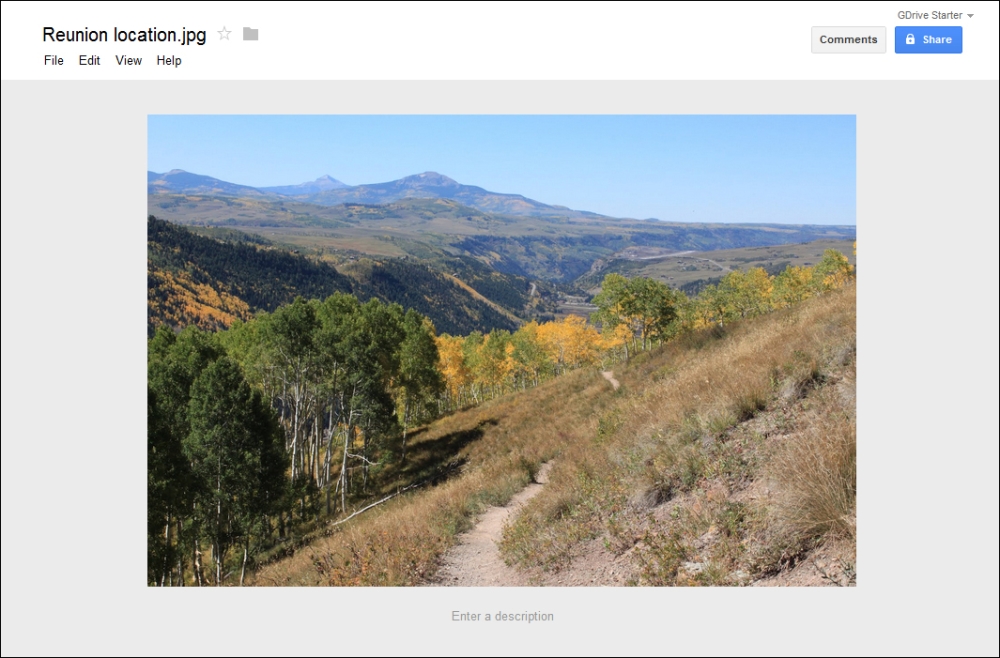
In addition to offering a rich preview of your photo, video, PDF, or other file types the Google Drive Viewer also gives you access to many of the functions you normally do in Google Drive. For example, using the File menu at the top, you can share, rename, star, organize, download, and edit the description of your file. You can even add comments to a file for you and people with whom you've shared the file with to see.
With Google Drive, you can create a folder structure that can be as simple or elaborate as you like. The following steps will show you how to create a new folder:
To create a new folder, click on the New folder button in the toolbar, or click on the CREATE button and select the Folder option from the Create menu.

You'll be asked to give your new folder a name, and once you've typed in a name, click on the blue Create button.

After creating the folder, you'll be taken directly to it in Google Drive. From here, you can create new documents or upload files directly into this folder.
You can also move existing files into a particular folder. There are two main ways to move files into folders. You can use the Organize screen, or you can use drag-and-drop. To use the Organize screen:
First, select one or more files or folders. (You can use the Ctrl or Command key to select more than one file or folder.)
Bring up the Organize screen by clicking on the Organize toolbar button at the top, or by right-clicking and selecting Organize… from the Context menu. The Organize screen will appear as follows:
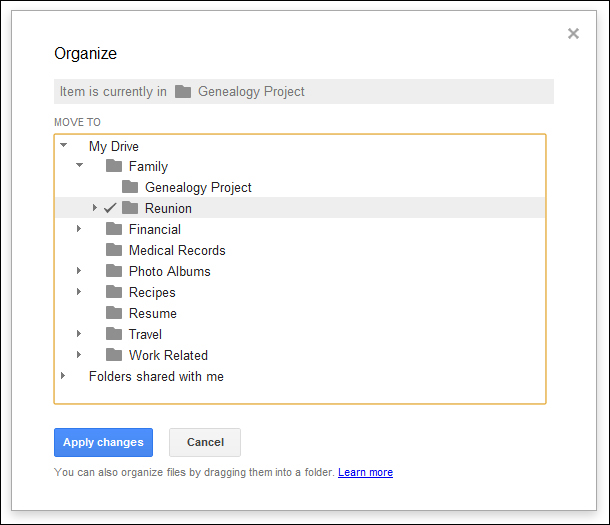
Note that the Organize screen shows you where the selected file currently is (in this example, under Genealogy Project). From here, you can select where you'd like the file to be instead.
Identify the folder location you want the file to be in, and then click just to the left-hand side of the folder icon. A checkmark will appear, indicating that is where the file will be. In this example, we have chosen a different folder under Family called Reunion.
Click the blue Apply changes button.
A notification will be displayed telling you that the files have been moved to the folder you specified.
An even simpler option compared to using the Organize screen is using drag-and-drop to move your files into folders. To move one or more files into folders using drag-and-drop:
Select one or more files or folders.
Click on one of the selected files.
Drag the files over to the Navigation panel on the left-hand side of the screen, hovering the mouse over My Drive.
My Drive will expand automatically showing you folders underneath it.
Once you've found the folder where you'd like the files to go, release the mouse, which will "drop" the files into the desired folder.
A notification will be displayed telling you that the files have been moved.
Sometimes, you'll be done with a file and will no longer want it in Google Drive. Fortunately, deleting one or more files from Google Drive is easy. To do so:
Select one or more files or folders in your Files list. (You can use the Ctrl or Command key to select more than one file or folder.)
Click on the Remove icon in the toolbar, or right-click and select Remove from the Context menu.
A notification will be displayed telling you that the files have been moved to the Trash (see The Trash section, next ).
The Trash is a special folder where files that you remove from Google Drive first go before they are permanently deleted. It's basically a holding area where removed files go to ensure you can easily restore a file in case you accidentally delete it.
To see what's in the Trash, go to the Navigation panel, and click on Trash. You may have to expand the navigation panel by clicking on the More option. Files and folders that have been put into the Trash folder will appear here.
From the Trash folder, you can do several important things including the following:
Permanently delete a file: To permanently delete one or more files from the
Trashfolder, first select the file or files you want to delete. Then, click on the Delete forever toolbar button at the top, or right-click on the selected files and select the Delete forever option from the Context menu. Note that you cannot undo deleting a file from the trash—once it's deleted, it's gone, and it cannot be recovered.Delete all files from the Trash folder: To permanently delete all files from the Trash, click on the Empty trash toolbar button at the top. You will be prompted to confirm if you want to permanently delete all files from Trash. Again, this action cannot be undone—once the trash is emptied, the deleted files cannot be recovered.
Restore a file: If you change your mind and decide you want a file back, it is easy to restore a file from the
Trashfolder to its original location (where it was before you removed it). To do so, select the file and click on the Restore toolbar button (or you can right-click and select Restore from trash from the Context menu). The file will be taken out of Trash and placed back into its original location.
As you can see, the Trash folder is a useful place or "holding area" where files go before they are fully deleted. Note the importance of the terminology here: removing a file from Google Drive refers to moving it into the Trash folder, which can be undone (by restoring it). Deleting a file can only be done from the Trash, and deleting is a permanent operation. You cannot get deleted files back.
There are two important things to keep in mind when deleting shared files:
For files that you own, but are shared with others, removing them will result in those files no longer being shared. Since sharing a file doesn't make a copy, but instead actually gives access to the original file, deleting a file that you have shared with others means that those people will no longer be able to access it (unless they made a separate copy of it for themselves).
For files that were shared with you, you are not the owner, and so you cannot delete those files. You can only delete files that you own. Yet, you may still be done with those files, and want them out of Google Drive. In this case, you can still remove them by selecting them and selecting Remove from the toolbar or the Context menu. However, this will not delete the file, and the owner of the file (or person who shared it with you) will not be notified. Instead, it will simply prevent the file from showing up in Google Drive.
Google Drive includes a powerful search function. Searching lets you quickly find your files based on one or more criteria that you specify. There are two main ways to find files in Google Drive: searching with text, and searching with predefined criteria known as filters. In both cases, searching takes place in the search bar:

You can perform a full text search by searching for one or more words. When you run such a search, results are returned based on one or more of your search terms matching any of the three fields given next:
The title of the file.
The text content of the file, which could be text from a PDF file, a spreadsheet, words in a Google Docs document, and so on.
The description of the file (which you can set or view in the Preview panel).
To start searching, simply type in your search keyword in the search box. In this example, we're searching for the keyword holiday. As you type, note that some search results will pop up instantly underneath your search query. These "instant results" represent only a partial set of search results. Often, what you're looking for will pop up in the "instant results", and you can then click on an item to open it directly.
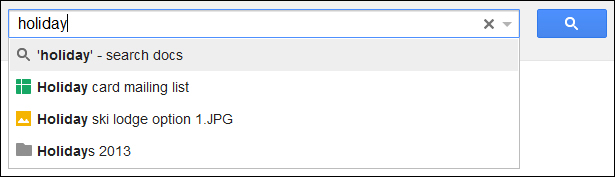
To fully run your search and see all search results, type in your search query and then press Enter or click on the blue search button on the right-hand side. This will perform a full search, returning results based on not only the file's title, but also the text content of that file.
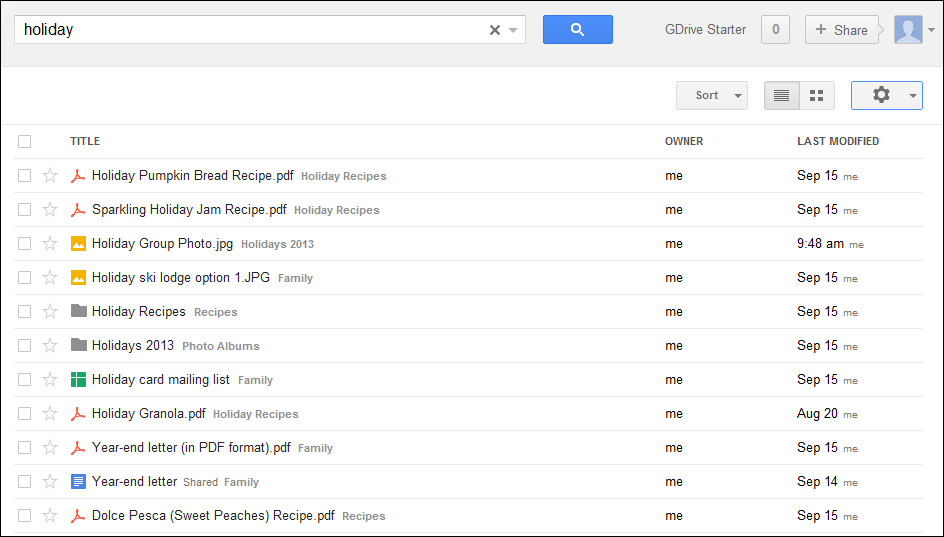
In this example, searching for holiday returned matches based on both the filename and the file's text contents. For example, the word holiday appears in the text of the Google Docs document Year-end letter, and so it shows up in the search results. Note that text from PDF files is also searchable.
From these search results, you can open the resulting file by clicking on it. You can also perform any other functions you're used to by selecting the document and using the toolbar, or by right-clicking the file to bring up the Context menu.
Tip
Sorting your search results
When you perform a search, search results will come back by default sorted by Relevance. This means that the most relevant search results will appear at the top, based on how strong the match is. If you would like to sort your search results instead by the last time the file was modified, you can do that as well by choosing Last modified from the Sort menu in the toolbar.
Another way to search for files is to use one or more predefined criteria, called filters. To get started, first open the advanced search options by clicking on the small arrow in the right-hand side of the search box (circled in the following screenshot):

Here are some of the general categories of things you can filter by:
Type: Use this category to filter by file type. For example, you can show only PDF files, folders, images, and all of the various Google types (documents, spreadsheets, presentations, and drawings).
Visibility: Choose one of the options here to show files based on their sharing status. For example, you can choose Private, which will show files that are still private to you (not shared broadly), but which may be shared with one or more people. For more information, refer to the Visibility Options sections given in the Sharing files with other people section.
Ownership: This category filter can help you quickly find files for which you either are or are not the owner. For example, you can choose Owned by me to show all files for which you are the owner, thereby excluding files that have been shared with you (for which you are not the owner).
Other: There are some other useful miscellaneous filters you can use. Choose Opened by me to show all files that you have ever opened, and Created with… to show files that were created with a particular third-party application (if you have such applications installed).
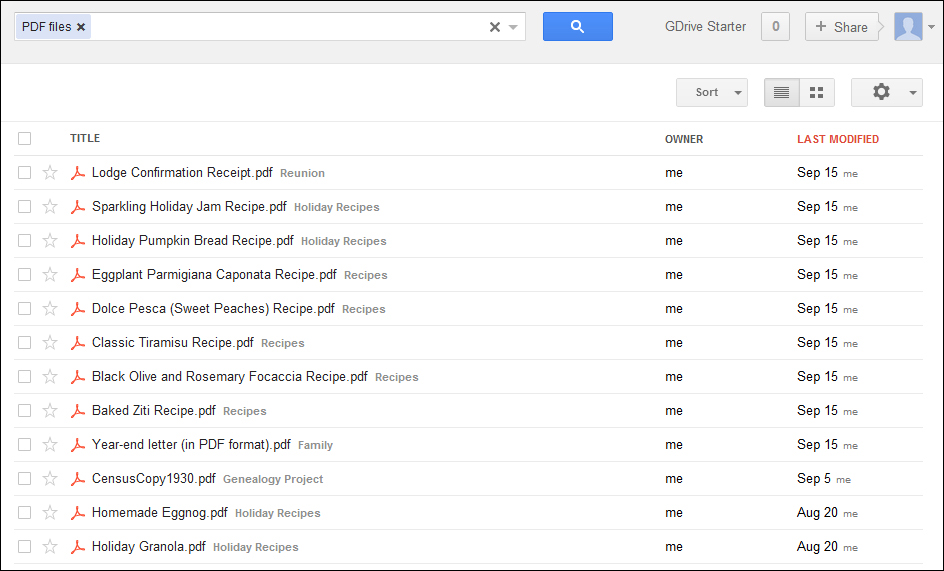
As an example, let's say you want to see a list of all your PDF files in Google Drive. Simply open up the advanced search options, and choose PDF files. A small filter chip will appear to indicate the criteria that you're filtering on (here, PDF files), and the matching search results will be shown. In this example, the search results are all PDF files in Google Drive (no matter what folder they're in):
From here, you can select and perform specific file operations on one of your search results. Or if you are done, you can click on the X in the search box to clear the search results and return to where you were.
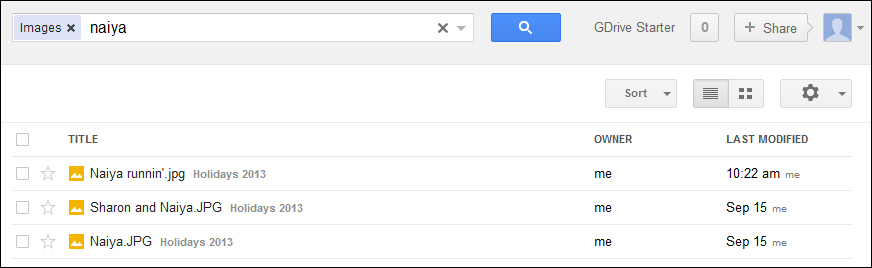
You can also search by keyword and one or more filters, all at the same time. First, select one or more filters in the advanced search options. In this example, we have selected Images. This will return all the images in Google Drive.
You can further narrow down these results by searching by keyword. Simply type in your search query to the right of the existing chip (here, it says Images). In this example we have searched for naiya. This combination search will show you all images that have the word naiya in the title. (Note that searches are not case-sensitive.)
With the ability to search by keyword, filter criteria, or a combination of both, you should have no trouble quickly finding files that you're looking for in Google Drive.
Searching for files shared with you by another person is easy in Google Drive. Simply type in the user's name or e-mail address, and their name will appear in the drop-down list of "instant" results shown previously. Click on their name, and this will search for all files in Google Drive shared with you by that person.
One of biggest benefits of storing your files in the cloud is how easy it is to share them with other people. No more e-mailing files around. Instead, with a few clicks you can give other people access to your file, right in the cloud. You don't need to make a separate copy, because all collaborators receive access to the exact same file. And if you assign edit permissions, those people can also edit the file, with the changes showing up immediately in Google Drive. Collaborating with others has never been easier.
By default, all files you create in Google Drive are not shared. They are private to only you, and only you can see them. This applies to both uploaded files, files created with the built-in applications, and files uploaded from your hard drive using the optional sync program. In situations where you want to collaborate with others on a file, that's where sharing comes in.
The Sharing settings screen is where you can view and change all sharing permissions associated with a file that you own. To open the Sharing settings screen, select one or more files or folders, and then click on the Share button in the toolbar.
Tip
Sharing a file from a Google program
The built-in Google programs (Docs, Sheets, Slides, and Drawings) as well as the Google Drive Viewer all let you share from directly within the program. In each program, simply click on the Share… option from the File menu at the top.

The Sharing settings screen has seven main parts, given as follows:
1 – Link to share: Paste this link into an e-mail or a chat message to let recipients access the document directly. (To copy the link, select the text, right-click, and choose Copy.)
2 – Share link via service: Click on the Gmail, Google+, Facebook, or Twitter icons to automatically share a link to this document via the selected service.
3 – Who has access (visibility): Click on the Change link to be able to set the visibility options to keep the file private, shared via a link, or shared publicly. Refer to the Visibility Options section given in the following section.
4 – Sharing recipient list: People with whom the file is currently shared will appear in this list. Refer to the The sharing recipient list section next.
5 – New sharing recipient field: Type in one or more e-mail addresses in this field to add people to the sharing recipient list. Here is where you also set the level of sharing permission to assign to the new recipients (Can edit, Can view, and so on). Refer to the Sharing access levels (permissions) section given later in this book.
6 – Messaging options: By default, when you share a file with someone, they will be notified via e-mail. This is helpful for the sharing recipients because they will have a record of the shared file in their e-mail with a link that they can refer to in the future. Uncheck the Notify people via email checkbox if you do not want this e-mail to be sent (for example, you could just send them the link directly yourself). Optionally, you can also specify a message by clicking on Add message. It is often helpful to do so, because you can give some background information on the file and why you're sharing it. Your note will show up in the sharing e-mail sent to the recipients.
7 – E-mail options: Check the appropriate checkbox if you would like to send a copy of the sharing e-mail to yourself (useful to see exactly what your sharing recipients will see, and to confirm that your e-mail went through). You can also indicate to paste the contents of the file in the e-mail, so recipients can preview the document directly from their e-mail.
The sharing recipient list shows all the people with whom the file is currently shared. In this example, the owner is listed, and there is one other sharing recipient. Note that you can share the file with as many people as you like.
Each sharing recipient is associated with a level of access (Can view, Can comment, or Can edit). For more information refer to the Sharing access levels (permissions) section given next.
To remove someone from the sharing recipient list, click on the X button on the right-hand side of their entry, and then click on the blue Apply changes button. This will remove that person's access to the file (unless it is shared publicly). You can change someone's access level in a similar way. Note that the person whose access you change or remove will not be notified (they will not receive an e-mail).
Every time you add a sharing recipient, you also indicate a sharing permission, or level of access that a person will have to the file being shared. There are four main access levels that a person can have for a particular file:
Viewer (shown as Can view): A viewer can open the file, read and see its contents, but cannot make any changes. They cannot delete the file and they cannot share it with other people.
Commenter (shown as Can comment): A commenter can do all the things that a viewer can with the file, and they can also leave comments in certain types of Google files. They cannot otherwise change the file, and like viewers, they cannot delete the file or share it with other people.
Editor (shown as Can edit): An editor can do all the things that a viewer or commenter can with the file. In addition, they can also make changes to the file, and, unless you specify otherwise, they can share it with other people. Editors cannot delete files shared with them; only the owner can do that.
Owner (shown as Is owner): An owner is generally the person who created or uploaded the file. An owner has full permission to a file, so they can edit the file and share the file with other people. The owner is also the only one who can delete the file.
Just as you can assign these sharing permissions to people, on files that are shared with you by someone else, you will have your own access level specified for the file—view, comment, or full edit permissions.
Every file has one single level of visibility that applies to the file broadly, regardless of specific individuals with whom you have shared the file. By default, this visibility level is Private, and only specific people who you have shared the file with can access it. But if you like, you can change this to be more widely shared.
To change the overall visibility of a file, click on the Change… link to the right-hand side of the first entry under Who has access in the Sharing settings screen. This will bring up the Visibility options screen as shown in the following screenshot:

There are three main visibility options you can choose from:
Private: The file is private and visible only to you and to the people with whom you explicitly share the file. These people will each appear as sharing recipients in the Who has access section. If they're not listed here, they don't have access. Use this option when you only want certain people to be able to access your file.
Anyone with the link: Anyone who has received the link to this file can access it. The link to the file is the "Link to share" at the top of the Sharing settings screen, and this link is initially made available only to you. Anyone who you send this link to will be able to access the file. This is a good option to choose when you want the file to be easily accessed by a large number of people; for example, you could send the link out to an e-mail list for a group project.
Public on the Web: Anyone on the Internet can find and access the file. The file can show up in search results, and anyone who knows the Web address of the file will be able to access it. Choose this setting when you want your file to be discoverable and accessible by everyone. They do not need to be signed into a Google account. This is a good option if you want to publish the link to your file on a website and have everyone easily access the file.
If you choose Private, you will be able to specify the access level (permission) for each person. If you choose either Anyone with the link or Public on the Web, you can also choose the access level, but it will apply to anyone accessing the document with those two visibility options. For example, you may want to give viewing permissions to anyone on the Web using the Public on the Web option. In this case, you could also give editing permissions to specific additional people with whom you explicitly share the file in the sharing recipients list.
Basic file sharing is simple and can be done with just a few steps:
Open the Sharing settings screen by selecting one or more files to share, and clicking on Share from the toolbar or the right-click context menu.
Type in the name of one or more recipients to share the file with.
Choose a level of access (permission) for the sharing recipients. Choose from Can view, Can comment, or Can edit.
Click on Add message and type in a short personalized message.
If desired, check the Send a copy to myself box which will also e-mail you about the file you just shared.
Click on Share & save.
At this point, an e-mail will be sent to each of the newly added sharing recipients, with your message and a link to the document.
Your sharing recipient will click on the link in the e-mail they receive, and your file will be opened in their web browser. If they have edit permissions, they can edit the file, too. The file will also show up in the Shared with me section of their Google Drive for easy later reference. They can also find the shared file by going back into their e-mail.
You can change sharing settings at any time by selecting the file and opening the Sharing settings screen. For example, you could remove somebody from the sharing recipients list, and this would mean that person could no longer access the file. You could also simply change their access level; for example, somebody may e-mail you requesting permissions to edit a file that they only have view permissions for, and you could grant them in this way.
That's it for basic sharing! It only takes a few seconds to collaborating in the cloud.
Sharing a folder is a popular and effective way to share multiple files at once. This is especially helpful when you're collaborating on a project as a team. In this case, all of the project's documents and files (text documents, spreadsheets, photos, PDFs, and so on) are all in the project folder, and the entire team receives access to that folder and the files inside.
This works well because when you share a folder, all of the files in that folder receive the same sharing permissions as the parent folder. And importantly, all new files that get created or uploaded into that folder also receive the same permissions. That means that if you share a folder with editing permissions with other people, any new content that gets created in that folder is automatically editable by everyone with whom the folder is shared.
Just as you can share files with other people, other people can share files with you. You can quickly find files other people have shared with you by clicking on the Shared with me option in the Navigation panel. All files that have been shared with you will show up here, and you can then work with them just like you can with any other file, depending on your permissions (refer to the Sharing access levels (permissions) sections given previously).
If you like, you can also move these into your main Google Drive folder (My Drive) by dragging-and-dropping the file onto the My Drive label. (You can also select the file and use the Organize screen.) This doesn't change the fact that the file is shared with you, but it does make it a little more convenient to access.
Google Drive includes some preferences that you can optionally set. Usually, the defaults work just fine, but if you'd like to tinker a bit, you can do so in the Settings page. To get started with settings, click on the "Settings" icon in the toolbar on the upper-right side, which will show the Settings menu:
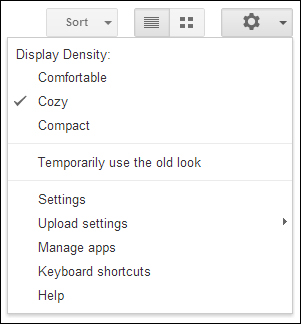
From here, you can choose from several options:
Display density: Choose from among three separate options that will control how much information can fit inside the Google Drive window at one time. This refers to the "compactness" of the user interface.
Settings: Opens up a screen with additional settings including your default language, time zone, and some user interface preferences.
Upload settings: Expand this submenu to set options related to uploading files. Refer to the The Upload settings menu section given previously.
Manage apps: Choose this option to display a screen that will allow you to manage your installed applications. Refer to the Using third-party add-on applications section next.
Keyboard shortcuts: This option will pop open a handy quick-reference list of keyboard shortcuts that you can use to quickly access your favorite commands.
Help: Takes you to the main support page where you can find detailed information on all of the features in Google Drive.
As you've seen, Google Drive offers a useful set of built-in applications that let you create and edit documents, spreadsheets, presentations, and drawings. With third-party add-on programs called Drive Apps, you can extend the functionality of Google Drive to do even more.
These Drive Apps read, write, and edit files stored directly in Google Drive, so you can use them to do useful things with your files all on the Web. And just like the built-in programs, you can use Drive Apps from anywhere (including your phone or tablet) and then share the files you create with them with other people.
From faxing and making diagrams, to project planning and editing video, the possibilities with Drive Apps range far and wide. Here is a list of some of the popular third-party applications that work with Google Drive that you can install and start using right now:
Send and receive faxes directly from/to Google Drive with HelloFax. You can fax PDFs, images, Microsoft Office files, even Google Docs documents. Go to www.hellofax.com.
Make visually sharp diagrams and flowcharts with LucidChart. Go to www.lucidchart.com.
Create 2D and 3D floor layouts and building designs with FloorPlanner. Go to www.floorplanner.com.
Edit, crop, resize, and style photos with Aviary. Go to www.aviary.com.
Manage and schedule your next project with Gantter. Go to www.gantter.com.
Edit videos and make movies in the cloud with WeVideo. Go to www.wevideo.com.
Make your own music with UJAM. Go to www.ujam.com.
Create stunning slide presentations with SlideRocket. Go to www.sliderocket.com.
Create and edit Microsoft Office documents, spreadsheets, and presentations natively with InstallFree Nexus. Go to nexus.installfree.com.
Create mind maps and brainstorming diagrams with MindMeister. Go to www.mindmeister.com.
Drive Apps are similar to other programs on your computer, in that you have to first install them before you can use them. However, there is a very important difference: with regular programs, you're installing an actual copy of the program on your hard drive, and you can access it only from your computer.
With Drive Apps, however, you're adding it to Google Drive, online and in the cloud. Nothing is actually installed on your computer's hard drive. What's great about this is that just like you can access Google Drive from anywhere, you can access your Drive Apps from anywhere, too. Everything is online and in the cloud—files and programs.
Installing Drive Apps is done via the Chrome Web Store and takes just a few clicks. But note that you don't have to use Chrome to use Drive Apps; they can be used from any web browser such as Firefox or Internet Explorer, in addition to Chrome.
To install a Drive App, follow the ensuing steps:
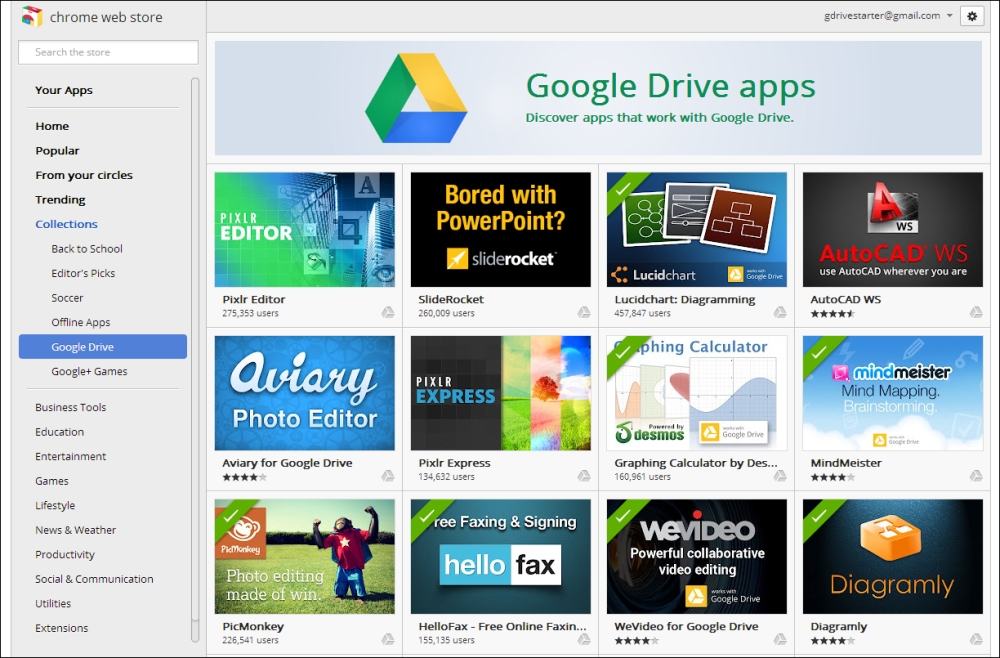
Visit the Chrome Web Store by navigating your web browser to https://chrome.google.com/webstore. (You can also click on Get more apps in the Manage Apps screen; refer to Managing your installed Drive Apps.)
Click on the Collections label on the left-hand side of the screen. This will expand a list of collections from which you can choose. From this list, click on Google Drive.
A list of available Drive Apps will now appear, looking something like the following screenshot (the actual apps that appear may be different). As you can see, there is a large variety of apps to choose from.
To get more details about an app, simply click on the app's picture. A details pop up will appear. We've clicked on Aviary Photo Editor, as shown in the following screenshot:

From here, you can read about an app and see screenshots of it in action. You can also read reviews and rate the app. Importantly, this pop up is where you actually install the app.
When you're ready to install the app, click on the blue ADD TO CHROME button, and accept the confirmation prompt that appears, as follows:

At this point, the Drive App is now installed. Returning to Google Drive, you will need to refresh your browser (using F5 or the reload or refresh option), and you'll get a confirmation that the app has been installed:

That's it! Your app is now installed and ready to use.
Tip
Do Drive Apps cost money?
Drive Apps generally do not cost any money to install. Many Drive Apps are completely free to use, while others are free but occasionally display advertisements in the user interface. Still others are free to use for a while on a trial basis, but you must then pay for a license to use the app after the trial period.
For many apps, you will have the option to use the app by default. Checking this box means that when you click on a file in Google Drive to open it, if the particular Drive App is able to open the file, then it will always be used to open the file. Specifically, it will be used instead of the Google Drive Viewer (which is the default app otherwise).
In other words, the Drive App that you've chosen to use by default will now be used to open files of types it can open. This is generally desirable, because while the Google Drive Viewer can only preview files, Drive Apps generally let you edit the files.
Note that you can always use any program, not just the default program, to open a particular file. To do so, right-click on the file and choose the desired application from the Open with option in the Context menu.
Using Drive Apps in Google Drive is just a matter of a few clicks. There are two main ways you can use Drive Apps. First, you can create a new file; many, but not all, Drive Apps support this. Second, you can open an existing file with a particular Drive App.
If a particular Drive App is able to create new files, it will show up in the Create menu, which you use to launch the app.

To create a new file using a Drive App:
Click on the red CREATE button in the upper-left corner to open the Create menu.
Click on the More option, appearing towards the bottom of the Create menu. This will pop open a submenu of Drive Apps that you've installed with which you can create new files. In this example, we see a number of apps.
Choose the app with which you want to create a new file
Your selected app will load in a new browser tab, and then you're ready to start using the app.
From here, the exact way the application works will vary depending on the app. Generally, you'll edit your new file in the app's user interface, saving it when done. Where does the file go when you save it? Back into Google Drive, where you can then edit it again, download it to your hard drive, or even share it with other people.
The other main way you can use a Drive App is by selecting one or more files, and then selecting the Drive App you'd like to use to open that file.

To open an existing file with a Drive App:
First, select a file, and then right-click on the file to bring up the Context menu (you can also select the file and click on the More toolbar button).
From here, select the Open with option that will show you a list of Drive Apps that you have installed that are able to open the file you selected.
In this example, we clicked on an image, and there are several apps installed that can open photos, including Aviary for Google Drive which we just installed.
Choose the app you'd like to use to open the file. The app will load in a new browser tab, and the selected file will appear, ready for action. Here, we have chosen to open the file in Aviary, one of many photo editors available that work with Google Drive.
When done, save the file in the app, and the changes will be written back to the file in Google Drive.
It's that simple! Just a few clicks and you're up and running with your newly installed Drive App.
Drive Apps are subject to very strict security requirements. Importantly, before apps can read or write files in Google Drive, you must first explicitly authorize them to do so. The first time you use a particular Drive App, whether with the Create or Open scenarios described in the previous section, you will be shown a special security screen by Google:
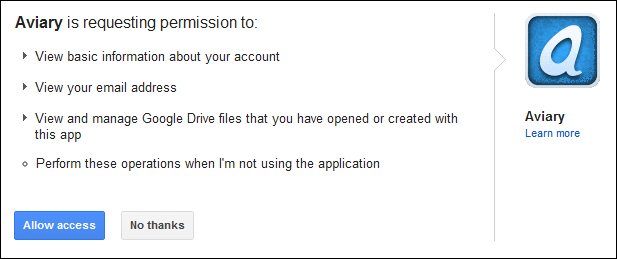
This screen lists the types of things the particular Drive App is requesting your permission to be able to do. It will only be able to function if you grant these permissions.
In this example, the application is requesting four types of permissions, such as the ability to read basic account information including your name and e-mail address. It is also requesting to be able to write files into Google Drive. Finally, it is requesting permission to read files that the application created, or that you have previously used the application to open. This means that the app cannot just go accessing any file in Google Drive—only ones it created, or you previously opened with the app.
To grant these permissions to the app, click on the blue Allow access button, and the app will be allowed to proceed. Otherwise, click on No thanks and this will prevent the application from having any access to Google Drive (and it will not be able to run).
To see a list of Drive Apps that are currently installed in Google Drive, choose the Manage apps option in the Settings menu by clicking on the Settings button on the toolbar. This will pop up the Manage apps screen:
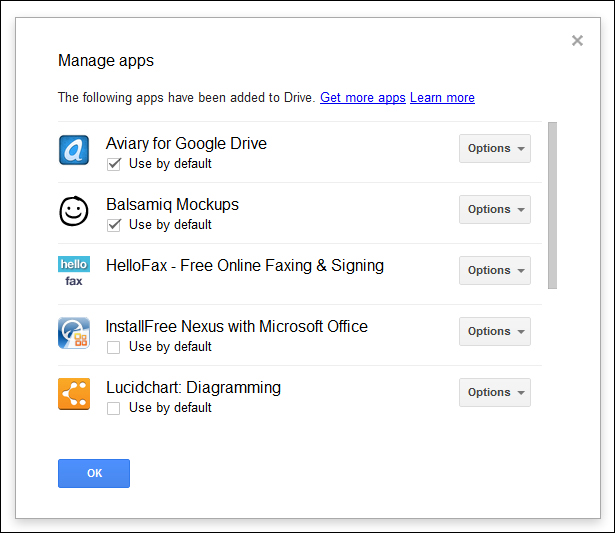
The Manage Apps screen lists all applications that have been added to Google Drive. This screen is also a convenient point to find and install more Drive Apps, just click on the Get more apps link at the top.
There are several actions you can perform related to a Drive App. To see these options, first open the Manage apps screen shown previously, and then click on the Options button next to the app you're interested in. A special options menu will appear:
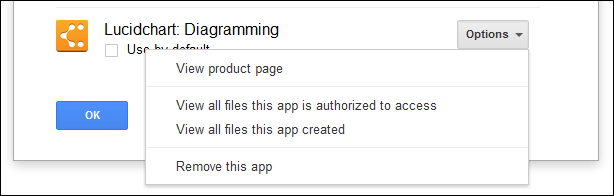
Here's an overview of some of these options.
View product page: Choose this option to open up the app details pop up described earlier, which will show important details about the app such as the app description, screenshots, company website, support information, and reviews.
View all files this app is authorized to access: In most cases, applications request permission to be able to access only those files that it created, or that you specifically choose to open with the app. Refer to the preceding Security permissions section. Choose this option to list all of those files that the application has permission to read and edit.
View all files this app created: Choose this option to see a list of all the files that the application has created in Google Drive. Generally, this will be all files that you saved after using the CREATE button, but in some cases, applications may also write files into Google Drive in other situations.
Remove this app: Choose this option to uninstall the Drive App from Google Drive.
When you choose Remove this app from the Manage apps screen for an app, this action will completely uninstall the application from Google Drive. In particular:
The app will be fully removed (uninstalled). It will no longer appear in the Create menu or the Open With menu.
You will not be able to create new files with the uninstalled app or open existing files with it.
Any files you created with the app that appears in Google Drive will not be removed. In other words, if you create a file with a Drive App, it will stay in Google Drive even after uninstalling the app. Uninstalling does not remove files, it only removes the app.
Because Drive Apps live in the cloud just like your files, removing an app from Google Drive means this change will be reflected regardless of where you access Google Drive (assuming you're using the same account, of course). Uninstalling a Drive app does not affect the current computer or mobile device you're working from.
Some apps create proprietary file formats that can only be read by the app. If you uninstall one of these apps, then you may not be able to open files you created earlier with it, even though those files are still in Google Drive.
You can always reinstall an application again later after uninstalling it.
Google Drive comes with an optional but popular sync program available for download for PC and Mac. The main purpose of this program is to keep your files in sync between Google Drive on the Web and a special Google Drive folder on your computer's hard drive—all automatically and in the background.
Keeping files in sync in this way brings you many benefits:
Access your files anywhere: Your entire set of files in Google Drive is available on the Web (at https://drive.google.com), and also on your PC or Mac (in a folder on your computer's hard drive called
Google Drive).Make changes anywhere: Your files are always up-to-date no matter where you make changes. If you make a change in one place, the file is updated everywhere else: in Google Drive on the Web, in the
Google Drivefolder on your computer's hard drive, and on your mobile device (if you have the Google Drive app). Updates are all done automatically.Keep a backup of your important files: Cloud storage is an excellent backup option, because your files are kept safely in the cloud. You have a safe, "off-site" copy of your important data that will be there in the event your computer encounters problems.
Upload large amounts of data: Uploading files and folders via the Web is a great way to get your files into the cloud (refer to the Uploading files from your computer section given in the book). But if you have a very large amount of data, you may find the sync program to be a faster and more convenient way of getting your files into Google Drive.
Keep files in sync with multiple computers: You can install the Google Drive sync program on multiple computers and even mobile devices. This is a great way to propagate your files to multiple locations, which can be useful for productivity and work scenarios as well as for backup.
Using the Google Drive sync program is free, and it costs nothing to download or install. Files that you synchronize from your computer into Google Drive do count against your Google Drive storage space (just like any file you upload).
Here are just a few ways you can use the Google Drive sync program.
Vacation photos: Returning from vacation, you download the contents of your camera's memory card to your computer. But you want to share the vacation photos with your family. Simply move the folder of vacation photos over to the
Google Drivefolder, and they will automatically be uploaded to the cloud, into Google Drive. From there, you can share the folder, and others can then add their own photos from the vacation. Any photos other people add to your shared folder in the cloud will automatically sync to your own computer.Receiving a fax: You install a third-party add-on faxing program for Google Drive. One of the features of this program is that you get a special phone number that you can use to receive faxes. When you receive a fax, the program automatically converts the fax to PDF format and puts the PDF file into a special
Received Faxesfolder in Google Drive. Immediately upon receiving the fax, the PDF created in the cloud will then be synced to all your devices where you can then view the PDF.Microsoft Office: You are working on a document or presentation in Microsoft Office on your PC or Mac. You also want to be able to work on this file in the cloud when you may not have access to your computer. You keep the file in your
Google Drivefolder, and as you work on it, all the changes are kept in sync with Google Drive, so you always have access to the latest copy on the Web. You install a third-party add-on application that can edit Microsoft Office files in Google Drive, and you use this when you are travelling and away from your work or home computer. The changes you make to the file in Google Drive on the Web while on the road are saved and automatically synced to your computer, so when you get back from your trip, you're ready to keep working, picking up with the latest version right where you left off.Tip
Working with Microsoft Office files
Although you can work with Microsoft Office files in the way described, it is often best to convert it to Google Docs format and work with that format instead. Refer to the Context menu section for how to convert files to Google Docs format. Working with the file in a Google Docs format is much easier, especially for editing and when you need to share the file with others.
When you install the Google Drive sync program on your computer, everything is kept up-to-date between the cloud (Google Drive on the Web) and your computer, automatically and in the background.
Note
Only files kept in a special Google Drive folder on your computer's hard drive are uploaded and kept in sync.
When you install the sync program, any files that you have already in Google Drive on the Web will be downloaded and placed into the Google Drive folder on your hard drive. Any files that you move into this folder on your hard drive (for example, from your Documents folder) will be uploaded to Google Drive on the Web.
Here are the most important basics on how syncing works:
When you create or upload files in Google Drive (on the Web at https://drive.google.com), they will be copied down to a special
Google Drivefolder on your computer's hard drive. On Windows, by default this folder will be located inC:\Users\YourUserName\Google Drive. On Mac, it will be in/Users/YourUserName/Google Drive.The same applies in the reverse direction when you create a file in the
GoogleDrivefolder on your computer's hard drive. It will be uploaded in the background to Google Drive on the Web, and you can then see the file in the cloud. If you have Google Drive installed on multiple computers (or on your mobile device), the files will sync back down to those devices, too.Similarly, if you make changes to existing files in Google Drive on the Web, those changes will sync to their counterparts in the
Google Drivefolder on your computer's hard drive. And as you would expect, changes made to a file in theGoogle Drivefolder on your computer sync back up to Google Drive on the Web.Note that only files in the special
Google Drivefolder on your computer's hard drive are kept in sync on the Web. Files in other folders, for example files in yourDocumentsorMy Documentsfolder, will not be uploaded to the Web or kept in sync.For files on your computer that you want to upload and sync to the cloud (Google Drive on the Web), you will need to move them into the
Google Drivefolder on your computer's hard drive. You could do this using the Cut and Paste menu options, for example, which will move the file (not copy it). That way, you avoid making duplicate copies of files.
That's all there is to it. The key thing to know when using the Google Drive sync program is that your files are kept up-to-date everywhere, across all your devices, automatically.
The following diagram shows how it all works:

There are two main concepts here—the cloud, and your computer. When files are in the cloud (in Google Drive), you can access them with your web browser. When you install the Google Drive sync program, which is an add-on program (and not Google Drive itself), this program will monitor a special folder on your computer called Google Drive. Files you move into this special folder on your computer, for example out of your Documents folder, will be uploaded to the cloud by the sync program where you can then access them using a web browser. Files you create on the Web will also be copied into your computer's special Google Drive folder by the sync program.
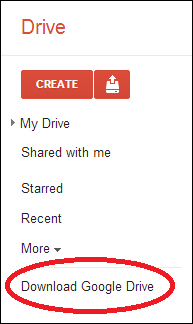
Installing the Google Drive sync program, known also as Google Drive for PC or Mac, is done in a few simple steps:
First, navigate your web browser to https://drive.google.com.
Click on the Download Google Drive button, found at the bottom of the Navigation panel on the left-hand side of the screen:
This will download the Google Drive installation file. For PC, the file will be called
googledrivesync.exe; for Mac, the file will be calledinstallgoogledrive.dmg.For PC, open the downloaded installation file to begin the installation process. For Mac, open the installation file, and then drag the Google Drive into your
Applicationsfolder. Installation of the sync program is quick (involving just a few prompts), and proceeding with the default options is just fine.You will be prompted to enter your Google account username and password for the account that you would like to keep in sync with your computer.
Once installed, launch the program (Start menu for PC,
Applicationsfolder for Mac).Follow any of the remaining instructions to complete the installation.
That's it! Google Drive is now installed for your PC or Mac. Your files in Google Drive will now start syncing to your computer's hard drive. This happens continually while your computer is on. If you turn your computer off, no worries: the next time it boots back up, Google Drive will load automatically and then check for any changes that have been made on the Web, and update the files in your computer as needed.
As we've seen, syncing files with the Google Drive sync program is automatic. File syncing is done in the background, with syncing done within seconds of a change either on your computer or the Web.
Installing Google Drive on your PC or Mac creates a special folder on your computer's hard drive called Google Drive. It's similar to other folders on your hard drive, with one difference: files and folders that you move into this folder on your computer will get uploaded and kept in sync with Google Drive on the Web.
The general idea is to move any files on your computer that you want to back up or keep in sync from their original folder (for example, Documents) into this special Google Drive folder. Note that it's best to move files into the Google Drive folder, not copy them. Otherwise, you'll have copies of the file in two different places (which can be problematic when you make changes).
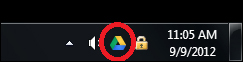
To get started, open the special Google Drive folder on your computer by clicking on the Open Google Drive folder in the menu that appears when you click on the Google Drive icon. For Windows, the icon appears in the system tray in the bottom-right corner of the screen:
On a Mac, the icon is on the menu bar in the upper-right corner of the screen:

If you had files already in Google Drive, you will see that they are in the process of being synced to the Google Drive folder on your computer. Files are synced one by one so you will gradually see them appear in the folder. If you have a large number of files to sync, this could take several minutes, hours, or more.
To get the current sync status, open the Google Drive menu by clicking on the Google Drive icon in the taskbar. The first item that appears will be the synchronization status, which will indicate that the sync is complete, or if the sync is not complete, then the current sync progress will be displayed:

At this point, there's nothing more you need to do. Everything is automatic. If you'd like to upload and keep the files on your computer in sync with Google Drive, simply move them into the Google Drive folder. To stop syncing them, move them out of the Google Drive folder on your hard drive, and they will no longer be kept in sync or be available in Google Drive on the Web.
Just like with uploading files through the Web, note that files that are uploaded to and kept in sync with Google Drive on the Web using the sync program will count against your storage space in Google Drive, just as if you had uploaded them through the Web. In other words, files in Google Drive on the Web—whether they got there from the sync program, or from being uploaded manually—take up space in Google Drive.
By default, all folders in Google Drive will be synced. However, you have the option of only syncing some folders of your choosing. To set this preference:
Open the Google Drive menu by clicking on the Google Drive icon, and then choose Preferences. The Preferences screen will appear.
Under the Sync options section, check the Only sync some folders to this computer checkbox.
You should see all of the folders in Google Drive in the list, each with a checkbox.
Check the ones you want to sync, and leave the ones you don't want synced unchecked.
Click on the Apply changes button, and your selections will be recorded.
You can access your files on the go from your mobile device using the Google Drive app for Android (phone and tablet) or for iOS (iPhone and iPad). Using these free apps, you can download, view, and even edit your files right on your device. You can even upload photos you take with your phone right into Google Drive. All the other features you're used to using on the Web work just as you'd expect on your phone or tablet including searching, sorting, sharing, and organizing.
The Google Drive app for Android is available for free from the Google Play Store, and it supports both phones and tablets.
To install the app, visit the Google Play Store by tapping the Play Store icon on your Android device. Find the application called Google Drive (you can search for it), and then install the app. Note you can also install the app by visiting Google's Play Store on the Web at https://play.google.com. Once installed, launch the app by tapping the Google Drive app icon in your device's apps screen.
The Google Drive app for iPhone and iPad is available for free from Apple's App Store, and it supports both phones and tablets.
To install the app, visit the App Store by taping on the App Store icon on your iPhone or iPad. Find the application called Google Drive (you can search for it), and then install the app. Once installed, launch the app by tapping on the Google Drive app icon in your device's apps screen.
For Android, iPhone, and iPad, the various flavors of the mobile Google Drive app all have the same basic functionality and work in similar ways. In fact, you'll recognize many of the basic user interface pieces from earlier in this book.
This corresponds to the Navigation panel on Google Drive for the Web, and functions in the exact same way. Tapping an item in this panel will update the files shown in the Files list on your mobile device.

The labels correspond to those found in the Navigation panel on Google Drive for the Web:
My Drive is where all files that you've created appear. Note that, unlike on the Web, your hierarchy of folders is not shown; instead, folders will be shown in the Files list and you can "drill down" into them as needed.
Shared with me is where all files that other people have shared with you appear. Clicking on this will filter your Files list to only those items.
Starred will show only those files that you have previously starred.
Recent shows a list of files sorted by modification date; use this to quickly find files that have most recently been created or edited by you or someone else.
Offline will show a list of files that are available for viewing offline, that is, while not connected to the Internet. Files can be marked to be kept offline in the Preview panel, discussed later.
The Files list appears when you tap on any of the items in the Navigation panel; for tablet devices that have a larger screen, the list will simply always be present to the right-hand side of the Navigation panel. In this example, we are in the Family folder.

For each file in this list, you can:
See the file's title, icon, and the date that the file was last modified.
Tap on the star to toggle whether the file is starred.
Tap on the arrow on the right-hand side to get additional details about the file via the Preview panel.
Tap on a file to open it. Google types can be previewed and even edited on the device. If you have an app installed on your device that can open the file, such as a PDF viewer or image editor, you'll have the opportunity to use that app to view the file.
The Preview panel shows a visual preview and additional details about the file, and also permits you to take additional actions on the file.

From the Preview panel, you can:
See the icon and title of the file
See a thumbnail (small image) preview of the file
Open the file by tapping on the Open button or the file thumbnail
See with whom a file is shared and their level of access (view or edit)
Share the file with other people
Mark the file as Available offline which means it will be copied onto your device and is viewable on the device even when you don't have an Internet connection
Return to the Files list by closing the Preview panel
The Actions menu lets you perform certain operations on the selected file. It is very similar to the Context menu that appears in Google Drive for the Web. To pop open the Actions menu in Android, long-press (tap-and-hold) a file in the Files list. For iPhone/iPad, click on the "Actions" icon in the upper-right corner of the Preview panel.
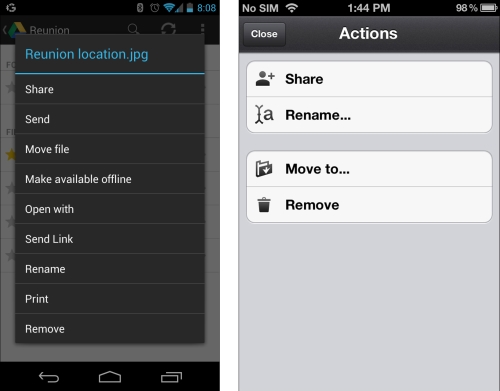
Here are some of the things you can do in the Actions menu:
Share the file with one or more people
Rename the file
Move the file to a different folder in Google Drive
Remove the file, placing it in the Trash
Print the file to any printer using Google Cloud Print
Send the file via e-mail
Depending on the application version, certain other advanced options, such as printing, may be supported.
The Create menu (or Add menu on iPhone/iPad) lets you create new items in Google Drive directly from your phone. This menu appears by clicking on the menu icon in the toolbar and selecting New, or by clicking on the + icon in the toolbar on iPhone/iPad.
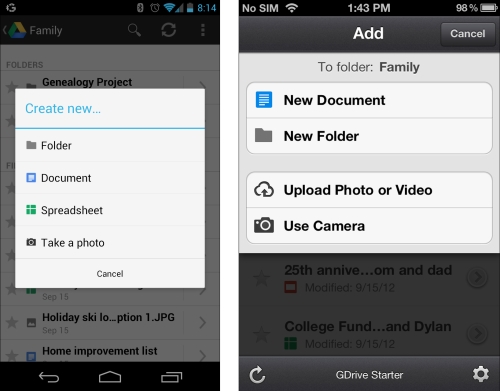
From the Create menu, you can create a new Google Docs document, a new folder, or you can upload a photo or video from your phone directly into Google Drive.
Just like with Google Drive on the Web, you can quickly search all of your files in Google Drive. On Android, click on the search icon in the toolbar which will display the search box (this is always visible on iPhone/iPad), and type in your query. Files matching your search will appear in the Files list. From here, you can work with a matching search result like any other file: open, preview, star, share, and more.
You can see that the mobile experience for Google Drive is robust and full-featured. With the Google Drive mobile app, you can do the majority of the same things you can with a web browser on your desktop—viewing, editing, and sharing on the go.