
In this recipe, we'll see the properties and the settings of the World window in Cycles.
The main characteristic of the Cycles World is that it can emit light, so it practically behaves as a light source. Actually, its effect is the famous "Global Illumination" effect.
As in Blender Internal, it is considered as a virtual dome at a large distance from the camera and never touching the scene's objects. Nothing in the 3D scene can affect the World. Actually, only the World can emit light on the scene and on the objects.
Open the
start_04.blendfile and go to the World window under the Properties panel to the right of the interface. This is where we see the usual Use Nodes button under the Surface tab.Although no node system for the World window is set by default, the World window has a dark medium gray color already slightly lighting the scene. Delete the default lamp or put it on a different and disabled layer to see that the spheroid in the scene is dark but still visible in the rendered 3D viewport.
It's already possible to change this gray color to some other color by clicking on the Color button right under Use Nodes (color at the horizon). This brings up the same color wheel we have seen for the shader colors. Set the color to
R 0.179,G 0.152, andB 0.047and save the file asstart_05.blend.
Note that both the intensity as well as the general color graduation of the World are driven by this color. To have more light, just move the Value slider (the vertical one) towards a whiter hue. To give a general color mood to the scene, pick a color inside the wheel. This will affect all of the scene's illumination but will show mainly in the shadows, as shown in the following screenshot:
However, to have access to all the options for the World, we have to initialize it as a node system:
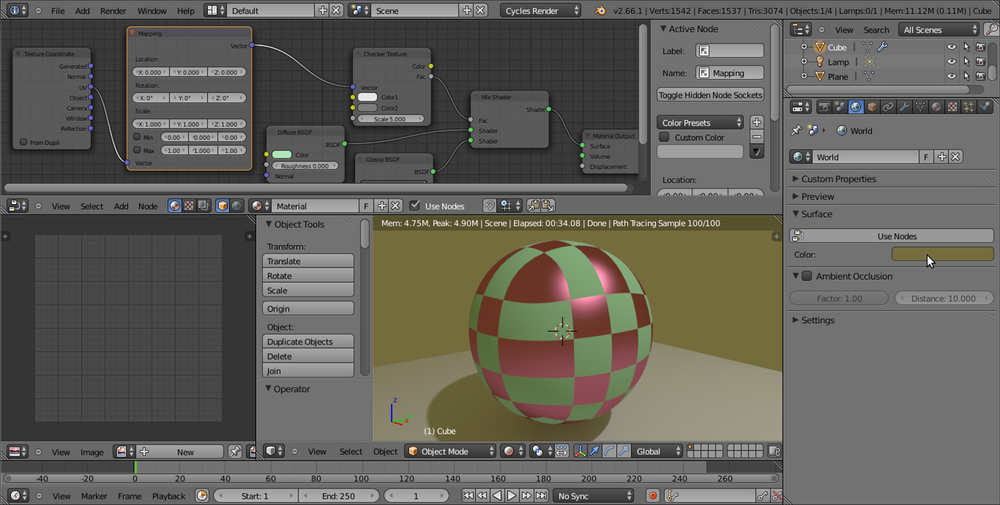
Look in the bottom header of the Node Editor window, on the left-hand side of the material datablock, there are two little icons: a little cube and a little world and, yes, the cube icon is used for creating materials, while the world icon is for the World window. At the moment, because we were working on the spheroid material, the cube icon is the one selected.
Click on the little world icon. The material's node disappears and the Node Editor window is empty now, because we entered the World mode. Check the little Use Nodes box on the right of the datablock to make a default world material appear. Or else, go to the World window under the Properties panel and click on the Use Nodes button under the Surface tab, as shown here:

Also, for the World, the default material is simply made up of two nodes: a Background node connected to a World Output node. In the Background node, there are two setting options: the Color box and the Strength slider, both of which are quite self-explanatory.
Go to the World window under the Properties panel and click on the little square with a dot to the right side of the Color slot. From the resulting menu, select the Sky Texture node item. This replicates a physical sky model, with an atmospheric Turbidity value slider and the Strength slider, as shown here:

Note that you can also modify the incoming direction of the light, that is, the location of the sun, by rotating the sphere icon inside the node interface.
Save the file as
start_06.blend.Click on the Color button, which is now labeled as Sky Texture under the Surface tab in the Properties panel and select the Environment Texture node to replace it:

Looking in the Rendered view, you'll see that the general lighting has turned to a pink color. This is to show that the World material is now using a texture to light the scene, but that at the moment there is no texture yet.
Click on the Open button both in the World window under the Properties panel or in the just added node inside the Node Editor window. Browse to the
texturefolder and load theBarce_Rooftop_C_3k.hdrimage (a free high dynamic range image licensed under the Creative Commons Attribution-Noncommercial-Share Alike 3.0 License from the sIBL Archive http://www.hdrlabs.com/sibl/archive.html).To better appreciate the effect, click on the little eye icon on the side of the Lamp item in the Outliner to disable its lighting. The spheroid is now exclusively lit by the
.hdrimage assigned to the World material. Actually, you can also see the image as a background in the Rendered preview. You can also rotate the viewport and watch the background texture, "pinned" to the World coordinates, rotate accordingly in real time.As for object's materials, the mapping of any texture you are going to use for the World can be driven by the usual Mapping and Texture Coordinates nodes we have already seen. Generally, for the World materials, only the Generated coordinates output should be used, and actually it's the one used by default if no mapping method is specified. Add the Mapping and Texture Coordinates nodes and connect them to the Vector input socket of the Environment Texture node, as shown in the following screenshot:

Save the file as
start_07.blend.
But now, let's imagine a case in which we want to assign a texture to the World material and use it for the general lighting of the scene, but we don't want it to show in the background of the render. That is, for example, we are using the hdr image to light the spheroid and the plane, but we want the two objects rendered on a uniform blue background, then how to do it? This is how we do it:
One way is to go in the Render window and, under the Film tab, check the Transparent option. This will show our spheroid and plane rendered both in the 3D viewport as well as in the effective final rendered image on a transparent background, that is, with a pre-multiplied alpha channel:

It's enough, then, to compose the rendered objects with a blue background image, both in an external image editing software (such as The Gimp, to stay inside F/OSS) or directly in the Blender compositor.
But the simplest way to render the two objects on a uniform blue background is to use a Light Path node:
If it's the case, uncheck the Transparent box in the Render window to restore the sky in the preview and in the render.
Left-click the World Output node in the Node Editor window, and press G and move it to the right.
Add a Mix Shader node (press Shift + A and select Shader |Mix Shader) and move it to the link connecting the Background node to the World Output node, to paste it automatically between the two nodes. Connect it to the Surface input socket of the World Output node.
Select the Background node in the Node Editor window. Press Shift + D to duplicate and move it down.
Connect its output to the second input socket of the Mix Shader node. Click on its Color box to change the color to
R 0.023,G 0.083, andB 0.179.Now, add a Light Path node (press Shift + A and go to Input | Light Path).
Connect the Is Camera Ray output of the Light Path node to the Fac input socket of the Mix Shader node, and voilà—the objects in the scene are lit by the
hdrimage connected to the first Background node, but they appear on a "sky" that is colored as set in the Color box of the second Background node:
Save the file as
start_08.blend.
To better explain this "trick", let's say we just created two different World materials: the first one with the texture and the second one with a plain light blue color (this is not literally true, actually the material is just one containing the nodes of both the "ideally" different worlds).
We mixed these two materials by using the Mix Shader node. The upper green socket is considered equal to a value of 0.000, while the bottom green socket is considered as a value of 1.000. As the name itself suggests, the Light Path node can set the path for the rays of light that, if you remember, are shot from the camera. Is Camera Ray means that only the rays directly shot from the camera have a value of 1.000, that is, not the reflected ones, or the transmitted ones, or whatever, which instead have a value of 0.000.
So, because the textured world is connected to a socket equal to the value 0.000, we don't see it directly as a background but only see its effect on the objects lit from the reflected light or from the hdr image. The blue sky world that is connected to the value 1.000 input socket instead shows as a background because the light rays shot from the camera directly hit the sky.
Just after the Surface tab, in the World window, there is the Ambient Occlusion (AO) tab. AO is a lighting method used to emphasize the shapes or the details of a surface, based on how much a point on that surface is occluded by the nearby surfaces. Although not exactly the same thing, AO can replace, in some cases, the Global Illumination effect. For example, to render interiors having fast and noise-free results, AO is a cheap way to get an effect that looks a bit like indirect lighting.
There is a checkbox to enable AO along with the following two sliders:
The Ambient Occlusion feature is only applied to the Diffuse BSDF component of a material. Glossy or Transmission BSDF components are not affected. Instead, the transparency of a surface is taken into account. For example, a half transparent surface will only half occlude the other surfaces.