
Because Moodle encourages interaction and exploration, your students' learning experience will often be non-linear. Moodle can enforce a specific order upon a course, using something called conditional activities. Conditional activities can be arranged in a sequence. Your course can contain a mix of conditional and non-linear activities.
In this section, I'll take you on a tour of a Moodle learning site. You will see a student's experience from the time the student arrives at the site, enters a course, and works through some material in the course. You will also see some student-to-student interaction, and some functions used by the teacher to manage the course. Along the way, I'll point out many of the features that you will learn to implement in this book, and how the demo site is using those features.
The front page of your site is the first thing that most users will see. This section takes you on a tour of the front page of a demonstration site.
Tip
Probably the best Moodle demo sites are http://demo.moodle.net/ and http://school.demo.moodle.net/. Many of the screenshots in this book are from http://school.demo.moodle.net. The contents of that site are graciously offered by Moodle Pty Ltd, under the Creative Commons Attribution-ShareAlike 3.0 Unported License.
When a visitor arrives at the demonstration learning site, the visitor sees the front page. You can require the visitor to register and log in before seeing any part of your site. Or, you can allow the anonymous visitor to see a lot of information about the site on the front page, which is what I have done in the following screenshot:

One of the first things that a visitor will notice is the announcement at the top and center of the page, Moodle 2.0 Book Almost Ready!. Below the announcement are two activities: a quiz, Win a Prize: Test Your Knowledge of E-mail History, and a chat room, Global Chat Room. Selecting either of these activities will require the visitor to register or log in with the site, as seen in the following screenshot:

Notice the line Some courses may allow guest access in the left column of the page. You can set three levels of access for your site and for individual courses, as follows:
Anonymous access allows anyone to see the contents of your site's front page. Notice that there is no anonymous access for courses. Everyone who enters a course must have a role in the system. However, there is a special role, called Guest, which is automatically given to any anonymous person.
Guest access allows the user to enter without logging in. This enables you to track usage by looking at the statistics for the user, Guest.
Registered access requires the user to register on your site. You can allow people to register with or without e-mail confirmation, require a special code for enrolment, manually create their accounts, import accounts from another system, or use an outside system (like a Lightweight Directory Access Protocol (LDAP) server) for your accounts. There's more on this in Chapter 2, Installing Moodle.
Returning to the front page, notice the Main menu in the upper left corner in the following screenshot. We added these two documents to the menu. They tell the user what the site is about, and how to use it:

In Moodle, the icons tell the user what kind of resource will be accessed by a link. In this case, the icon tells the user that the first resource is a PDF (Adobe Acrobat) document and the second is a Web page. Course material that a student observes or reads, such as web or text pages, hyperlinks, and multimedia files are called resources. In Chapter 5, Resources, Activities and Conditional Access, you will learn how to add resources to a course.
In the side bars of the page, you will find Blocks. For example, the Main menu, Calendar, and Tags blocks. You can choose to add a block to the front page, to all of the pages in the site, or to an individual course.
Other blocks display a summary of the current course, a list of courses available on the site, the latest news, who is online, and other information. At the bottom-right side of the front page, you see the Login block. Chapter 13, Extending your Course by Adding Blocks, tells you how to use these blocks.
On the right-hand side of the front page, you see a Site Description. This is optional. If this were a course, you could choose to display the Course Description.
The Site or Course Description can contain anything that you can put on a web page. It is essentially a block of HTML code that is displayed on the front page.
You can choose to display the available courses on the front page of your site. Looking at the screenshot a few pages back, you can see that in my demonstration site, I've chosen to display the available courses on the front page to anyone who visits the site. On the demonstration site run by Moodle, they have chosen to hide the courses from the users who are not logged in. Their front page displays the information about their site, and links that enable the visitors to proceed to the login page, as seen in the following screenshot:

When a course is displayed in a list, clicking on the information icon ![]() next to a course displays its Course Description in a popup window. Clicking on a course's name takes you into the course. If the course allows anonymous access, you are taken directly into the course. If the course allows guest access or requires registration, you are taken to the login screen.
next to a course displays its Course Description in a popup window. Clicking on a course's name takes you into the course. If the course allows anonymous access, you are taken directly into the course. If the course allows guest access or requires registration, you are taken to the login screen.
Now, let us take a look inside a course:

In the preceding screenshot, the user has logged in as Barbara Gardner and entered the Psychology in Cinema course. Notice the breadcrumbs trail (the Navbar) at the top-left corner of the screen, which tells us the name of the site and the short name of the course.
At the upper-right side of the screen, we see a confirmation that the user has logged in. That is not a part of the Navbar, but usually appears next to it.
Like the front page, this course uses various blocks. The most prominent one is the Navigation block on the left. Let's talk more about navigation:
The Navigation block shows you where you are and where you can go in the site. In the demonstration, you can see direct links to the topics in the course. This enables the student to jump to a topic that is much further down on the page, without scrolling.
At the bottom of the Navigation block is a link to the My courses page. Clicking this link displays the courses the student is enrolled in and notices if the student has anything due in those courses, as seen in the following screenshot:

We will cover how to create assignments in Chapter 7, Adding Assignments, Lessons, Feedback, and Choices.
Moodle enables you to organize a course by Week, in which case each section is labeled with a date instead of a number. Or, you can choose to make your course a single, large discussion forum. Most courses are organized by Topic, such as the one seen in the next screenshot:

Notice that the first topic is not numbered. Moodle gives you a Topic 0 to use as the course introduction.
Teachers can hide and show sections at will. This enables a teacher to open and close resources and activities as the course progresses.
Topics are the lowest level of organization in Moodle. The hierarchy is: Site | Course Category | Course Subcategory (optional) | Course | Section. Every item in your course belongs to a Topic, even if your course consists of only Topic 0.
Clicking on the link for a discussion takes the student into the forum. Clicking on a discussion thread opens that thread in the forum. You can see in the following screenshot that the teacher started with the first post. Then a student replied to the original post:

The student's message in the preceding screenshot doesn't serve our students. Fortunately, the teacher has editing rights to this forum, and so he or she can delete posts at will. The teacher can also rate posts for their relevance, as shown in the following screenshot:

Because Moodle supports an interactive, collaborative style of learning, students can also be given the ability to rate forum posts and the material submitted by other students. You'll find out more about forums in Chapter 9, Getting Social with Chats and Forums.
Next, the student will enter a workshop called Observing the Familiar.
In this workshop, the student writes and updates some defined observations. These observations are then rated by other students in the course. When the student first enters the workshop, he or she sees directions for completing the workshop, as seen in the next screenshot:

After reading these directions, the student continues to the workshop submission form, which is seen in the next screenshot:

Notice the online editor that the student uses to write the assignment. This gives the student basic What You See Is What You Get (WYSIWYG) features. The same word processor appears when the course creators create web pages, when students write online assignment entries, and at other times when a user is editing and formatting text.
Moodle can be configured to use several different kinds of editors. Depending upon your exact version and how your site administrator configures your site, yours might differ slightly from what is shown here.
We've been looking at Moodle from a student's perspective. Students usually don't edit course material. Let us see what happens when you turn on the editing mode to make changes.
When a Guest user or a registered student browses through your learning site, Moodle displays the pages normally. However, when someone with a course editing privilege enters a course, Moodle offers a button for switching into editing mode:
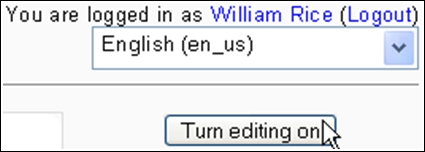
Clicking Turn editing on puts Moodle into editing mode:

Let's walk through the icons that become available in editing mode.
Clicking the edit icon ![]() enables you to edit whatever that icon follows. In this example, clicking the edit icon that follows the paragraph enables you to edit the section description:
enables you to edit whatever that icon follows. In this example, clicking the edit icon that follows the paragraph enables you to edit the section description:

Clicking the edit icon next to the quiz Win a Prize: Test Your Knowledge of E-mail History, takes you into the editing window for that quiz. In that window, you can create, add, and remove quiz questions, change the grading scheme, and apply other settings to the quiz.
Clicking the delete icon ![]() deletes whatever item the icon follows. If you want to remove an item from a course but are not sure if you'll want to use it later, don't delete the item. Instead, hide it from view. Hiding and showing is explained in the next paragraph.
deletes whatever item the icon follows. If you want to remove an item from a course but are not sure if you'll want to use it later, don't delete the item. Instead, hide it from view. Hiding and showing is explained in the next paragraph.
I call these the hidden/shown icons ![]() /
/![]() instead of hide/show because the icons indicate the current state of an item, instead of indicating what will happen when you click on them. The hidden icon indicates that an item is hidden from the students.
instead of hide/show because the icons indicate the current state of an item, instead of indicating what will happen when you click on them. The hidden icon indicates that an item is hidden from the students.
Clicking it shows the item to the students. The show icon indicates that an item is shown to the students. Clicking it hides the item from the students.
If you want to remove an item from a course while keeping it for later use, or if you want to keep an item hidden from students while you're working on it, hide it instead of deleting it.
These ![]()
![]()
![]() icons indicate what group mode has been applied to an item. Groups are explained in Chapter 12, Groups and Cohorts. For now, you should know that you can control access to items based upon what group a student belongs to. Clicking these icons enable you to change that setting.
icons indicate what group mode has been applied to an item. Groups are explained in Chapter 12, Groups and Cohorts. For now, you should know that you can control access to items based upon what group a student belongs to. Clicking these icons enable you to change that setting.
The course material that a student observes or reads, such as web or text pages, hyperlinks, and multimedia files are called resources. Course materials that a student interacts with, or that enables interaction among students and teachers, are called activities. Now, let us see how to add some resources and activities to your Moodle site or course.
In editing mode, you can add resources and activities to a course. Moodle offers more activities than resources, such as chat, forum, quiz, wiki, and more.
You add resources and activities by using the drop-down menu that appears in editing mode, as seen in the following screenshot:

Selecting an item brings you to the editing settings page for that type of item. For example, selecting URL displays the window seen in the following screenshot. Notice that you can do much more than just specify a hyperlink. You can give this link a user-friendly name, a summary description, open it in a new window, and more.

Every resource and activity that you add to Moodle has a description. This description appears when a student selects the item. Also, if the item appears in a list (for example, a list of all the resources in a course), the description will be displayed.
When building courses, you will spend most of your time in the edit settings pages for the items that you add. You will find their behavior and appearance to be very consistent. The presence of a description is one example of that consistency. Another example is the presence of the help icon ![]() next to the title of the window. Clicking this icon displays an explanation of this type of item.
next to the title of the window. Clicking this icon displays an explanation of this type of item.
Also, the edit settings pages are divided into sections. Some sections are present for almost every resource and activity that you add. These sections are covered once in this book, in order to avoid repetition.
The contents of the Administration menu change depending upon who is logged in. For example, the next screenshot shows the Administration menu when a student is in one of our courses:

The following screenshot shows the teacher's view of the Administration menu:

The choices on this menu apply to the course itself. If a teacher, administrator, or course creator selects an activity or resource in the course, the user is taken inside that activity/resource. Then, the Administration submenu for that item will appear. In the example seen in the following screenshot, the teacher has selected an assignment and is looking at the Administration submenu for that assignment:

This short tour introduced you to the basics of the Moodle experience. The following chapters take you through installing Moodle and creating courses. If you work through those chapters in order, you will discover many more features that are not mentioned in this tour. And, because Moodle is open source, new features can be added at any time. Perhaps you will be the one to contribute a new feature to the Moodle community.