

In this recipe we will learn how to use bump maps to distort the surface of an object or at least create the illusion of it.
Now the surface of our key is reacting in a realistic way to light, but it is still missing something. Every real key has got some word or pattern on it. To obtain this effect, we are going to add a bump texture at the key material in order to add these details on the surface.
These are the steps we are going to follow to create the bump for our material:
Let's go to our node editor and add a new node. To do this press Shift + A and go to Inputs | Texture Coordinate. This node will allow us to tell Cycles what kind of coordinate we want to use for the textures of our material. Now we need to add an Image Texture node. We will find it in the Textures section of the Add menu. Before we start to link the nodes, we need the last one. From the Vector section of the Add menu, add a Bump node.
Now let's link the UV output from the Texture Coordinate node to the Vector input of the Image Texture node and the Color output of the latter to the Height input of the Bump node. As a last linking we need to put the Normal output of the Bump node into the Normal input of both the Diffuse BSDF and Glossy BSDF nodes. We are almost ready, as we just need to add the image that we want to use as a bump map. To do this we need to click on the open image icon in the Image Texture node. From the file browser go to the
Chapter01/Blend/Texturesfolder and open theKey_Bump.pngimage.That's it! Looking at the real-time viewport we can see the bump map doing its work on the key surface. Without changing anything of the mesh geometry we can see really fine details, affecting the way the light reacts on the surface of the key.
There is one last thing to change. The strength of the bump node is definitely too much. To adjust this, let's change the Strength value of the Bump node to
0.030.
The final node setup of the key material will look like the following screenshot:
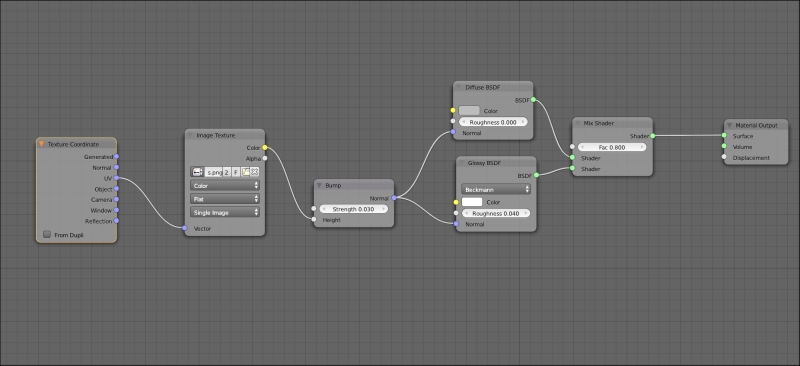
We used the Texture Coordinate node to tell the Image Texture node where to place the image on the surface of our key. Then with the Bump node we converted the black and white image information into vector information which is readable by the BDSFs.
When we use a bump map, Cycles will treat the surface as it would be lower in correspondence to the black areas of the image and higher in correspondence to the white ones. Of course all the grayscale in the middle will give information about the position of the surface. Taking this information in account, the BDSFs will calculate the behavior of the light bouncing on the surface of the object.
A bump map is a black and white image which contains information about the shape of the surface of an object. It is used to add details to a mesh without actually changing the geometry of it. This means that during the rendering process, Cycles will take to account the information taken from the bump map and make the light react accordingly even if the surface is actually flat. A bump map will not change the silhouette of the object, it will just fake the details on the surface. To actually change the geometry we need to use displacement, but we will cover this technique later on in the book, in Chapter 8, Creating a Car Animation, in the Creating the materials for the exterior environment recipe.