
So we've delved into getting and installing Slic3r, doing our initial printer calibration, printing our first print, and using Slic3r with other printer software. Where do we go from here? Well, right now our prints aren't the best in the world, there are some settings in Slic3r that could help make them better.
Open up Slic3r and go to the Print Settings tab. We're staying in the Simple mode for now, because it's easier to track the changes we make to the changes in our final print.
The Print Settings section is where a lot of changes will happen as we print. Let's go down the list of options in this section so we know what they are and why we might want to change them, sometimes from print to print.
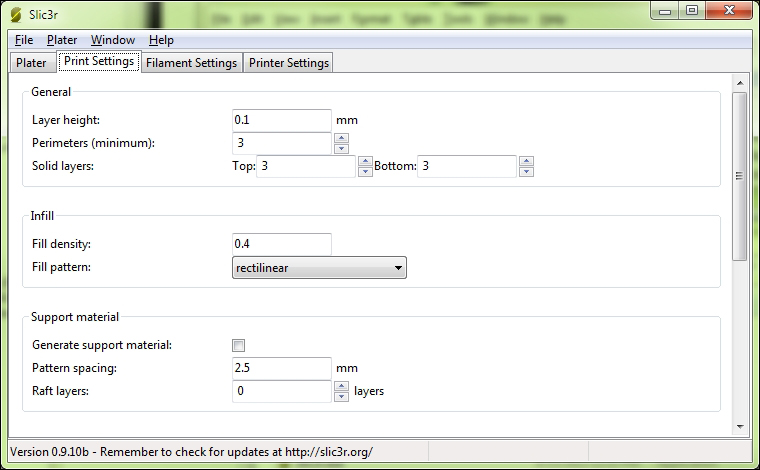
First up is Layer height option. The default layer height of 0.4mm is ok, assuming that we have a 0.5mm nozzle. So we can leave that for now.
If our nozzle is more than 0.5mm though, we will have a lot of squeeze out of our filament. So if our nozzle is larger, increase the size of the layer. 80 percent of the nozzle diameter is a good rule of thumb.
This also means that if we have a nozzle less than 0.5mm, we can make our layer height default smaller. Again, 80 percent of the nozzle diameter is a good starting place.
Depending on our object we are printing, the Perimeters (minimum) setting of 3 is good.
If there are gaps in the walls, especially of sloped surfaces, increasing the number of perimeters is something to try.
Next, Solid layers is the setting of how many layers Slic3r will tell the printer to fill completely at the top and the bottom of the print.
For the bottom layers, this will give the object a stable base that is less prone to warping.
For the top, the default of 3 layers is based on the extruded filament width, and how much coverage the filament will give as it gets to the top of the object.
For the Infill settings, a value of 0.15 for Fill density should stay, but change Fill pattern to honeycomb. It's a bit slower, but more stable.
This is how the inner part of the object is filled with plastic. Since filling the entire object uses a lot of plastic, and isn't needed, we set the infill settings.
Layer height, infill settings, perimeters, what does it all mean? Let's look into those settings and what they stand for, in more detail.
The layer height of the print means how thick each layer of plastic is deposited on the model. The thinner the layer, the smoother and more detailed the print can be.
We don't always want thin layers though. Some prints, such as for mechanical parts, or parts that will not be seen, can be done with thicker layer heights. If we're printing parts for a RepRap or another printer, the layer height can be thicker for the structural elements. It doesn't directly relate to the structural strength however. That would be covered in a moment when discussing the Perimeters and Infill settings.
For thicker layer heights, it's usually a good idea to have layers at or under your nozzle size. This is so the extruder will press the plastic into the layer below. If the layer height is higher, the plastic will have a chance to cool before touching the foundation layer, and also only have gravity to help weld the two layers together.
If we're printing objects for viewing, such as a statue or a decorative item, we'll usually want to go with thinner layer heights. This comes at the expense of printing speed, because the printer will now need to lay down more layers to complete the model. So finding a balance between looks and speed is something we will constantly juggle.
For very detailed objects, resolutions as low as 0.1mm have been achieved by some printers.
These make up the walls of the object. They are also important for adding stability to the object being printed. The Slic3r developers recommend a minimum of two perimeters for printing. Having at least two will help both the structure of the outside, and help to cover up imperfections in the print.
There is also a setting for solid layers. It is related to Perimeters, in that, it determines the number of solid layers at the top and the bottom of the print. The default setting for this is three perimeters.
For models that are not solid, set them with the Infill settings; having more than one top layer will help bridge any gaps in the model and will result in a better fill for the top of the model.
The default setting for Slic3r is for the three top and bottom layers to be solid. Depending on our model, and what we want to do with it, we can change this. Coming up is a hack for making hollow objects such as vases from normally solid objects.
Infill in our objects gives them stability. Too much infill, however, such as making our object solid, can not only cause printing issues, but also is a waste of plastic.
The Fill Density setting ranges from 0 to 1, with 0 being 0 percent, and 1 being 100 percent. The default setting for Fill Density is 40 percent, or 0.4 in the preference. This is a decent setting to start with, but for structural components, or ones that will depend on being rigid under stress, raising that up would be a good idea.
The developers suggest a minimum of 0.2 as the setting to support flat ceilings. Any lower, the top of your model is likely to sag inward.
The Fill Pattern is interesting. This setting is how Slic3r will tell our printer how to fill in the inside of our model. The honeycomb option is good for structure, but takes longer to print. The developers also recommend rectilinear and line for infill, but there are several others to choose from. A bit of experimentation will reveal what is best for what models we want to print.
Settings can be more than just settings. More than just a tool for making nicer quality prints. We can use some settings to alter the objects themselves, to make changes to the objects, and have it come out as what we want without having to touch the modeling software.
There are some interesting things you can do while printing models and changing these settings. For instance, if you set the Infill Fill Density to 0, and the Top setting of Solid layers to 0, you can make any object hollow with the top open.
We'll need to make sure the model can actually print this way, structurally. If it can, it is an interesting way to make custom vases or other open cupped objects. Having a higher setting on the Perimeters (minimum) will help some prints with this.