
We've talked about G-code at various points in this book. We know that it's the code that Slic3r produces and sends to the printer. What exactly is it though? How can we alter it directly to affect our prints? In this recipe, we'll look at a model sliced by Slic3r in order to better understand how our printer functions.
For this recipe, let's slice up one of our torture test files to look at. Let's take Snake by Zomboe (http://www.thingiverse.com/thing:4743) to look at.
We will slice the file and take a look at the generated G-code that Slic3r produces.
Load up Slic3r. For this example, we will use its GUI.
In the Output options on the Print Settings tab, check the box with Verbose G-code. We do this to get more information on what our G-code is doing, it turns on comments for all of the lines of G-code:

Slice our model, taking note where we saved it.
Open the sliced model into a text editor. The sliced model will be named
<filename>.gcode.
Now that we have our model sliced, let's take a look at it:
; generated by Slic3r 0.9.10b on 2013-08-07 at 08:28:44

; layer_height = 0.4
; perimeters = 3
; top_solid_layers = 3
; bottom_solid_layers = 3
; fill_density = 0.4
; perimeter_speed = 30
; infill_speed = 60
; travel_speed = 130
; nozzle_diameter = 0.5
; filament_diameter = 3
; extrusion_multiplier = 1
; perimeters extrusion width = 0.53mm
; infill extrusion width = 0.53mm
; solid infill extrusion width = 0.53mm
; top infill extrusion width = 0.53mm
; first layer extrusion width = 0.70mm

G21 ; set units to millimeters
M107 ; disable fan
M104 S200 ; set temperature
G28 ; home all axes
G1 Z5 F5000 ; lift nozzle

M109 S200 ; wait for temperature to be reached
G90 ; use absolute coordinates
G92 E0 ; reset extrusion distance
M82 ; use absolute distances for extrusion
G1 F1800.000 E-1.00000 ; retract
G92 E0 ; reset extrusion distance
G1 Z0.350 F7800.000 ; move to next layer (0)
G1 X55.204 Y56.037 ; move to first skirt point
G1 F1800.000 E1.00000 ; compensate retraction
G1 X56.044 Y55.197 F540.000 E1.03865 ; skirt
G1 X57.054 Y54.367 E1.08118 ; skirt
G1 X58.204 Y53.757 E1.12354 ; skirt
.
. <truncated for brevity>
.
G1 X114.772 Y113.057 F600.000 E1.01138 ; perimeter
G1 F1800.000 E0.01138 ; retract
G92 E0 ; reset extrusion distance
M107 ; disable fan
M104 S0 ; turn off temperature
G28 X0  ; home X axis
M84     ; disable motors

; filament used = 681.3mm (4.8cm3)

; avoid_crossing_perimeters = 0
; bed_size = 200,200
; bed_temperature = 0
.
. <truncated for brevity>
.
; wipe = 0
; z_offset = 0
The actual file is much longer than the one we have here, but this gives us a good section to look at. So what are we seeing here?
The first part, each line starting with a semi-colon (;) are comments. They tell us when the file was slice, and helpfully, what are the settings for. So if we have a file that we feel prints perfectly, but don't know what configuration we used, we can go back to the sliced file and get the settings again.
Note
The settings at the bottom of the sliced file are only available with Verbose G-code. The settings at the top of the file are there in normal mode.
In G-code, the semi-colon (;) stands for a comment. Comments can be on a line by themselves or as part of a line:
; first layer extrusion width = 0.70mm
M104 S0 ; turn off temperature
Once a comment is started though, it continues to the end of the line. This may be useful if we want to save a sliced file and add in notes of our own. We can also use post-processing scripts to add in G-code, and comments about what it does.
After the comments is a long set of lines with letters and numbers. The letters indicate the type of action that is to be performed, and the numbers indicate either the action itself, or the interval that is used in the action.
More information on 3D printing G-code can be found at the RepRap wiki (http://reprap.org/wiki/G-code). Though not all firmware support all of the G-codes listed there.
The following list contains the most common letters in our G-code file. They are listed in order of importance and frequency:
G: Prepares the machine for movement and the type of movement wanted.M: In G-codeMis an auxiliary function; in our case telling our printer to do something specific to 3D printing. This controls the heated bed, fan, extruder, and other 3D printing-specific mechanical parts.X,Y, andZ: These are for the location that the nozzle should go to at that point in the G-code. We will usually see X and Y together, with Z added when the hot end is raised or bed lowered, depending on our printer style.F: This is for the feed rate of our filament.E: Defines the precision for our feed rate. When coupled withF, it defines how our filament is extruded. A negative number means our filament is being extracted to prevent blobbing or threads of filament.S: In most G-code it defines the speed of the tool. When it is coupled with a code responsible for temperature, it defines the temperature for that part.
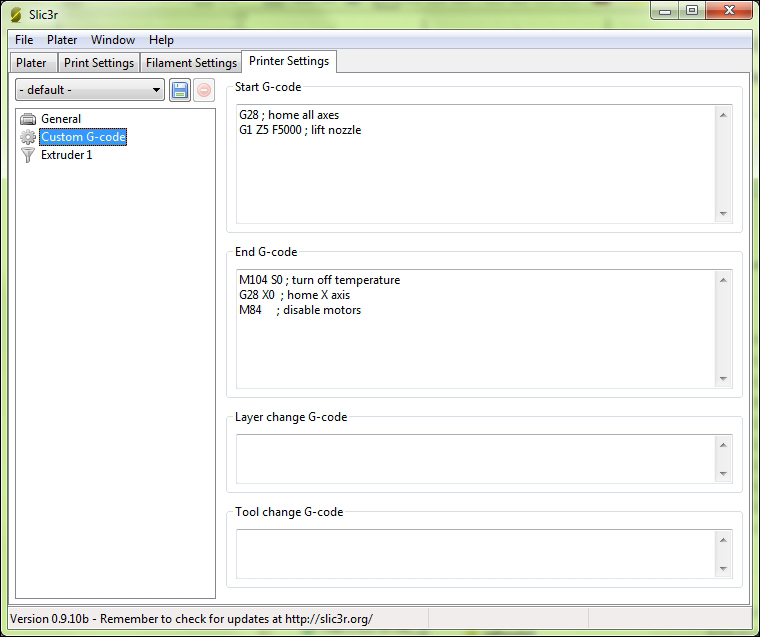
Slic3r also allows us to input extra G-code at the time of slicing. We can have it input code at the start of a print, the end of a print, each time a print layer is finished, and whenever a tool is changed (in our case, this means switching to a different extruder).
Note
Custom starting G-code commands are inserted after the temperature control codes for the heated bed and extruder.
These can be set in the Printer Settings tab under the Custom G-code selection. We see that Slic3r already puts in some G-code for us for the common printing tasks.