
If you have an Android device or are running an Android emulator, you could use a utility provided with the Android SDK itself called the adb. We will discuss adb more in the second chapter. For now, we will just set up the SDK and we are ready to go.
Once the device is connected via a USB, we could simply type in adb devices in our terminal, which will show us the list of serial number of the devices attached. Make sure you have also turned on USB debugging in your device settings.
$ adb devices
List of devices attached
emulator-5554   device
Tip
Downloading the example code
You can download the example code files for all Packt books you have purchased from your account at http://www.packtpub.com. If you purchased this book elsewhere, you can visit http://www.packtpub.com/support and register to have the files e-mailed directly to you.
Now, as we have seen before, Android is based on a Linux kernel, so most Linux commands would work perfectly fine on Android as well via an adb shell. The adb shell gives you a direct shell interaction with the device where you can execute commands and perform actions as well as analyze information present in the device. In order to execute the shell, simply need to type in the following command:
adb shell.
Once we are in the shell, we could run ps in order to list the running processes:
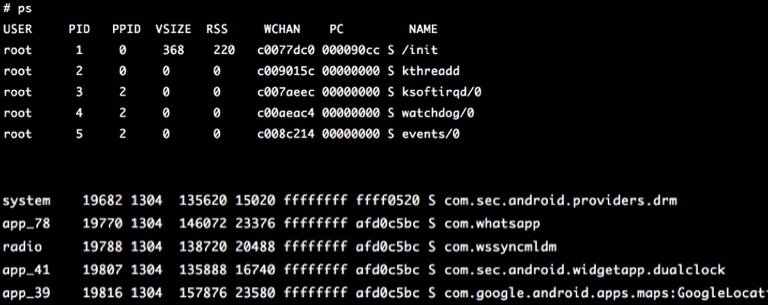
As you can see, ps will list all the processes currently running in the Android system. If you look carefully, the first column specifies the username. Here we can see a variety of usernames, such as system, root, radio, and a series of users with the initials app_. As you might have guessed, the processes running with the name of the system are owned by the system, root are running as root processes, radio are the processes related to telephony and radio, and app_ processes are all the applications the user has downloaded and installed on their device and are currently running. So, just like in Linux where a user identifies a unique user who is currently logged in to the system, in Android, a user identifies an application/process that is running in its own environment.
So, the core of the Android security model is Linux privilege separation. Every time a new application is initiated in the Android device, it is assigned a unique User ID (UID), which will further belong to some or the other group that is pre-defined.
Similar to Linux, all the binaries that you use as commands are located at /system/bin and /system/xbin. Also, the application's data that we install from the Play Store or any other source will be located at /data/data, whereas their original installation file, that is, .apk will be stored at /data/app. Also, there are some applications that need to be purchased from the Play Store instead of just downloading it for free. These applications will be stored at /data/app-private/.
Android Package (APK) is the default extension for the Android applications, which is just an archive file that contains all the necessary files and folders of the application. We will go ahead and reverse engineer the .apk files as well in the coming chapters.
Now, let's go to /data/data and see what is in there. An important point to note here is in order to do this on a real device, the device needs to be rooted and must be in the su mode:
# cd /data/data
# ls
com.aditya.facebookapp
com.aditya.spinnermenu
com.aditya.zeropermission
com.afe.socketapp
com.android.backupconfirm
com.android.browser
com.android.calculator2
com.android.calendar
com.android.camera
com.android.certinstaller
com.android.classic
com.android.contacts
com.android.customlocale2
So, what we see here, for example, com.aditya.facebookapp, are individual application folders. Now, you may wonder why, instead of having common folder names such as FacebookApp or CameraApp, it is written in a style of words separated by dots. So, these folder names specify the package name of the individual applications. Package name is a unique identifier that applications are identified by on the Play Store as well as the device. For example, there might be a number of camera applications or calculator applications with the same name. Hence, in order to uniquely identify different applications, the package name convention is used instead of the normal application names.
If we go inside any of the application folders, we would see different subfolders, such as files, databases, and cache, which we will be looking at later on in the Auditing Android applications section, of Chapter 3, Reversing and Auditing Android Apps.
shell@android:/data/data/de.trier.infsec.koch.droidsheep # ls
cache
databases
files
lib
shell@android:/data/data/de.trier.infsec.koch.droidsheep #
An important thing to note here is that if the phone is rooted, we could modify any of the files present in the filesystem. Rooting a device means we have full access and control over the entire device, which means we could see as well as modify any files we wish.
One of the most common security protections most people think of is the pattern lock or the pin lock present by default in all Android phones. You could set up your own pattern by navigating to Settings | Security | Screen Lock.
Once we have set up the password or pattern lock, we will now go ahead and connect the phone with a USB to our system. Now, the password lock key or pattern lock pattern data is stored at /data/system with the name password.key or gesture.key. Note that, if the device is locked, as well as the USB debugging is turned on, you will need a custom bootloader to turn the USB debugging on. The entire process is beyond the scope of this book. To learn more about Android, refer to Defcon presentation by Thomas Cannon Digging.
Since cracking the password/pattern will be tougher and would need brute force (we will see how to decrypt the actual data later on), we will simply go ahead and remove the file, and that will remove the pattern protection for us from the phone:
shell@android:/data # cd /data/system
shell@android:/data/system # rm gesture.key
So, as we can see that once the phone is rooted, almost anything could be done with the phone with just a USB cable and a system. We will see more about USB-based exploitation in the upcoming chapters of this book.