
The two packages that you'll add here are a core vision package called OpenCV and a core voice recognition package called pocketsphinx. It's up to you whether to use them or not, but allowing your robot to see, hear, and speak seems like it should be a part of any robotics project, so adding them now will make them easier to use later. Let's start with OpenCV.
First, when you created your SD card, you copied an image to your card. So now, your card thinks it is only the size of the image that you copied, no matter what size it really is. You'll need to reclaim this space.
To do this, you'll need to issue some fairly cryptic commands, but fortunately, you'll be able to use the defaults, so it will be straightforward. First, open a terminal window. The card I am using is an 8 GB card, so if your card is of a different size, don't be worried if you don't see the exact numbers as you see here. Fortunately, you'll be using default values throughout the process, so you won't need to know anything special about your card. To begin with, type sudo su and enter your password.
Then follow the following steps:
Type
ll /dev/mmcblk*and you should see something like this:
Now you are going to make changes to the
mmcblk0device. Typefdisk /dev/mmcblk0.Enter the
pcommand and you should see something like this:
You're now going to expand the second device,
/dev/mmcblk0p2. To do this, delete the partition and create a new partition. The information that exists on your SD card should, however, be preserved during this process. Enterdin the prompt and enter2for the second partition. Now enterpagain and you should see something like this:
You will now create a new partition using defaults so that the partition takes up the entire card. In the command prompt, type
n, thenp, then2, and then hit Enter through each choice that the programs request. Your device should now appear like this: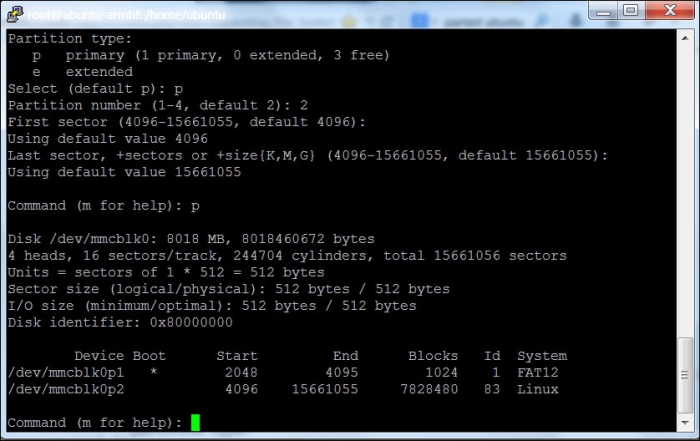
Notice that the second partition is now much larger than the original.
Type
wto commit your changes. Now you need to reboot, so typereboot.The final step will expand the filesystem. After the system reboots, type
sudo suand enter your password. Now typedf. You should see something like this:
It's the
/dev/mmcblk0p2device that you want to resize. Typeresize2fs /dev/mmcblk0p2and then enterdf. You should see the following:
Now that you have installed your operating system and expanded your storage device, your BeagleBone Black is ready to use.
Now you'll install OpenCV, an open source library of image processing and a web camera that provides access capabilities you'll use on these projects.
First, you'll need to download a set of libraries and the OpenCV itself. There are several possible steps; I'm going to suggest one that I followed to install it on my system. Once you have booted the system and opened a terminal window, type the following commands in the same order as they have been explained:
sudo apt-get install build-essential: You are going to need this library as it provides a set of essential build tools.sudo apt-get install libavformat-dev: This library provides a way to code and decode audio and video streams.sudo apt-get install libcv2.4 libcvaux2.4 libhighgui2.4: These are the basic OpenCV libraries. Note the number at the end of each of these library specifications; this will almost certainly change as new versions of OpenCV become available. If Version 2.4 does not work, go to opencv.org to find the latest version of OpenCV.sudo apt-get install python-opencv: This is the Python development kit for OpenCV. It is needed as you are going to use some Python code; it's the easiest language to use with this functionality.sudo apt-get install opencv-doc: This is the documentation for OpenCV, just in case you need it.sudo apt-get install libcv-dev: This provides a set of header files used to compile OpenCV.sudo apt-get install libcvaux-dev: This provides a translator for certain tool sets.sudo apt-get install libhighgui-dev: This provides a set of header files used to compile OpenCV, especially the GUI.cp -r /usr/share/doc/opencv-doc/examples: Execute this command in your home directory; this will copy all the examples to your home directory.
Now you're ready to try out the OpenCV library. I prefer to use Python when programming simple tasks, so I used the Python examples. If you prefer the C examples, feel free to explore. In order to use the Python examples, you'll need one more library. So type sudo apt-get install python-numpy as you will need this to manipulate the matrices that OpenCV uses to hold the images you will get from your webcam.
Now that you have those, you can try one of the Python examples. Change the current directory to that of the Python examples by typing cd /home/ubuntu/examples/python. In this directory, you will find a number of useful examples; you only need to look at the most basic example, called camera.py. You can try running this example, but you'll need to connect a USB web camera, reboot, bring up a VNC server connection, bring up a terminal window, and type python camera.py. You should see something like this:

In my case, the camera window eventually turned black and did not show the output from the camera. I realized that I needed to change the resolution of the image to one that is supported by the camera and OpenCV. To do this, you need to edit the camera.py file, adding two lines like this:

These two lines, cv.SetCaptureProperty(capture, 3, 360) and cv.SetCaptureProperty(capture, 4, 240), change the resolution of the captured image to 360 x 240 pixels. Now run camera.py and you should see this:

Your project can now see! You will use this capability to do a number of impressive tasks that will use this video input.
The second piece of open source infrastructure that you'll add now is the voice recognition software—pocketsphinx. To make it work, you'll need to purchase a USB sound card, as the BeagleBone Black does not have an audio in/out provision. You'll also need to purchase a microphone and speaker to attach to your USB sound card. Connect these, and reboot the system. You're now ready to install the software.
You can do this over the LAN connection via an SSH terminal window, so as soon as your board flashes that it has power (look out for the heartbeat LED), open up an SSH terminal window using PuTTY or some similar terminal emulator. Once the terminal window comes up, log in with your username and password. Now type cat /proc/asound/cards. You should see the following response:

Notice that the system thinks there are two possible audio devices. The first is the HDMI sound device and the second is your USB audio card. Now you can use the USB card to both create and record sound.
First, let's get some music going. This will let you know that your USB sound device is working. You'll need to first configure your system to look for your USB card and play and record some sounds from there as default. To do this, you'll need to add a couple of libraries to your system:
The first are some ALSA libraries. ALSA stands for Advanced Linux Sound Architecture, but all you really need to know is that it enables your sound system on the BeagleBone Black. First, install two libraries associated with ALSA by typing
sudo apt-get install alsa-base alsa-utils.Then also install the library include files by typing
sudo apt-get install libasound2-dev. This will install the basic capability that you need.Now you can use an application called alsamixer to control the volume of both the input and the output of your USB sound card. Type
sudo alsamixerin the prompt. You should see a screen like this:
Press F6, and select your USB sound device using the arrow keys. The screen should now appear like this:

You can use the arrow keys to set the volume for both the speakers and the mic. Make sure you use the M key to unmute the microphone.
Now make sure that your system knows about your USB sound device. In the prompt, type
sudo aplay –l. You should see the following:
Once you have added the libraries, add a file to your home directory by the name
.asoundrc. This will be read by your system and used to set your default configuration. Using your favorite editor, create the.asoundrcfile and insert the following in it:
The line to be added is
pcm.!default sysdefault:Device. This will tell the system to use our USB device as a default.Now that your system is ready, record some sound and play it. To do this, use the
arecordprogram. In the prompt, typearecord -d 5 -r 48000 test.wav. This will record 5 seconds of a sound at a 48,000 sample rate.Once you've typed the command, then either speak into the microphone or make some other recognizable sound. After 5 seconds, you should be able to play the sound.
Type
aplay test.wav, and you should hear the recording of your voice.
If you can't hear your recording, check alsamixer to make sure your speakers and microphone are both unmuted.