

Ok, first of all, we should set up the networking settings, since we are going to download a lot of software packages. The Ethernet cable should be plugged into the BeagleBone Black's Ethernet connector and the other end should be connected to the LAN switch. If the connection works, we should see the following line in the BeagleBone Black's kernel messages:
libphy: 4a101000.mdio:00 - Link is Up - 100/Full
Tip
Let me remind you that you can use either the tail -f /var/log/kern.log or dmesg command to see the kernel messages.
We can avoid using an Ethernet connection with a network trick; in fact, the host PC can be used as a gateway, for the BeagleBone Black, that can access the Internet using the USB cable. In the host, we can use the following commands:
# iptables --table nat --append POSTROUTING --out-interface eth1 -j MASQUERADE
#  iptables --append FORWARD --in-interface eth4 -j ACCEPT
# echo 1 >> /proc/sys/net/ipv4/ip_forward
Then, on the BeagleBone Black, we can set the gateway through the USB cable using the following command:
root@beaglebone:~# route add default gw 192.168.7.1
The eth1 device is the preferred Internet connection on the host system, while the eth4 device is the BeagleBone Black's device as viewed on the host system, as already seen earlier.
If we have a DHCP server installed in our LAN, the eth0 interface should automatically display an IP address. Here is what I get on my LAN:
root@BeagleBone:~# ifconfig eth0
eth0      Link encap:Ethernet  HWaddr 78:a5:04:ca:c9:fe
          inet addr:192.168.32.30  Bcast:192.168.32.255 Mask:255.255.255.0
          inet6 addr: fe80::7aa5:4ff:feca:c9fe/64 Scope:Link
          UP BROADCAST RUNNING MULTICAST  MTU:1500  Metric:1
          RX packets:143 errors:0 dropped:0 overruns:0 frame:0
          TX packets:136 errors:0 dropped:0 overruns:0 carrier:0
          collisions:0 txqueuelen:1000
          RX bytes:23623 (23.0 KiB)  TX bytes:19576 (19.1 KiB)
          Interrupt:40
However, if the DHCP server is up and running, but for some mystic reasons, this magic doesn't happen, we can force it using the following command:
root@BeagleBone:~# dhclient eth0
On the other hand, if the DHCP server is not working at all, we can use a static configuration by altering the /etc/network/interfaces file by adding the following lines:
iface eth0 inet static
    address 192.168.32.30
    netmask 255.255.255.0
    network 192.168.32.0
    gateway 192.168.32.8
Next, we need to add the DNS settings to the /etc/resolv.conf file by adding the following lines:
nameserver 94.249.192.104
nameserver 8.8.8.8
Tip
Note that the IP/DHCP addresses mentioned in the commands are user specific. You should change them so that they match your settings.
When all the modifications are in place, we should restart the networking activities:
root@BeagleBone:~# /etc/init.d/networking restart
Now we are ready to verify that the network settings are set correctly by trying to update the software repositories with the following command:
root@BeagleBone:~# aptitude update
Get: 1 http://security.debian.org wheezy/updates Release.gpg [836 B]
Get: 2 http://ftp.us.debian.org wheezy Release.gpg [1,655 B]
Get: 3 http://debian.beagleboard.org wheezy-bbb Release.gpg [490 B]
Get: 4 http://security.debian.org wheezy/updates Release [102 kB]
...
Get: 38 http://ftp.us.debian.org wheezy-updates/main 2014-06-16-2054.31.pdiff [5
01 B]
Fetched 20.1 MB in 35s (561 kB/s)

Current status: 78 updates [+78], 2 new [+2].
There is 1 newly obsolete package: libmozjs10d
Here, the system tells you that just one package is obsolete, and there are some new packages to be installed, so you can either leave all of them untouched or decide to upgrade everything. In the latter case, we can use the following command:
root@BeagleBone:~# aptitude upgrade
The following packages will be upgraded:
  acpi-support-base apache2 apache2-mpm-worker apache2-utils apache2.2-bin
  apache2.2-common apt apt-utils base-files bash BeagleBone bind9-host curl
  dbus dbus-x11 dpkg dpkg-dev file gnupg gpgv libapt-inst1.5 libapt-pkg4.12
  libavcodec-dev libavcodec53 libavformat-dev libavformat53 libavutil-dev
  libavutil51 libbind9-80 libc-bin libc-dev-bin libc6 libc6:armel libc6-dev
  libcups2 libcurl3 libcurl3-gnutls libdbus-1-3 libdbus-1-dev libdns88
  libdpkg-perl libgnutls26 libgssapi-krb5-2 libisc84 libisccc80 libisccfg82
  libjpeg-progs libjpeg8 libjpeg8-dev libk5crypto3 libkrb5-3
  libkrb5support0 liblcms2-2 liblwres80 libmagic1 libnspr4 libnss3

  libsmbclient libsoup-gnome2.4-1 libsoup2.4-1 libssl-dev libssl-doc
  libssl1.0.0 libswscale-dev libswscale2 libwbclient0 libxfont1 libxml2
  libxml2-dev libxml2-utils linux-libc-dev locales multiarch-support
  openssh-client openssh-server openssl rsyslog tzdata
The following packages are RECOMMENDED but will NOT be installed:
  bash-completion gnupg-curl gnupg-curl:armel krb5-locales
78 packages upgraded, 0 newly installed, 0 to remove and 0 not upgraded.
Need to get 53.2 MB of archives. After unpacking 159 kB will be freed.
Do you want to continue? [Y/n/?]
A lot to do here. For the moment, I decide to leave the system untouched. So, I just answer no by typing n.
Now let's see how to set up a proper LAMP suite.
First of all, we should drop the Bone101 service in order to free port 80, which is the World Wide Web's default port:
root@BeagleBone:~# systemctl stop bonescript.socket
root@BeagleBone:~# systemctl disable bonescript.socket
rm '/etc/systemd/system/sockets.target.wants/bonescript.socket'
Ok. Now, to test whether port 80 is really free, we type the following command and echo it to be sure of its status:
root@BeagleBone:~# netstat -pln | grep ':80\>' || echo "OK."
OK.
Now, we can switch the Apache web server from port 8080 to port 80 by altering the first lines of the /etc/apache2/sites-enabled/000-default file as follows:
--- 000-default.orig  2014-04-23 20:21:56.619140638 +0000
+++ 000-default  2014-10-10 20:00:21.752090984 +0000
@@ -1,4 +1,4 @@
-<VirtualHost *:8080>
+<VirtualHost *:80>
   ServerAdmin webmaster@localhost

   DocumentRoot /var/www
Then, replace all the 8080 occurrences with the string 80 in the /etc/apache2/ports.conf file as follows:
--- ports.conf.orig  2014-04-23 20:23:46.623046902 +0000
+++ ports.conf  2014-04-23 20:24:01.580078153 +0000
@@ -5,8 +5,8 @@
 # Debian etch). See /usr/share/doc/apache2.2-common/NEWS.Debian.gz and
 # README.Debian.gz

-NameVirtualHost *:80
-Listen 80
+NameVirtualHost *:8080
+Listen 8080

 <IfModule mod_ssl.c>
     # If you add NameVirtualHost *:443 here, you will also have to change
Now that all the modifications are done, we will now restart the server. To do so, we will use the following command:
root@BeagleBone:~# /etc/init.d/apache2 restart
[....] Restarting apache2 (via systemctl): apache2.service. ok
Once the server has been restarted, we will check whether the server is in the listening state. To do this, we will type the following command:
root@BeagleBone:~# netstat -pln | grep ':80\>'
tcp6       0      0 :::80                   :::*             LISTEN
2367/apache2
Ok, we did it! You can now repoint your browser to the default port 80 to verify that everything is working correctly.
Now, we can verify that the Apache PHP support is working by adding a simple PHP file to the DocumentRoot directory /var/www, as specified in the /etc/apache2/sites-enabled/000-default configuration file:
root@BeagleBone:~# cd /var/www/
root@BeagleBone:/var/www# cat > test.php <<EOF
<?php
phpinfo();
?>
EOF
Tip
The <<EOF trick used in the preceding command is often used when we need to supply one or more commands to a program directly to its standard input line (stdin). Using such a syntax, we tell the Bash shell to send the lines to the command itself and the line that holds the EOF characters directly to stdin of the executed command.
Now, if we point the browser to the URL http://192.168.7.2/test.php, we'll most probably get a blank page. This means that Apache lacks the PHP support, so let's install it:
root@BeagleBone:~# aptitude install libapache2-mod-php5 apache2-mpm-worker- apache2-
The following NEW packages will be installed:
  apache2-mpm-prefork{a} libapache2-mod-php5 libonig2{a} libqdbm14{a}
  lsof{a} php5-cli{a} php5-common{a}
The following packages will be REMOVED:
  apache2 apache2-mpm-worker
The following packages will be upgraded:
  apache2.2-bin apache2.2-common
2 packages upgraded, 7 newly installed, 2 to remove and 74 not upgraded.
Need to get 6,748 kB of archives. After unpacking 14.4 MB will be used.
Do you want to continue? [Y/n/?]
Tip
Don't forget the sign—after apache2-mpm-worker and apache2 because this means that we want to uninstall these packages, as they are incompatible with the apache2-mpm-prefork package.
You may discover the difference between the apache2-mpm-worker and apache2-mpm-prefork packages by surfing the net.
Get: 1 http://ftp.us.debian.org/debian/ wheezy/main lsof armhf 4.86+dfsg-1 [315
kB]
Get: 2 http://security.debian.org/ wheezy/updates/main php5-common armhf 5.4.4-1
4+deb7u14 [589 kB]...
Setting up php5-common (5.4.4-14+deb7u14) ...
Setting up apache2-mpm-prefork (2.2.22-13+deb7u3) ...
[....] Starting apache2 (via systemctl): apache2.service. ok
Setting up libonig2 (5.9.1-1) ...
Setting up libqdbm14 (1.8.78-2) ...
Setting up libapache2-mod-php5 (5.4.4-14+deb7u14) ...

Creating config file /etc/php5/apache2/php.ini with new version
[....] Restarting apache2 (via systemctl): apache2.service. ok
Setting up php5-cli (5.4.4-14+deb7u14) ...
We can update the alternatives using /usr/bin/php5 to provide /usr/bin/php (php) in auto mode. Note that during this procedure, we may get a lot of errors, which are as follows:
insserv: Starting led_aging.sh depends on rc.local and therefore on system facil
ity `$all' which can not be true!
insserv: Max recursions depth 99 reached
insserv:  loop involving service udhcpd at depth 2
insserv: There is a loop between service rc.local and mountall-bootclean if star
ted...
dpkg: error processing apache2-mpm-worker (--configure):
 dependency problems - leaving unconfigured
Errors were encountered while processing:
 apache2.2-common
 apache2
 apache2-mpm-worker
Don't panic! Just replace the /etc/init.d/led_aging.sh file with the following code:
#!/bin/sh -e
### BEGIN INIT INFO
# Provides:          led_aging.sh
# Required-Start:    $local_fs
# Required-Stop:     $local_fs
# Default-Start:     2 3 4 5
# Default-Stop:      0 1 6
# Short-Description: Start LED aging
# Description:       Starts LED aging (whatever that is)
### END INIT INFO

x=$(/bin/ps -ef | /bin/grep "[l]ed_acc")if [ ! -n "$x" -a -x /usr/bin/led_acc ]; then/usr/bin/led_acc &fi
Tip
Downloading the example code
You can download the example code files from your account at http://www.packtpub.com for all the Packt Publishing books you have purchased. If you purchased this book elsewhere, you can visit http://www.packtpub.com/support and register to have the files e-mailed directly to you.
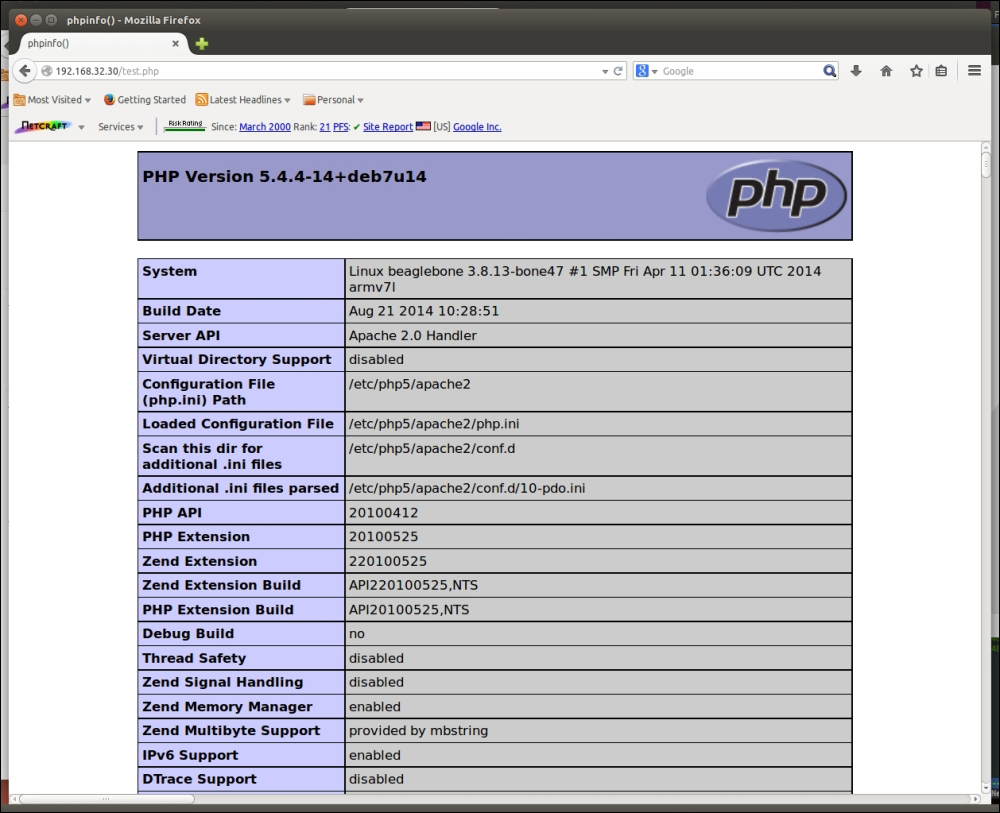
Ok. Now we can test the PHP support by reloading the URL http://192.168.7.2/test.php. The output should be something similar to the following screenshot:
Now the last step is to add the MySQL database server and the corresponding PHP support.
Installing the MySQL server is quite easy:
root@BeagleBone:~# aptitude install mysql-server mysql-client
Type the preceding command and proceed with the installation as mentioned earlier, and when the system asks for an administrative password for the database of the root user (don't confuse this MySQL user with the system's root user!), we should create one.
Tip
It may happen that some strange characters are displayed on the serial terminal; don't panic, it's just a display issue. We can ignore them and enter the desired root's password.
Also, note that you can install the mysql-client packet too to be able to manage the database settings from the command line.
When finished, the system should display this:
Setting up libhtml-template-perl (2.91-1) ...
Setting up mysql-client (5.5.38-0+wheezy1) ...
Setting up mysql-server (5.5.38-0+wheezy1) ...
This means that the MySQL server is up and running. We can easily test it by running the following command, again using the preceding <<EOF trick:
root@BeagleBone:~# mysql -u root -p <<EOF
show databases;
EOF
The system will ask for the database's root password to be inserted during the installation by showing the following line:
Enter password:
Then, if the password is correct, the output will be as follows:
Database
information_schema
mysql
performance_schema
If we get the preceding output, it means that we did it! This means that the installation was successful. However, the PHP still lacks the MySQL support; in fact, if we add the following code to the mysql_test.php file in the /var/www directory (as done earlier for the test.php file):
<?php
        # Check the PHP's MySQL support
        if (!function_exists("mysql_connect"))
                die("MySQL support missing!");

        # Get connect with the MySQL server.
        # Don't forget to replace the following string "ROOTPASS" with
        # the database's root password you choose during the installation!!!
        $connect = mysql_connect("localhost", "root", "ROOTPASS")
                or die("Unable to Connect");
        mysql_select_db("information_schema")
                or die("Could not open the db");

        # Do a simple query
        $showtablequery = "SHOW TABLES FROM information_schema";
        $query_result = mysql_query($showtablequery);

        # Let's display the result!
        while($row = mysql_fetch_array($query_result))
                echo $row[0] . " ";
?>
Then, pointing the web browser to the URL http://192.168.32.30:8080/mysql_test.php, we will see an error message as follows:
MySQL support missing!
So, to install PHP's MySQL support, use the following command:
root@BeagleBone:~# aptitude install php5-mysql
If we try reloading the preceding URL, we will not see the error messages anymore but the following text:
CHARACTER_SETS COLLATIONS COLLATION_CHARACTER_SET_APPLICABILITY COLUMNS COLUMN_PRIVILEGES ENGINES EVENTS FILES GLOBAL_STATUS GLOBAL_VARIABLES KEY_COLUMN_USAGE PARAMETERS PARTITIONS PLUGINS PROCESSLIST PROFILING REFERENTIAL_CONSTRAINTS ROUTINES SCHEMATA SCHEMA_PRIVILEGES SESSION_STATUS SESSION_VARIABLES STATISTICS TABLES TABLESPACES TABLE_CONSTRAINTS TABLE_PRIVILEGES TRIGGERS USER_PRIVILEGES VIEWS INNODB_BUFFER_PAGE INNODB_TRX INNODB_BUFFER_POOL_STATS INNODB_LOCK_WAITS INNODB_CMPMEM INNODB_CMP INNODB_LOCKS INNODB_CMPMEM_RESET INNODB_CMP_RESET INNODB_BUFFER_PAGE_LRU
Just a few years ago, the native compilation of programs on the target embedded system was previously unheard of, but the latest CPUs are now really powerful and both the RAM and storage (Flash, MMC, and so on.) memories are quite large to support native compilations. The BeagleBone hardware is capable of handling native compilations with ease although in terms of compilation time, it is more practical to cross-compile for larger projects or use the kernel (that's why we will show you how to install a cross-compiler on the host PC in the last section of this chapter).
The command to install the GGC suite is as follows:
root@BeagleBone:~# aptitude install gcc make
Tip
On my system, the preceding packages are already installed; in this case, the preceding command will give an answer to us as follows:
No packages will be installed, upgraded, or removed.
0 packages upgraded, 0 newly installed, 0 to remove and 74 not upgraded.
Need to get 0 B of archives. After unpacking 0 B will be used.
To check whether the compiler is working, we can consider compiling the classic Hello World C program. To do so, just insert the following code into a file called helloworld.c:
#include <stdio.h>

int main(int argc, char *argv[])
{
        printf("Hello World!\n");

        return 0;
}
Now we can compile it using the following command:
root@BeagleBone:~# make CFLAGS="-Wall -O2" helloworld
cc -Wall -O2    helloworld.c   -o helloworld
To execute the new program, type the following line:
root@BeagleBone:~# ./helloworld
Hello World! If it prints Hello World, then our code has been executed successfully!