

At the heart of the Pi is the Broadcom BCM2835 System on a Chip (SOC)—imagine all the common hardware components of a PC baked into a small chip. The CPU is called ARM1176JZF-S, runs at 700 MHz, and belongs to the ARM11 family of the ARMv6 architecture. For graphics, the Pi sports a Broadcom VideoCore IV GPU, which is quite powerful for such a tiny device and capable of full HD video playback. The following figure shows the Raspberry Pi Model B:
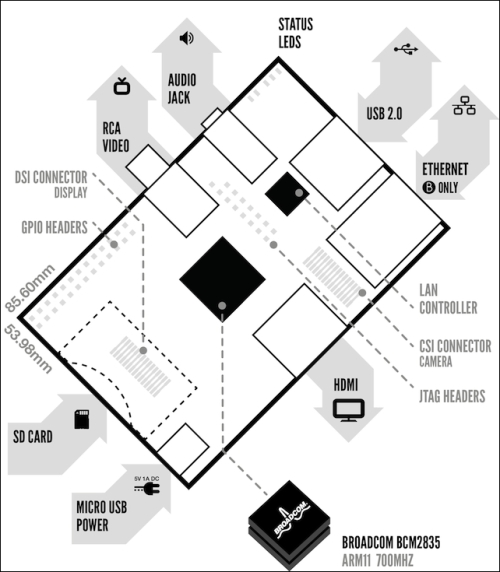
Raspberry Pi Model B board showing key components
At the edge of the board, we find the General Purpose Input/Output (GPIO) pins, which, as the name implies, can be used for any kind of general tinkering and to interface with other pieces of hardware.
The RCA video jack is for composite video output, which we can use to connect the Pi to one of those old television sets using an RCA connector cable. On the Model B+, this connector has been combined with the audio jack.
We can get sound out of the Pi, either through the HDMI cable connected to a monitor, or from this 3.5 mm analog audio jack using headphones or desktop speakers.
Status LEDs are used to tell us what the Pi is up to at the moment. They have the following meanings:
The USB 2.0 ports allow us to connect keyboards, mice, and most importantly for us, Wi-Fi dongles, microphones, video cameras, and GPS receivers. We can also expand the number of USB ports available with the help of a self-powered USB hub.
The Ethernet port allows us to connect the Pi to a network at a maximum speed of 100 Mbit/s. This will most commonly be a home router or a switch, but it can also be connected directly to a PC or a laptop. A Category 5 twisted-pair cable is used for wired network connections.
The Camera Serial Interface (CSI) is where the official Raspberry Pi camera module connects to using a flexible flat cable.
The High-Definition Multimedia Interface (HDMI) connector is used to connect the Pi to a modern TV or monitor. The cable can carry high-resolution videos up to 1920 x 1200 pixels and digital sound. It also supports a feature called Consumer Electronics Control (CEC), which allows us to use the Pi as a remote control for many common television sets.
The power input on the Raspberry Pi is a 5V (DC) Micro-USB Type B jack. A power supply with a standard USB to micro-USB cable, such as a common cell phone charger, is then connected to feed the Pi.
Note
The most frequently reported issues from Raspberry Pi users are without a doubt those caused by insufficient power supplies and power-hungry USB devices. Should you experience random reboots, or that your Ethernet port or attached USB device suddenly stops working, it's likely that your Pi is not getting enough stable power.
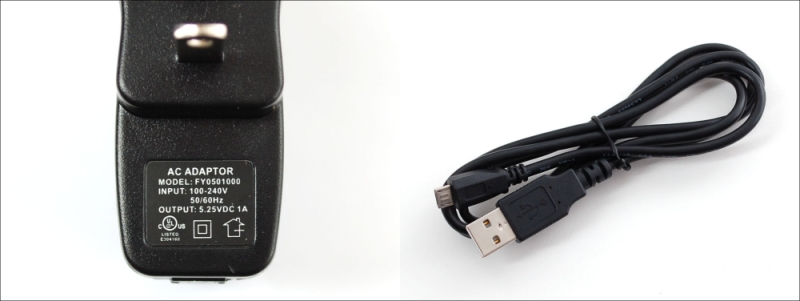
5.25V 1A power supply with USB to Micro-USB cable
Take a look at the OUTPUT printed on your power adapter. The voltage should be between 5V to 5.25V and the amperage provided should be at least 700mA. The official 2A power supply sold by the Foundation is highly recommended (1A = 1000mA).
You can help your Pi by moving your devices to a self-powered USB hub (a hub that has its own power supply).
Also note that the Pi is very sensitive to devices being inserted or removed while it's running, and powering your Pi from another computer's USB port usually doesn't work well.
The SD card is where all our data lives, and the Pi will not start without one inserted into the slot. The Raspberry Pi Model A and B takes a standard-sized SD card while the Model B+ uses the tiny Micro SD.
SD cards come with a wide variety of data storage capabilities. A card with a minimum of 4 GB of storage space is recommended for the projects in this book. The SD cards also carry a class number that indicates the read/write speed of the card—the higher the better.