
We'll start by adding a circle to our scene (press Shift + A to access the Add menu). By default, circles are added with 32 sides (and 32 vertices). This screenshot will work just fine for us:

Next, we'll rotate the circle by 90° on the X axis (R, 90, X, and Enter). Then, we'll apply our rotation and scale by pressing Ctrl + A and selecting Rotation & Scale. We want to apply the rotation here for Blender to be aware of the object's default orientation. This is relevant to several tools and modifiers that we'll be using. We need to apply the scale for the same reason. For instance, the Bevel tool often doesn't work properly when objects do not have their scale values applied. We'll discuss this in detail in the later sections. For now, go ahead and apply your rotation and scale to the circle as shown here:

Now, we'll switch to the Front view with 1 on the numpad. We'll then go into Edit mode by hitting the Tab key. Switch to Vertex selection mode by using Ctrl + Tab:

Next, we'll use Shift + D to duplicate them. We'll scale the new circle down using the S key and drag the cursor to the middle of the circle. This smaller circle will form the inside of the barrel and allow us to make changes to the outer circle without losing track of the center (and vertices) of the original one.

Next, we'll start deleting some vertices that we don't want. The outside of the barrel will not be a perfect circle, so we'll need to change it. First, we'll delete three vertices at both the top and bottom of the circle. To do this, we'll select the ones that we don't want any longer, and then hit X. From the pop-up menu, select Vertices. This will give you a good idea of how much of the original circle is remaining. You can select more or fewer vertices depending on the desired look.
Next, we'll delete half of both the circles:

This will allow us to add the Mirror modifier. This modifier will duplicate half of an object across its axis. Using it, we can model one side of the gun, and Blender will automatically fill in the other side to match it. Obviously, this will save us a lot of time. In order to do this, go to the Modifiers tab of your properties panel and select Mirror.

At this point, it's important to select the proper axis. A few steps back, we applied rotation and scale to the circle. This is an example of why this is important-we want the object coordinates (in Blender's 3D space) to match the axis that's listed on the mirror modifier. In this particular case, it may not have mattered (since we're mirroring across the same axis that we rotated on). In general, however, this is a good habit to get into. So, let's go ahead and select the X axis on the mirror modifier. At this point, we'll also want to enable the Clipping feature. This will ensure that our vertices do not cross the centerline of an object:

So, let's go ahead and select these options:

Now that we've done this, we'll be able to work on just one side of the object. So, let's start making changes to the mesh. I'm going to grab the innermost vertex at the top of our circle and extrude it upon the Z axis by pressing E and Z and hitting Enter when we've finished extruding.
If you don't specify an axis, you'll be able to extrude (and move) this vertex in all three dimensions, which we definitely don't want to do here. So, we'll just continue to extrude vertices and move them until we have a rough shape for the cross-section of our barrel.
Obviously, there's a lot of room to personalize the model at this point—you don't need to follow these pictures exactly:

Once you have the cross-section that you're looking for, it's time to fill in some faces. It's not strictly necessary to do this right now (we'll actually end up deleting these), but it will enable us to see how Blender handles pre-existing faces during mesh editing. So, let's pick two edges at the top of our circle and create a face with the F key.

This is one way to create faces (individually). We can create a series of faces from two sets of edges. In this next example, we'll select two sets of four edges and automatically fill them in. To do this, use Ctrl + and Bridge Edge Loops.

As soon as we do this, there's a good chance that you'll have a problem. Some of the faces will appear darker than others, which indicates that the normals are inverted. In Blender (and other 3D applications), a normal is the vector perpendicular to your face or the direction that your face is "pointing" at. When normals are inverted, they can cause all types of problems with your model. Lines that should be smooth may end up looking sharp, and materials and textures may not work properly. In older versions of Blender, there were no visual indications (by default), and your faces were inverted. However, in newer versions, faces appear darker when you look at the "bottom" or "inside" area, and they appear lighter when you look at the "top" or "outside" area. You can also pull up your shelf with the N key, and select Normals under Mesh Display. This will produce a series of lines, which show you the direction your faces are "pointing" at. In this example, the series of faces that I just created point in the wrong direction:

Blender does have a tool for automatically correcting normals. When you select all the faces with the A key and press Ctrl + N, Blender attempts to calculate the proper direction of the faces and flips the incorrect ones. Unfortunately, this doesn't work very well with 2D shapes. Since we just have a 2D cross section of our gun barrel right now, we'll leave this step for later.
For now, let's go through and fill in the rest of our faces. All of the faces that we've created this far are known as quads, meaning that they're four-sided faces. However, you can also have tris (or triangles) and N-Gons, which are faces with more than four edges. There are advantages and disadvantages to using N-Gons, and we'll look at this later on in the modeling process. For now, you can just create an N-Gon by selecting a ring of edges and hitting the F key.

Once all your faces are filled in, you can select all of them with A key and extrude them with the E key. By default, the faces will extrude along the Y axis, which is exactly where we want them to go. In some cases, however, the faces will extrude along an axis that you don't want them to. To fix this, you can specify the axis (as we did previously with the vertices). In this case, press E and Y to extrude the faces back on the Y axis. At this point, you can drag the faces back as far as you'd like to create the gun barrel.
As you do so, you'll see more faces with incorrect normals. At this point, however, we have a real 3D object, so Blender will be able to recalculate our normals properly. Select the entire mesh again and hit Ctrl + N. All of your faces will instantly point in the correct direction.

Now, let's move to our side view (numpad 3).

The front of our barrel will be angled, so we'll use the knife tool to cut across our existing mesh to create this slant. To activate the knife tool, press Shift + K (or K then Z to cut through the entire mesh). Move the knife at the top-left corner of the barrel, and anchor it with the left mouse button. Then, drag the knife down across your faces until you have the angle that you want. Press the left mouse button again and hit Enter. At this point, you have cut a new set of edges into your mesh.
However, we're not done yet. With our new edges still selected, press the V key to rip them apart. This creates duplicate vertices that sit at the top of each other, "ripping" the mesh apart. You can move one set of vertices away from the other on the Y axis if you'd like; it makes things easier to see. You can also hit Esc immediately after ripping it apart.

Next, we'll select one vertex in our front section of the barrel (the piece we don't want). By pressing Ctrl + L, Blender will automatically select all the linked (connected) vertices. You can then delete them, leaving just the section that you want.

Next, we'll fill in faces at the front of the gun barrel again. Use a combination of quads and N-Gons to do this, so we can take a look at how each one is affected by the next step in our modeling process.

First, we'll add an Edge Split modifier to the gun. Most mechanical objects contain both smooth and sharp edges. Using the Edge Split modifier, we can tell Blender which angles should be sharp and which should be smooth. It's an incredibly useful tool for creating machines in Blender. To add it, just go back to your Modifier and select Edge Split.

Once you add the modifier, go ahead and hit Smooth on the toolbar at the left-hand side of the screen. This will tell Blender that the entire object should use smooth shading except where the Edge Split modifier tells it not to. In this case, any angle that is greater than (or equal to) 30° will show up as Flat (sharp). Any angle less than this will show up as smooth. You can see the difference between smooth and flat shading in the upcoming picture.
By changing the Split Angle within the modifier, you're telling Blender which angles should be smooth and which should be sharp. There are times you'll want to change this number, but the default angle of 30° is actually very good most of the time. So, we'll leave this in place.

Now that we've got this taken care of, we'll smooth out our gun barrel a little bit. To do this, we'll use the Bevel tool. First, select the edges that you'd like to smooth out, then press W and select Bevel to activate the tool. Alternatively, you can activate the tool by pressing Ctrl + B.
With the tool activated, you can drag the mouse across the screen to change the amount of beveling on an edge. By rolling the mouse wheel, you will increase the number of segments to the bevel. If you want a sharp edge (like the corner of a piece of metal) it's best to just use one segment. If you're trying to create smooth curves, you can roll the mouse wheel up until the curve is sufficiently smooth. By selecting different edges on the gun barrel, you can smooth out the overall shape.
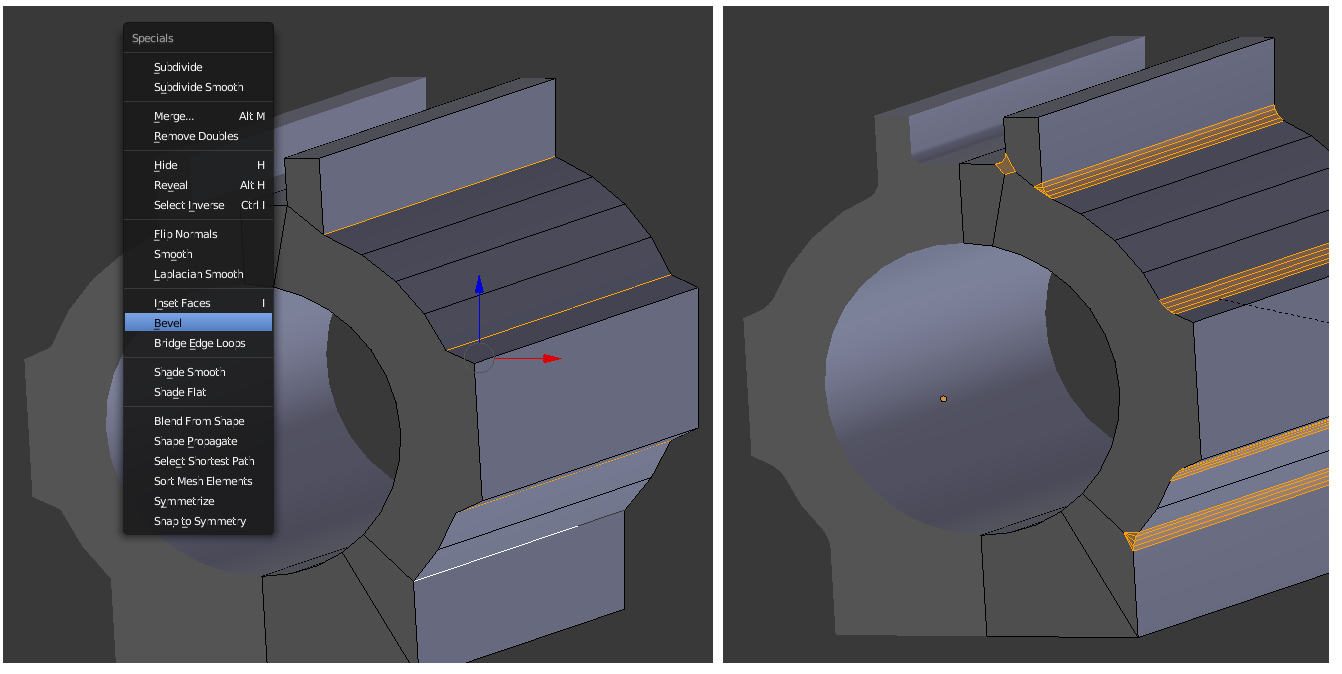
As we look at the front of the gun, we notice an interesting problem. Actually, it's not a problem; it's just the way that Blender does beveling. This is why we've filled in these faces at the front of the barrel, so we could observe the effects of the bevel tool on different types of faces. Here, you can see one of the key advantages of an N-Gon. It will not become distorted by the beveling process. This is not true for QUADs and TRIs:

These faces on the front of the barrel will technically work, but they look a bit messy. If you want to clean things up, you can quickly select all the faces you want to keep, then press Ctrl + I. This is known as the select inverse function, and it does exactly what the name implies.

Next, you can just delete the faces with the X key. Then, select the edge loops that form the front of the barrel and press F. This will automatically fill in a single N-Gon on the front of the barrel.

Next, we'll use the Bevel tool again to just slightly bevel the front edges of the barrel. Since there are no perfect angles in nature, this is a very common way to establish a bit of realism for mechanical models.
When you've done this, just select the two edge loops that make up the barrel and press Ctrl + E and Mark Sharp. The angles will show up as sharp anyway (since they probably exceed 30°), but if you know that you want an edge to be sharp, it never hurts to mark it that way. You may make changes down the line that affect an edge's angle. This way, you never have to worry about it.

At this point, the basic shape of our barrel is complete. Make any final corrections that you'd like, and then we'll move on to the rest of the gun.
The first thing we want to do is select the barrel again, and then press Shift +S and Cursor to Selected. This will place the 3D cursor at the origin point of our gun object. Any objects that we add after this will be automatically placed there:

Next, we'll bring up the Add menu again and add a cube to our project. It will appear directly in line with the gun barrel. Depending on the scale of your barrel, the cube may appear slightly bigger or smaller than the image shown here:

Tab into the Edit mode and adjust the scale until it's to your liking.

Next, use Ctrl + R to run a loop cut around the outside of the cube. This will enable us to make a few changes to the shape.

You can move the loop cut up or down as you'd like. When you've finished this, you can grab various edges and move them back or forward to create the desired shape for the gun's body.

Once you've formed the basic shape that you'd like, we'll delete the front and rear faces of the gun's body. Afterwards, you can go in and bevel the edges as much (or as little) as you'd like. Again, you can use the provided image at the beginning of the chapter if you'd like, or you can modify it to make it your own.

Once you have a shape that you like, we'll go ahead and join this object to our barrel. In order to do this, we'll need to make a few changes.
First, we'll delete the very top and bottom faces of the body. Then, we'll delete one half of it (make sure to delete the same half that you did with the barrel—we want all of the mesh to be on the same side).
Then, Tab out to Object mode. Select the gun body first and then the barrel. Press Ctrl + J to join the body to the barrel.

Next, we'll grab the very top and bottom edges of our gun block and extrude them in toward the center (on the X axis). Since Clipping was selected on our Mirror modifier, the edges will not go past the object's centerline.
After you've done this, select the series of small edges (from the bevel) in the middle of the gun block and extrude these into the centerline as well.

Next, we'll be filling in some faces on the back of the gun's body. We'll use a combination of N-Gons and quads to do this.
It's important to know where you can use an N-Gon and where you can't. The most important rule about N-Gons is that they must always be flat. As we look at the back of our gun's body, we can see a series of small curved edges in the middle:

To better understand this rule, look at the following image. You can see that the portions of a sphere have been cut out and replaced with a single, curved N-Gon. The N-Gon is bending to connect various edges together. This dramatically affects both the shape and shading of your object, and it will create unwanted artifacts at render time:

Going back to our gun's body, we'll fill flat edges in with N-Gons. When you're finished with this, select the outer ring of edges at the back.

We'll attempt to bevel this in the same way we did before. However, depending on the exact shape of your gun's body, you may end up with something like this:

What you're seeing here is beveled edges that are overlapping each other. This is a fairly common occurrence with the bevel tool. When it happens, the best fix is to change the geometry a little bit. In this case, we'll remove the bottom N-Gon first. Then, we can extrude a series of small edges across, towards the middle. Once you've done this, you can fill the holes back in and re-bevel them:

Repeat these steps with the front of the body as well.

At this point, we've covered all of the key topics for this chapter. Using the same methods that we've just looked at, you can now go through and create basic shapes for the rest of body. The following image is just a sample; feel free to use your imagination here!

When you've got basic shapes added and beveled, the result will look something like this:

Make sure that all of your different meshes are a part of the same object (the original barrel). When you're finished with this, we'll be ready to move on to the detailing phase.