

As, initially, Arduino was initially designed for artists and designers, the Arduino team has tried to develop Arduino software (IDE) as simply as possible without compromising on the power of the tool. Before you run your "Hello World" program, you need to install Arduino IDE on your computer.
Arduino IDE is supported on all major operating systems, initially Windows, Mac, and Linux.
Download "Windows Installer" or "Windows ZIP file for non admin install".
If you have downloaded "Windows Installer", double click on it and it will be installed.
If you have downloaded "Windows ZIP file for non admin install", extract it and you will find
arduino.exe. Double click on it to get started with the Arduino IDE.
Download "Linux 32 bits" or "Linux 64 bits" depending on your OS type.
Extract it and run the Arduino executables to get started with the Arduino IDE.
If you have used IDEs such as Visual Studio, XCode, and Eclipse before, you'd better lower your expectations, because Arduino IDE is very simple. It mainly consists of an editor, a compiler, a loader, and a serial monitor. It has no advanced features such as a debugger or code completion:
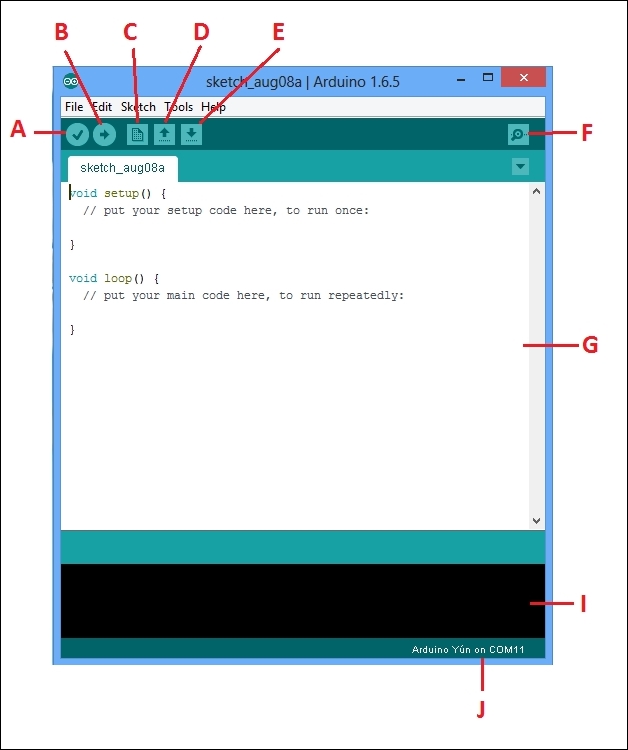
Let's look into each button separately:
A: Verify button: This will compile the program that's currently in the editor. It does not only verify the program syntactically. It also turns it into a representation suitable for the Arduino board.
B: Upload button: This will compile and upload the current program to the connected Arduino Board.
C: New button: This creates a new program by opening a new editor window.
D: Open button: With this button, you can open an existing program from the file system.
F: Serial monitor: Arduino can communicate with a computer via a serial connection. Clicking the Serial Monitor button opens a serial monitor window that allows you to watch the data sent by Arduino and also to send data back. You will learn more about it in the Using serial communication section.
H: Error console: This is where you will see all the error messages of your code.
I: Status bar: This will show the connected Arduino board name along with the COM port number.