

We can now proceed to power up Intel Galileo and connect it to its terminal.
Before going forward with the board connection, you need to install a modem control program to your host system in order to connect Intel Galileo from its UART interface with minicom.
Note
Minicom is a text-based modem control and terminal emulation program for Unix-like operating systems. If you are not comfortable with text-based applications, you can use graphical serial terminals such as CuteCom or GtkTerm.
To start with Intel Galileo, perform the following steps:
Install minicom:
$ sudo apt-get install minicomTip
Downloading the example code
You can download the example code files from your account at http://www.packtpub.com for all the Packt Publishing books you have purchased. If you purchased this book elsewhere, you can visit http://www.packtpub.com/support and register to have the files e-mailed directly to you.
Attach the USB of your 6-pin TTL cable and start minicom for the first time with the
–soption:$ sudo minicom –sBefore going into the setup details, check the device is connected to your host. In our case, the serial device is
/dev/ttyUSB0on our host system. You can check it from your host's device messages (dmesg) to see the connected USB.When you start minicom with the
–soption, it will prompt you. From minicom's Configuration menu, select Serial port setup to set the values, as follows: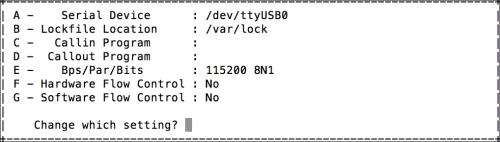
After setting up the serial device, select Exit to go to the terminal. This will prompt you with the booting sequence and launch the Linux console when the Intel Galileo serial device is connected and powered up.
Next, complete connections on Intel Galileo. Connect the TTL-232R cable to your Intel Galileo board's UART pins. UART pins are just next to the Ethernet port.
Make sure that you have connected the cables correctly. The black-colored cable on TTL is the ground connection. It is written on TTL pins which one is ground on Intel Galileo.
We are ready to power up Intel Galileo. After you plug the power cable into the board, you will see the Intel Galileo board's boot sequence on the terminal. When the booting process is completed, it will prompt you to log in; log in with the
rootuser, where no password is needed.The final prompt will be as follows; we are in the Intel Galileo Linux console, where you can just use basic Linux commands that already exist on the board to discover the Intel Galileo filesystem:
Poky 9.0.2 (Yocto Project 1.4 Reference Distro) 1.4.2 clanton
clanton login: root
root@clanton:~#
Your board will now look like the following image:

If you have connected Intel Galileo to a local network with an Ethernet cable, you can use Telnet to connect it without using a serial connection, after performing some simple steps:
Run the following commands on the Intel Galileo terminal:
root@clanton:~# ifup eth0
root@clanton:~# ifconfig
root@clanton:~# telnetd
The
ifupcommand brings the Ethernet interface up, and the second command starts the Telnet daemon. You can check the assigned IP address with theifconfigcommand.From your host system, run the following command with your Intel Galileo board's IP address to start a Telnet session with Intel Galileo:
$ telnet 192.168.2.168