Book Image

Internet of Things with Arduino Cookbook

By : Marco Schwartz
Book Image

Internet of Things with Arduino Cookbook

By: Marco Schwartz

Overview of this book

Arduino is a powerful and very versatile platform used by millions of people around the world to create DIY electronics projects. It can be connected to a wide variety of sensors and other components, making it the ideal platform to build amazing Internet of Things (IoT) projects on—the next wave in the era of computing. This book takes a recipe-based approach, giving you precise examples on how to build IoT projects of all types using the Arduino platform. You will come across projects from several fields, including the popular robotics and home automation domains. Along with being introduced to several forms of interactions within IoT, including projects that directly interact with well-known web services such as Twitter, Facebook, and Dropbox we will also focus on Machine-to-Machine (M2M) interactions, where Arduino projects interact without any human intervention. You will learn to build a few quick and easy-to-make fun projects that will really expand your horizons in the world of IoT and Arduino. Each chapter ends with a troubleshooting recipe that will help you overcome any problems faced while building these projects. By the end of this book, you will not only know how to build these projects, but also have the skills necessary to build your own IoT projects in the future.
Table of Contents (14 chapters)
Internet of Things with Arduino Cookbook
Credits
About the Author
About the Reviewer
www.PacktPub.com
Preface
Index

Interacting with basic actuators


In this recipe, we are now going to see how to control the outputs of the Arduino board. This will be very useful in the rest of the book, as we will control several output devices, such as lamps.

Getting ready

To realize this recipe, we first need to have something to control. Here, I will just use a simple relay, but you can of course use components, such as a single LED.

This is the relay I used for this recipe:

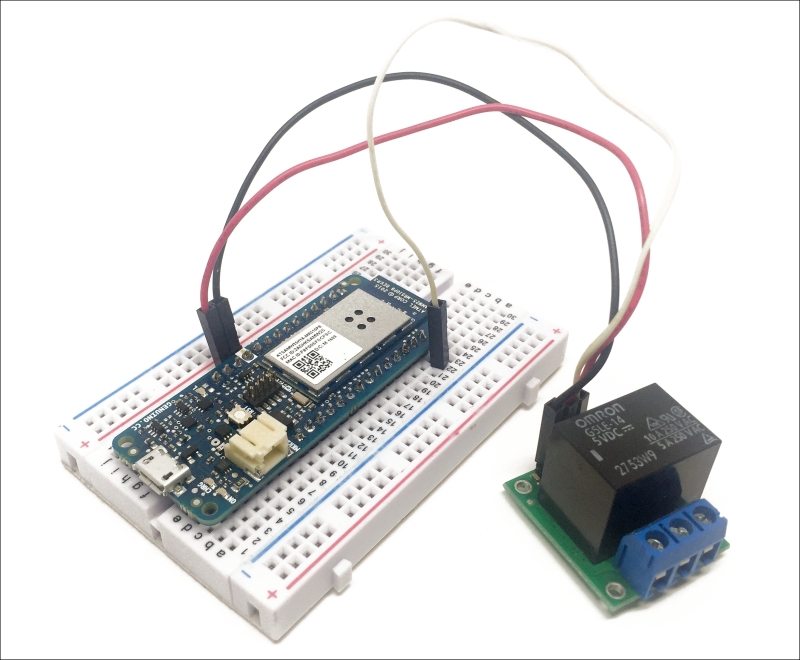
We are now going to assemble the project for this recipe. First, plug the MKR1000 board into the breadboard. After that, connect the relay VCC pin to the VCC pin of the Arduino board, and the GND pin to the ground of the MKR1000. Finally, connect the SIG pin of the relay to pin 5 of the Arduino board. This is the final result:

How to do it...

  1. We are now going to configure the board to see how to control outputs, like this relay. To illustrate this we are going to switch the relay on and off every second. This is the complete sketch for this recipe:

    // Pins
    int relayPin = 5;
    void setup() {
    
      // Set pin as output
      pinMode(relayPin, OUTPUT);
    }
    void loop() {
    
      // Set relay ON
      digitalWrite(relayPin, HIGH);
    
      // Wait
      delay(1000);
    
      // Set relay OFF
      digitalWrite(relayPin, LOW);
    
      // Wait
      delay(1000);
    }
  2. Now, copy this sketch into the Arduino IDE and upload it to the Arduino board. Once that's done, you should immediately see (and hear) the relay switching on and off every second.

How it works...

The sketch simply uses the digitalWrite() function of the Arduino language to control the state of the pin to which the relay is connected, along with the delay() function, therefore switching the relay on and off continuously.

There's more...

You can, of course, use what you learned in this project to control other output devices, such as LEDs. We are going to see in other recipes, later in this book, how to control larger output devices, such as lamps and other home appliances.

See also

You can now continue to the next set of recipes, where we are actually going to connect the board to the Internet.