

In this recipe, we are going to finally learn how to use the on-board Wi-Fi chip that is on the MKR1000 board, and connect the board to your local Wi-Fi. This is a very important recipe, are we are going to use this in nearly every recipe of this book to build IoT projects.
Before we can use the Wi-Fi chip that is on the board, we need an Arduino library to be able to control it. The library for this chip is called the WiFi101 library and you can find it inside the Arduino library manager.
To access the library manager, simply go to Sketch | Include Library | Manage Libraries inside the Arduino IDE. Then, type wifi101 to find the library:

To install the library from there, simply click on the Install button just next to the library version.
Let's now connect the board to your Wi-Fi network. The sketch is quite long here, so I have split it into three parts.
This is the main part of the sketch, which will actually connect your chip to your local Wi-Fi network:
// Libraries
#include <SPI.h>
#include <WiFi101.h>

// Credentials
char ssid[] = "wifi-name";     //  your network SSID (name)
char pass[] = "wifi-pass";  // your network password
int status = WL_IDLE_STATUS;     // the Wifi radio's status

void setup() {

  // Serial
  Serial.begin(115200);

  // Attempt to connect to Wifi network:
  while ( status != WL_CONNECTED) {
    Serial.print("Attempting to connect to WPA SSID: ");
    Serial.println(ssid);

    // Connect to WPA/WPA2 network:
    status = WiFi.begin(ssid, pass);

    // Wait 10 seconds for connection:
    delay(10000);
  }

  // you're connected now, so print out the data:
  Serial.print("You're connected to the network");
  printCurrentNet();
  printWifiData();

}

void loop() {

  // Check the network connection once every 10 seconds:
  delay(10000);
  printCurrentNet();
}
What you actually need to change here are the following lines:
char ssid[] = "wifi-name";     //  your network SSID (name)
char pass[] = "wifi-pass";  // your network password
You need to change those lines to put your own Wi-Fi network's name and password. This is something you will have to do in all the sketches for the rest of this book, as we are always going to connect the Arduino board to the local Wi-Fi network.
Then, the following function will print data about your IP address:
void printWifiData() {
  // print your WiFi shield's IP address:
  IPAddress ip = WiFi.localIP();
  Serial.print("IP Address: ");
  Serial.println(ip);
  Serial.println(ip);

  // print your MAC address:
  byte mac[6];
  WiFi.macAddress(mac);
  Serial.print("MAC address: ");
  Serial.print(mac[5], HEX);
  Serial.print(":");
  Serial.print(mac[4], HEX);
  Serial.print(":");
  Serial.print(mac[3], HEX);
  Serial.print(":");
  Serial.print(mac[2], HEX);
  Serial.print(":");
  Serial.print(mac[1], HEX);
  Serial.print(":");
  Serial.println(mac[0], HEX);

}
And this function will print data about the current Wi-Fi network to which your Arduino board is connected:
void printCurrentNet() {
  // print the SSID of the network you're attached to:
  Serial.print("SSID: ");
  Serial.println(WiFi.SSID());

  // print the MAC address of the router you're attached to:
  byte bssid[6];
  WiFi.BSSID(bssid);
  Serial.print("BSSID: ");
  Serial.print(bssid[5], HEX);
  Serial.print(":");
  Serial.print(bssid[4], HEX);
  Serial.print(":");
  Serial.print(bssid[3], HEX);
  Serial.print(":");
  Serial.print(bssid[2], HEX);
  Serial.print(":");
  Serial.print(bssid[1], HEX);
  Serial.print(":");
  Serial.println(bssid[0], HEX);

  // print the received signal strength:
  long rssi = WiFi.RSSI();
  Serial.print("signal strength (RSSI):");
  Serial.println(rssi);

  // print the encryption type:
  byte encryption = WiFi.encryptionType();
  Serial.print("Encryption Type:");
  Serial.println(encryption, HEX);
  Serial.println();
}
It's now time to finally test this sketch and connect your board to the Internet! You can get the whole sketch from the GitHub repository of the following book:
https://github.com/marcoschwartz/iot-arduino-cookbook
Now, make sure to change your Wi-Fi name and password inside the sketch, and then upload the sketch to the board. Immediately open the Serial monitor. This is what you should see:
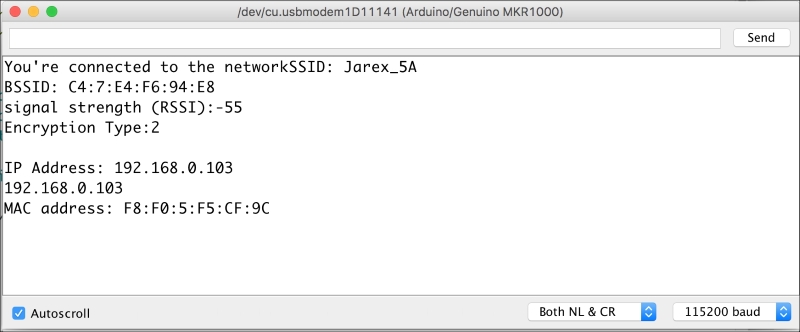
If you can see something similar, congratulations, your board is now connected to your Wi-Fi network and to the Internet (assuming your Wi-Fi router is connected to the Internet).