Book Image

Internet of Things with ESP8266

By : Marco Schwartz
Book Image

Internet of Things with ESP8266

By: Marco Schwartz

Overview of this book

The Internet of Things (IoT) is the network of objects such as physical things embedded with electronics, software, sensors, and connectivity, enabling data exchange. ESP8266 is a low cost WiFi microcontroller chip that has the ability to empower IoT and helps the exchange of information among various connected objects. ESP8266 consists of networkable microcontroller modules, and with this low cost chip, IoT is booming. This book will help deepen your knowledge of the ESP8266 WiFi chip platform and get you building exciting projects. Kick-starting with an introduction to the ESP8266 chip, we will demonstrate how to build a simple LED using the ESP8266. You will then learn how to read, send, and monitor data from the cloud. Next, you’ll see how to control your devices remotely from anywhere in the world. Furthermore, you’ll get to know how to use the ESP8266 to interact with web services such as Twitter and Facebook. In order to make several ESP8266s interact and exchange data without the need for human intervention, you will be introduced to the concept of machine-to-machine communication. The latter part of the book focuses more on projects, including a door lock controlled from the cloud, building a physical Bitcoin ticker, and doing wireless gardening. You’ll learn how to build a cloud-based ESP8266 home automation system and a cloud-controlled ESP8266 robot. Finally, you’ll discover how to build your own cloud platform to control ESP8266 devices. With this book, you will be able to create and program Internet of Things projects using the ESP8266 WiFi chip.
Table of Contents (20 chapters)
Internet of Things with ESP8266
Credits
About the Author
About the Reviewer
www.PacktPub.com
Preface
Index

Configuring the ESP8266 module and controlling an LED


We are now going to configure the ESP8266 module, which means building the hardware and also configuring the board so it can receive commands from the cloud.

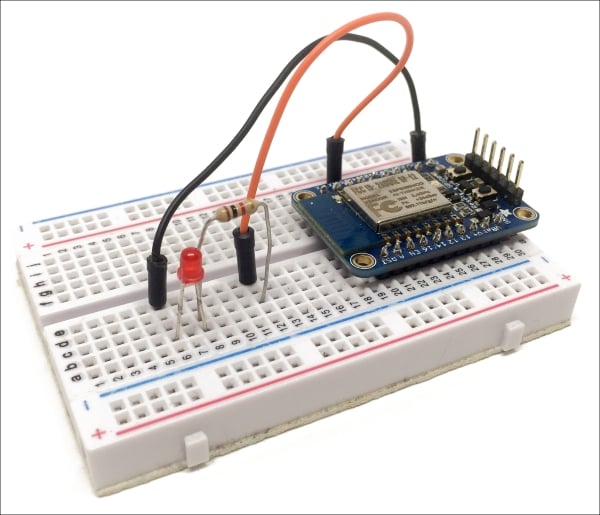
Simply place the ESP8266 board on your breadboard, and then connect the FTDI breakout board to it.

For the LED, simply connect it in series with the resistor, with the longest pin of the LED connected to the resistor. Then, connect the remaining pin of the resistor to pin 5 of the ESP8266 board, and the remaining pin of the LED to the GND pin.

This is the final result:

We are now going to configure the board so it can receive commands from the cloud.

This is the complete sketch for this part:

// Import required libraries
#include <ESP8266WiFi.h>
#include <PubSubClient.h>
#include <aREST.h>

// Clients
WiFiClient espClient;
PubSubClient client(espClient);

// Create aREST instance
aREST rest = aREST(client);

// Unique ID to identify the device for cloud.arest.io
char...