
The Ardupilot platform (based on the Arduino robotics platform) has been around for a long time. In 2007, it was conceived by a company called 3D Robotics. It's an open code-base (fully programmable), and has exploded in its versatility and capabilities since 2013 with the advent of the Pixhawk line. The latest version (2.1 at the time of the authoring of this book) implements even more versatility and stability through the capabilities of expanding the processing power via the optional Intel Edison Compute Module, and the addition of the cube. The cube contains a triple-redundancy sensor array of gyros, accelerometers, magnetometers, and barometers housed in a cushioned cube-shaped platform designed to minimize vibration and electronic interference.
In addition to Intel Edison, you can use Rasberry Pi, ODroid, NVidia TX1, and BeaglePilot project coprocessors to customize the functionality of your Pixhawk 2.1 in any way you wish. Although not every Pixhawk 2.1 has the Edison port (if you're planning on using Edison, the listing for the Pixhawk you buy should explicitely say Edison Ready), the other coprocessors can be added to any Pixhawk board.
Feel overwhelmed? Good. Then the goal is achieved with regard to showing you that the Pixhawk's capabilities are vast. So vast, in fact, that it is a full-on robotics platform brain capable of virtually anything you can imagine. The Pixhawk's limitations are only within the grasp of your programming skills.
Full-disclosure here, we won't be venturing too deeply into the programming languages and commands therein for customizing Pixhawk. That could be a whole book, or rather a series of books, all by itself. Instead, we'll be venturing into Pixhawk as it can be applied to practical purposes in its stock state (with minor tweaks).
The important point is that if DJI represents proprietary systems (although very high quality proprietary systems), Pixhawk represents open architecture. DJI would be like Apple and Pixhawk would be like Linux.
Now, you can breathe. We won't be terrifying and overwhelming you with screens and screens of coding. Let's get into the device itself.
The following image shows the Pixhawk 2.1:
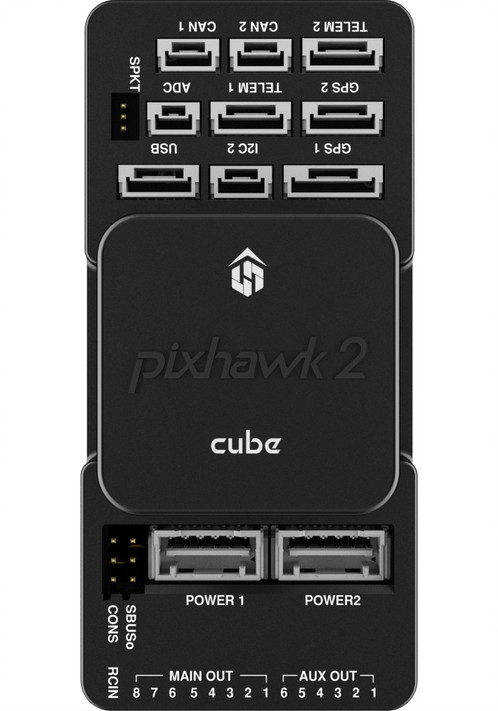
Although, at first glance, the interface for plugs on the device itself looks complicated, you should take a closer look. Each plug type has a unique size and shape with a very clearly written label. We'll get deeper into all of the plugs and whatnot later in the book. But just for the sake of familiarity, let's take a quick look at a few:
- CAN ports: Think of a CAN port as a CAN do port. A CAN bus is a common method of communication between devices (such as sensors) and the Pixhawk. You can also daisy-chain these devices. For instance, one device you may want to plug into a CAN port could be a (digital) pitot tube.
- TELEM ports: Telem stands for telemetry. These are essentially ports that can send and receive commands and information about exactly what's happening on the Pixhawk. Devices such as coprocessors (except Edison), and Head's Up Display (HUD) which overlays information on top of a video feed for transmission to the ground would plug into these ports.
- ADC ports: ADC ports are for analog sensors. Analog sensors usually return a voltage (rather than a digital information signal). These are usually used for analog pitot tubes.
- I2C ports: Much like the CAN ports, I2C ports can handle many different types of devices via a hub.
- GPS ports: This is simply where your GPS sensor plugs in. But why are there two? This has been a request that 3D Robotics listened to from users. Dual GPS can yield a better location sensing. Whichever sensor has a better signal is what the Pixhawk uses. If only one sensor is plugged in, it uses that sensor full time.
- Power ports: Contrary to what you may think, these ports are not meant to supply power to the devices that the Pixhawk controls. Rather, these ports read the status of the power source (battery) and supply voltage to the sensors and unit itself. Power to the servos, speed controllers, or other devices that the Pixhawk controls must be supplied to the servo rail via a BEC (which we'll get into when we design our first drone in Chapter 2, Your First Drone - An Autonomous RC Car.
- MAIN OUT/AUX OUT: These are the ports that whatever we're controlling with our Pixhawk plug into. These will usually be servos and speed controllers for motors.