

In this chapter, we will cover the following recipes:
- Grabbing the International Space Station flyover data and visualizing it
- Tracking using RTL-SDR
- Airplane tracking with RTL-SDR
- Satellite tracking using GPredict and RTL-SDR
- Satellite tracking using the SatNogs Network client / ground station and RTL-SDR
- Adding other interfaces – ISS tracking and text to speech
There are thousands of satellite "birds" up there. Buzzing around at all hours of the day and night—whether commercial, military, or educational—these satellites send and receive data from professional and amateur ground stations around the globe. And as satellites get cheaper, the number of them has proliferated, leading to an increasing problem for potential catastrophic collisions in space.
Tracking all that activity is a challenge. So, why not employ your own BBB in this endeavor?
Amateur satellite watchers have been around nearly since the dawn of Sputnik, an activity that fell under the rubric of ham radio, or HamSat. Nowadays, there is a host of interesting tools available that play nicely on Linux as well as microcomputers, such as BeagleBone Black.
For your smartphone alone, you can find dozens of free, downloadable tracking apps. Given their basic purpose—telling you when a satellite might pass nearby or passively receiving basic monitoring data—they deliver quick hits of excitement. However, these apps are limited in functionality, flexibility, and purpose. What we want to do is stretch what's possible to track a satellite, bringing this information and data down to Earth in a more pliable form so that you can explore other useful and creative purposes for it.
So, to begin our satellite tracking adventures, we will begin with easy recipes. Then, we will continue with more advanced scenarios and robust tools that will give you greater control over the variety of data that you capture and simultaneously amp up user experience.
The easiest scenario of all begins by piggybacking on preexisting web services and then making the interaction a little more interesting by combining it with some tasks executed by BeagleBone Black.
IFTTT for the ISS
We used the IFTTT web service in our previous chapter to provide part of the machinery to send photos captured on our smartphone. Here, we will use it to help us track the International Space Station (ISS), but we will take the interaction a bit further.
The materials needed are as follows:
- The BBB, headless or connected to an external monitor and tethered over USB with Ethernet (or Wi-Fi, if you choose)
- A smartphone with cell or Internet connectivity
Perform the following steps:
- The easiest, most basic way to get the ISS's flyover data is by signing up for SMS alerts from NASA's website at http://spotthestation.nasa.gov/index.cfm.
The first few times you get the alert, it is a thrill to know when you can potentially go outside and watch the space station fly over your head. Here is a typical message showing the directional data points:
Subject:SpotTheStation
Time: Tue Apr 21 8:18 PM, Visible: 4 min, Max Height: 80 degrees, Appears: NW, Disappears: SE
Soon, however, you may want to do more with this information. To do this, the next steps will build on recipe of pulling images into a rotating "screensaver" cycle using the
fehpackage from Chapter 8, The Internet of Things. However this time, we will use fresh space imagery. Additionally, we will add ingredients to grab flyover data and display it.So, let's slightly modify the steps and code from the earlier chapter.
- From your smartphone, go to the IFTTT Space Channel (https://ifttt.com/space) and activate the version according to whether you use an Android or iPhone.
- Once you've done this, IFTTT suggests useful trigger pairings, "This channel goes well with…". Choose Google Drive as the pairing.
- Activate the following two triggers:
Add NASA's Image of the Day to my Dropbox
Log each time the ISS passes overhead to a Google Docs spreadsheet
Now, we will tweak our Dropbox Uploader script and
cronjobs from the last chapter. As a reminder, thecronjob looks for a new image file in Dropbox at specified intervals and cycles it into afehimage playback queue on your screen, while the Dropbox Uploader script actually downloads new images into a specified directory on your BBB.So, if you successfully executed the recipe for NowPix in Chapter 8, The Internet of Things, proceed to the next steps. Otherwise, return to Chapter 8, The Internet of Things, and follow the steps to download and display the images.
- Create a
Spacedirectory on your BBB that mirrors yourSpacedirectory created by IFTTT on your Dropbox account using the following command:$ mkdir Space - Now, confirm that the content of your IFTTT directory on Dropbox can be accessed and read properly; list the images that are there. This is why we put a dummy image here in an earlier step, as follows:
$ cd Dropbox-Uploader $ ./dropbox_uploader.sh list /IFTTT/Space
Your terminal output should look similar to this:
> Listing "/IFTTT/Space"... DONE [F] sample_image_name_here.jpg
- Download the actual images to your BBB's directory with the following command:
$ ./dropbox_uploader.sh download -s /IFTTT/Space /home/debian/SpaceYour terminal output should look similar to this:
> Download "/IFTTT/Space"... DONE [F] sample_image_name_here.jpg
- Check that you did, in fact, get the images through the following code:
$ cd NowPix $ ls
- Set up a
cronjob (refer to the prior chapter for more information on running acronjob) to run the downloader script, as follows:$ crontab -e - Append the open file with the following line:
*/3 * * * * /home/debian/Dropbox-Uploader/dropbox_uploader.sh -s download /IFTTT/Soace /home/debian/SpaceNext, we want to have our space images display on screen whenever a new one is added. This will use
feh, the package we explored in Chapter 8, The Internet of Things. So, if you successfully executed the recipe for NowPix in previous chapter, proceed to the next step. Otherwise, return to Chapter 8, The Internet of Things and follow these steps to usefeh. - Modify the
fehscript accordingly:$ feh -FD10 /home/debian/Space - Next, we want our BBB to parse the flyover time data—both archived and near future—and turn it into nice, visual displays. So, at this point, we will depart from the earlier steps and add a powerful data visualization library used in Python,
matplotlib. We will also add thebasemaplibrary, which extends the functionality ofmatplotlibby adding a toolkit to plot 2D data on maps in Python.So now, install the Python libraries as follows:
$ sudo apt-get install python-matplotlib $ sudo apt-get install python-mpltoolkits.basemap
- Create a python file that will serve as our test ISS tracking tool based on the output from the spreadsheet that we will generate on Dropbox using the following command:
$ sudo nano iss_track1.py - From our Github repo, download the code for this recipe with this command:
$ git clone https://github.com/HudsonWerks/space-satellite.git - Browse the new directory and open up the following tile:
$ cd space-satellite $ sudo nano iss_track1.py
Take a look at the opened code. It piggybacks on the wonderful Open-Notify API developed by rocket maker and satellite wonk, Nathan Bergey, and is nicely commented and broken down into clear sections, including a call to an API, the visual map projection code, the color values for the map, the coordinates that we want to track, and the timing for the data updates.
- If you are running headless, we will use a method here that you may not be familiar with, called X-session. This is basically an SSH remote session that can run X-commands and load graphical windows within your regular SSH terminal. So, on your desktop client box, open up another terminal window, this time with the following:
$ ssh -X debian@<ip-address_here> - Run the Python script:
$ sudo python iss_track1.pyYou may encounter the following error:
File "/usr/lib/python2.7/lib-tk/Tkinter.py", line 1712, in __init__ self.tk = _tkinter.create(screenName, baseName, className, interactive, wantobjects, useTk, sync, use)tkinter.TclError: no display name and no $DISPLAY environment variable
If so, here is how you can fix it:
$ sudo xauth add `xauth list`If all goes as expected, your screen output (over the X-session terminal) will look similar to this:

The blue dot shows the current location of the ISS with its coordinates updated every minute.
- Quit the script by pressing Ctrl + C.
Getting ready
The materials needed are as follows:
- The BBB, headless or connected to an external monitor and tethered over USB with Ethernet (or Wi-Fi, if you choose)
- A smartphone with cell or Internet connectivity
Perform the following steps:
- The easiest, most basic way to get the ISS's flyover data is by signing up for SMS alerts from NASA's website at http://spotthestation.nasa.gov/index.cfm.
The first few times you get the alert, it is a thrill to know when you can potentially go outside and watch the space station fly over your head. Here is a typical message showing the directional data points:
Subject:SpotTheStation
Time: Tue Apr 21 8:18 PM, Visible: 4 min, Max Height: 80 degrees, Appears: NW, Disappears: SE
Soon, however, you may want to do more with this information. To do this, the next steps will build on recipe of pulling images into a rotating "screensaver" cycle using the
fehpackage from Chapter 8, The Internet of Things. However this time, we will use fresh space imagery. Additionally, we will add ingredients to grab flyover data and display it.So, let's slightly modify the steps and code from the earlier chapter.
- From your smartphone, go to the IFTTT Space Channel (https://ifttt.com/space) and activate the version according to whether you use an Android or iPhone.
- Once you've done this, IFTTT suggests useful trigger pairings, "This channel goes well with…". Choose Google Drive as the pairing.
- Activate the following two triggers:
Add NASA's Image of the Day to my Dropbox
Log each time the ISS passes overhead to a Google Docs spreadsheet
Now, we will tweak our Dropbox Uploader script and
cronjobs from the last chapter. As a reminder, thecronjob looks for a new image file in Dropbox at specified intervals and cycles it into afehimage playback queue on your screen, while the Dropbox Uploader script actually downloads new images into a specified directory on your BBB.So, if you successfully executed the recipe for NowPix in Chapter 8, The Internet of Things, proceed to the next steps. Otherwise, return to Chapter 8, The Internet of Things, and follow the steps to download and display the images.
- Create a
Spacedirectory on your BBB that mirrors yourSpacedirectory created by IFTTT on your Dropbox account using the following command:$ mkdir Space - Now, confirm that the content of your IFTTT directory on Dropbox can be accessed and read properly; list the images that are there. This is why we put a dummy image here in an earlier step, as follows:
$ cd Dropbox-Uploader $ ./dropbox_uploader.sh list /IFTTT/Space
Your terminal output should look similar to this:
> Listing "/IFTTT/Space"... DONE [F] sample_image_name_here.jpg
- Download the actual images to your BBB's directory with the following command:
$ ./dropbox_uploader.sh download -s /IFTTT/Space /home/debian/SpaceYour terminal output should look similar to this:
> Download "/IFTTT/Space"... DONE [F] sample_image_name_here.jpg
- Check that you did, in fact, get the images through the following code:
$ cd NowPix $ ls
- Set up a
cronjob (refer to the prior chapter for more information on running acronjob) to run the downloader script, as follows:$ crontab -e - Append the open file with the following line:
*/3 * * * * /home/debian/Dropbox-Uploader/dropbox_uploader.sh -s download /IFTTT/Soace /home/debian/SpaceNext, we want to have our space images display on screen whenever a new one is added. This will use
feh, the package we explored in Chapter 8, The Internet of Things. So, if you successfully executed the recipe for NowPix in previous chapter, proceed to the next step. Otherwise, return to Chapter 8, The Internet of Things and follow these steps to usefeh. - Modify the
fehscript accordingly:$ feh -FD10 /home/debian/Space - Next, we want our BBB to parse the flyover time data—both archived and near future—and turn it into nice, visual displays. So, at this point, we will depart from the earlier steps and add a powerful data visualization library used in Python,
matplotlib. We will also add thebasemaplibrary, which extends the functionality ofmatplotlibby adding a toolkit to plot 2D data on maps in Python.So now, install the Python libraries as follows:
$ sudo apt-get install python-matplotlib $ sudo apt-get install python-mpltoolkits.basemap
- Create a python file that will serve as our test ISS tracking tool based on the output from the spreadsheet that we will generate on Dropbox using the following command:
$ sudo nano iss_track1.py - From our Github repo, download the code for this recipe with this command:
$ git clone https://github.com/HudsonWerks/space-satellite.git - Browse the new directory and open up the following tile:
$ cd space-satellite $ sudo nano iss_track1.py
Take a look at the opened code. It piggybacks on the wonderful Open-Notify API developed by rocket maker and satellite wonk, Nathan Bergey, and is nicely commented and broken down into clear sections, including a call to an API, the visual map projection code, the color values for the map, the coordinates that we want to track, and the timing for the data updates.
- If you are running headless, we will use a method here that you may not be familiar with, called X-session. This is basically an SSH remote session that can run X-commands and load graphical windows within your regular SSH terminal. So, on your desktop client box, open up another terminal window, this time with the following:
$ ssh -X debian@<ip-address_here> - Run the Python script:
$ sudo python iss_track1.pyYou may encounter the following error:
File "/usr/lib/python2.7/lib-tk/Tkinter.py", line 1712, in __init__ self.tk = _tkinter.create(screenName, baseName, className, interactive, wantobjects, useTk, sync, use)tkinter.TclError: no display name and no $DISPLAY environment variable
If so, here is how you can fix it:
$ sudo xauth add `xauth list`If all goes as expected, your screen output (over the X-session terminal) will look similar to this:
The blue dot shows the current location of the ISS with its coordinates updated every minute.
- Quit the script by pressing Ctrl + C.
How to do it…
Perform the following steps:
- The easiest, most basic way to get the ISS's flyover data is by signing up for SMS alerts from NASA's website at http://spotthestation.nasa.gov/index.cfm.
The first few times you get the alert, it is a thrill to know when you can potentially go outside and watch the space station fly over your head. Here is a typical message showing the directional data points:
Subject:SpotTheStation
Time: Tue Apr 21 8:18 PM, Visible: 4 min, Max Height: 80 degrees, Appears: NW, Disappears: SE
Soon, however, you may want to do more with this information. To do this, the next steps will build on recipe of pulling images into a rotating "screensaver" cycle using the
fehpackage from Chapter 8, The Internet of Things. However this time, we will use fresh space imagery. Additionally, we will add ingredients to grab flyover data and display it.So, let's slightly modify the steps and code from the earlier chapter.
- From your smartphone, go to the IFTTT Space Channel (https://ifttt.com/space) and activate the version according to whether you use an Android or iPhone.
- Once you've done this, IFTTT suggests useful trigger pairings, "This channel goes well with…". Choose Google Drive as the pairing.
- Activate the following two triggers:
Add NASA's Image of the Day to my Dropbox
Log each time the ISS passes overhead to a Google Docs spreadsheet
Now, we will tweak our Dropbox Uploader script and
cronjobs from the last chapter. As a reminder, thecronjob looks for a new image file in Dropbox at specified intervals and cycles it into afehimage playback queue on your screen, while the Dropbox Uploader script actually downloads new images into a specified directory on your BBB.So, if you successfully executed the recipe for NowPix in Chapter 8, The Internet of Things, proceed to the next steps. Otherwise, return to Chapter 8, The Internet of Things, and follow the steps to download and display the images.
- Create a
Spacedirectory on your BBB that mirrors yourSpacedirectory created by IFTTT on your Dropbox account using the following command:$ mkdir Space - Now, confirm that the content of your IFTTT directory on Dropbox can be accessed and read properly; list the images that are there. This is why we put a dummy image here in an earlier step, as follows:
$ cd Dropbox-Uploader $ ./dropbox_uploader.sh list /IFTTT/Space
Your terminal output should look similar to this:
> Listing "/IFTTT/Space"... DONE [F] sample_image_name_here.jpg
- Download the actual images to your BBB's directory with the following command:
$ ./dropbox_uploader.sh download -s /IFTTT/Space /home/debian/SpaceYour terminal output should look similar to this:
> Download "/IFTTT/Space"... DONE [F] sample_image_name_here.jpg
- Check that you did, in fact, get the images through the following code:
$ cd NowPix $ ls
- Set up a
cronjob (refer to the prior chapter for more information on running acronjob) to run the downloader script, as follows:$ crontab -e - Append the open file with the following line:
*/3 * * * * /home/debian/Dropbox-Uploader/dropbox_uploader.sh -s download /IFTTT/Soace /home/debian/SpaceNext, we want to have our space images display on screen whenever a new one is added. This will use
feh, the package we explored in Chapter 8, The Internet of Things. So, if you successfully executed the recipe for NowPix in previous chapter, proceed to the next step. Otherwise, return to Chapter 8, The Internet of Things and follow these steps to usefeh. - Modify the
fehscript accordingly:$ feh -FD10 /home/debian/Space - Next, we want our BBB to parse the flyover time data—both archived and near future—and turn it into nice, visual displays. So, at this point, we will depart from the earlier steps and add a powerful data visualization library used in Python,
matplotlib. We will also add thebasemaplibrary, which extends the functionality ofmatplotlibby adding a toolkit to plot 2D data on maps in Python.So now, install the Python libraries as follows:
$ sudo apt-get install python-matplotlib $ sudo apt-get install python-mpltoolkits.basemap
- Create a python file that will serve as our test ISS tracking tool based on the output from the spreadsheet that we will generate on Dropbox using the following command:
$ sudo nano iss_track1.py - From our Github repo, download the code for this recipe with this command:
$ git clone https://github.com/HudsonWerks/space-satellite.git - Browse the new directory and open up the following tile:
$ cd space-satellite $ sudo nano iss_track1.py
Take a look at the opened code. It piggybacks on the wonderful Open-Notify API developed by rocket maker and satellite wonk, Nathan Bergey, and is nicely commented and broken down into clear sections, including a call to an API, the visual map projection code, the color values for the map, the coordinates that we want to track, and the timing for the data updates.
- If you are running headless, we will use a method here that you may not be familiar with, called X-session. This is basically an SSH remote session that can run X-commands and load graphical windows within your regular SSH terminal. So, on your desktop client box, open up another terminal window, this time with the following:
$ ssh -X debian@<ip-address_here> - Run the Python script:
$ sudo python iss_track1.pyYou may encounter the following error:
File "/usr/lib/python2.7/lib-tk/Tkinter.py", line 1712, in __init__ self.tk = _tkinter.create(screenName, baseName, className, interactive, wantobjects, useTk, sync, use)tkinter.TclError: no display name and no $DISPLAY environment variable
If so, here is how you can fix it:
$ sudo xauth add `xauth list`If all goes as expected, your screen output (over the X-session terminal) will look similar to this:
The blue dot shows the current location of the ISS with its coordinates updated every minute.
- Quit the script by pressing Ctrl + C.
There's more…
One of the more exciting add-ons to our BBB satellite and object tracking recipes is an extremely low-cost USB dongle called RTL-SDR. RTL is short for Realtek RTL2832U controller and tuner chipset, which is inside this dongle and can be purchased for around USD $20.00.
Besides being cheap, the best part of the story is SDR, which stands for Software Defined Radio. SDR is kind of what it sounds similar to: instead of using hardware components, such as amps, mixers, filters, and modulators, it is radio with its key functions driven by software.
SDR can receive signals over a very wide band of frequencies (for example, from 50 to 2500 MHz) without actually requiring specialized hardware. Using various software modules, SDR also performs different radio protocols. The result is that this software—in conjunction with an RTL dongle—now replaces what used to be a wide variety of specialized radio components.
For radio enthusiasts (including old school ham radio operators) and hackers alike, the flexibility of SDR is compelling; you can now transmit and monitor anything across a vast radio spectrum from cordless phones to Bluetooth devices, microwave ovens, car alarms, video devices, ZigBee, airplanes, and even satellites.
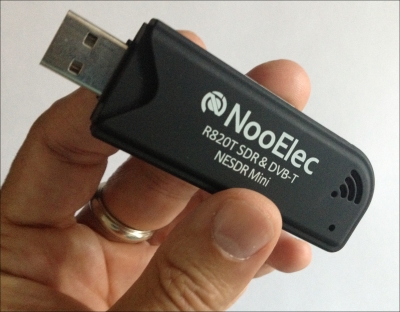
The RTL-SDR dongle
SDR is a large topic and we will only explore a handful of recipes using it. You can learn more about its applications at the principal source for all things related to RTL-SDR at http://www.rtl-sdr.com/about-rtl-sdr/.
Because of its many uses, certain applications of SDR and similar radio scanners may be illegal in some countries. Before proceeding with any of the following recipes, ensure that you will not encounter any restrictions on usage at https://en.wikipedia.org/wiki/Scanner_%28radio%29#Legislation.
See also
SDR is a large topic and we will only explore a handful of recipes using it. You can learn more about its applications at the principal source for all things related to RTL-SDR at http://www.rtl-sdr.com/about-rtl-sdr/.
Because of its many uses, certain applications of SDR and similar radio scanners may be illegal in some countries. Before proceeding with any of the following recipes, ensure that you will not encounter any restrictions on usage at https://en.wikipedia.org/wiki/Scanner_%28radio%29#Legislation.
Before diving into some of the more challenging and arcane "upper atmosphere" options to use RTL-SDR, we will do a recipe that's a little easier and more down to Earth, namely tracking planes.
This recipe is derived from a variety of sources, including David Scheltema's tutorial on Make Magazine (http://makezine.com/projects/tracking-planes-with-rtl-sdr/), which is a Debian variation on an RPi version. It also comes via the posts of David Taylor of Edinburgh, Scotland (satsignal.eu/raspberry-pi/dump1090.html) and Drew Fustini of Chicago, Illinois (element14.com/community/community/designcenter/single-board-computers/blog/2014/04/07/sdr-and-sbc-cheap-thrills-with-radio-waves) for Angstrom on the BBB. Additionally, Adafruit has a lesson for the RPi, which either borrows from or is inspired by the references mentioned before. All of these miss some steps, however, to make it fly on the current BeagleBone Black Debian distros, be it Wheezy or Jessie.
Here are the materials needed:
- The RTL-SDR dongle.
- An antenna—You could spend hundreds of dollars on this part of your kit. However, there are numerous low-cost and plenty powerful antennas that will get you a good signal for all of our recipes. Here, we use a Diamond antenna (http://www.aesham.com/glass/magnet/diamond-antenna-mr-75s/), and it only costs USD $38.00.
- An antenna adapter—If you use an antenna other than the small one that often comes with the dongle, such as the one mentioned before, you will need to buy a separate adapter. Don't worry! They're cheap, too, and ours was only about USD $6.00 (http://amzn.to/1WoB7Lq).
- Powered USB.
- Ethernet or Wi-Fi connectivity.
Perform the following steps:
- Attach the antenna to the RTL-SDR dongle via the USML adapter.
- Power your BBB via a 5V power supply, plug the SDR dongle directly into the USB port, and connect via Ethernet.
- Always ensure that your packages are up to date; let's upgrade them here using the following command:
$ sudo apt-get update && sudo apt-get upgrade - Check that the dongle is recognized with this command:
$ lsusbThe output should look similar to this, with the Realtek SDR dongle appearing:
Bus 001 Device 002: ID 0bda:2838 Realtek Semiconductor Corp. RTL2838 DVB-T Bus 001 Device 001: ID 1d6b:0002 Linux Foundation 2.0 root hub Bus 002 Device 001: ID 1d6b:0002 Linux Foundation 2.0 root hub
- Log in as root with this command:
# sudo -i - As we will create a stripped-down firmware toolset for RTL-SDR here, we need to compile software from source files. We first need to install
cmake, a tool that we came across in an earlier chapter. As a reminder,cmakeis an alternative method to build packages and can be installed as follows:# apt-get install cmake - Then, install the USB library for RTL-SDR, as follows:
# apt-get install libusb-1.0-0-dev - Next, we will grab the RTL-SDR library and configure and compile it with make. The last command here will take a few minutes to complete:
# git clone git://git.osmocom.org/rtl-sdr.git # cd rtl-sdr # cmake ./ -DINSTALL_UDEV_RULES=ON # make
- Now, install it with the following command:
# make install - Head back up to the root directory, where we need to bring the aircraft scanner-specific package on board. This requires another series of downloading, setting up, and installing ingredients, which goes as follows:
# cd # git clone https://github.com/antirez/dump1090.git # cd dump1090 # make
- Configure the path for the shared libraries:
# echo "/usr/local/lib/" >> /etc/ld.so.conf - Let's run a test, ensuring that we are in the
dump1090directory:# cd /home/debian/dump1090 # ./dump1090
If your RTL dongle/scanner is operating as it should, the command will begin quickly dumping any nearby aircraft to standard output. If you use the small antenna that came with your dongle, its range will be very limited. Press Ctrl + C to interrupt the command.
- The last step is to put this galloping data in an easier-to-read format. In the terminal window, paste the following command:
$ ./dump1090 --interactive --net --net-http-port 8081This last command and its options tell
dump1090to begin outputting data in a more viewable form. One version of this output is immediately visible in your terminal window, with the data refreshed continuously and sorted into tidy columns by flight number, altitude, speed of aircraft, latitude, and so on.Even more interesting is the
--net-http-port 8081option, which sends the data via HTTP to a specified port—in this case, the 8081 port. With this option enabled, we can open a browser and access a web page with some JavaScript, and the Google Map API is available as part of the installed package. - So, open a browser and paste the following address into the window using one of the following:
http://beaglebone.local:8081/http://192.168.7.2:8081/http://your_bbb_ip:8081/You will immediately see a Google Map along with a sidebar window showing a rollup of the data. Move the map around until it is positioned at your current location, and you should see plane icons appearing. Clicking on an icon pulls this particular flight's data into the frame.
Watch the icons closely to see what kind of general range your receiver and antenna are getting before the aircraft disappears from the screen.
- To quit the program, type Ctrl + C in the BBB's terminal window.
- Check out the Raspberry Pi version of RTL-SDR used as a portable SDR scanner at https://learn.adafruit.com/freq-show-raspberry-pi-rtl-sdr-scanner?view=all.
- Public Lab has a wonderful write up describing how plane tracking using RTL-SDR yielded information about FBI's surveillance aircraft at http://publiclab.org/notes/ajawitz/06-11-2015/raspberry-pi-as-marine-traffic-radar.
Getting ready
Here are the materials needed:
- The RTL-SDR dongle.
- An antenna—You could spend hundreds of dollars on this part of your kit. However, there are numerous low-cost and plenty powerful antennas that will get you a good signal for all of our recipes. Here, we use a Diamond antenna (http://www.aesham.com/glass/magnet/diamond-antenna-mr-75s/), and it only costs USD $38.00.
- An antenna adapter—If you use an antenna other than the small one that often comes with the dongle, such as the one mentioned before, you will need to buy a separate adapter. Don't worry! They're cheap, too, and ours was only about USD $6.00 (http://amzn.to/1WoB7Lq).
- Powered USB.
- Ethernet or Wi-Fi connectivity.
Perform the following steps:
- Attach the antenna to the RTL-SDR dongle via the USML adapter.
- Power your BBB via a 5V power supply, plug the SDR dongle directly into the USB port, and connect via Ethernet.
- Always ensure that your packages are up to date; let's upgrade them here using the following command:
$ sudo apt-get update && sudo apt-get upgrade - Check that the dongle is recognized with this command:
$ lsusbThe output should look similar to this, with the Realtek SDR dongle appearing:
Bus 001 Device 002: ID 0bda:2838 Realtek Semiconductor Corp. RTL2838 DVB-T Bus 001 Device 001: ID 1d6b:0002 Linux Foundation 2.0 root hub Bus 002 Device 001: ID 1d6b:0002 Linux Foundation 2.0 root hub
- Log in as root with this command:
# sudo -i - As we will create a stripped-down firmware toolset for RTL-SDR here, we need to compile software from source files. We first need to install
cmake, a tool that we came across in an earlier chapter. As a reminder,cmakeis an alternative method to build packages and can be installed as follows:# apt-get install cmake - Then, install the USB library for RTL-SDR, as follows:
# apt-get install libusb-1.0-0-dev - Next, we will grab the RTL-SDR library and configure and compile it with make. The last command here will take a few minutes to complete:
# git clone git://git.osmocom.org/rtl-sdr.git # cd rtl-sdr # cmake ./ -DINSTALL_UDEV_RULES=ON # make
- Now, install it with the following command:
# make install - Head back up to the root directory, where we need to bring the aircraft scanner-specific package on board. This requires another series of downloading, setting up, and installing ingredients, which goes as follows:
# cd # git clone https://github.com/antirez/dump1090.git # cd dump1090 # make
- Configure the path for the shared libraries:
# echo "/usr/local/lib/" >> /etc/ld.so.conf - Let's run a test, ensuring that we are in the
dump1090directory:# cd /home/debian/dump1090 # ./dump1090
If your RTL dongle/scanner is operating as it should, the command will begin quickly dumping any nearby aircraft to standard output. If you use the small antenna that came with your dongle, its range will be very limited. Press Ctrl + C to interrupt the command.
- The last step is to put this galloping data in an easier-to-read format. In the terminal window, paste the following command:
$ ./dump1090 --interactive --net --net-http-port 8081This last command and its options tell
dump1090to begin outputting data in a more viewable form. One version of this output is immediately visible in your terminal window, with the data refreshed continuously and sorted into tidy columns by flight number, altitude, speed of aircraft, latitude, and so on.Even more interesting is the
--net-http-port 8081option, which sends the data via HTTP to a specified port—in this case, the 8081 port. With this option enabled, we can open a browser and access a web page with some JavaScript, and the Google Map API is available as part of the installed package. - So, open a browser and paste the following address into the window using one of the following:
http://beaglebone.local:8081/http://192.168.7.2:8081/http://your_bbb_ip:8081/You will immediately see a Google Map along with a sidebar window showing a rollup of the data. Move the map around until it is positioned at your current location, and you should see plane icons appearing. Clicking on an icon pulls this particular flight's data into the frame.
Watch the icons closely to see what kind of general range your receiver and antenna are getting before the aircraft disappears from the screen.
- To quit the program, type Ctrl + C in the BBB's terminal window.
- Check out the Raspberry Pi version of RTL-SDR used as a portable SDR scanner at https://learn.adafruit.com/freq-show-raspberry-pi-rtl-sdr-scanner?view=all.
- Public Lab has a wonderful write up describing how plane tracking using RTL-SDR yielded information about FBI's surveillance aircraft at http://publiclab.org/notes/ajawitz/06-11-2015/raspberry-pi-as-marine-traffic-radar.
How to do it…
Perform the following steps:
- Attach the antenna to the RTL-SDR dongle via the USML adapter.
- Power your BBB via a 5V power supply, plug the SDR dongle directly into the USB port, and connect via Ethernet.
- Always ensure that your packages are up to date; let's upgrade them here using the following command:
$ sudo apt-get update && sudo apt-get upgrade - Check that the dongle is recognized with this command:
$ lsusbThe output should look similar to this, with the Realtek SDR dongle appearing:
Bus 001 Device 002: ID 0bda:2838 Realtek Semiconductor Corp. RTL2838 DVB-T Bus 001 Device 001: ID 1d6b:0002 Linux Foundation 2.0 root hub Bus 002 Device 001: ID 1d6b:0002 Linux Foundation 2.0 root hub
- Log in as root with this command:
# sudo -i - As we will create a stripped-down firmware toolset for RTL-SDR here, we need to compile software from source files. We first need to install
cmake, a tool that we came across in an earlier chapter. As a reminder,cmakeis an alternative method to build packages and can be installed as follows:# apt-get install cmake - Then, install the USB library for RTL-SDR, as follows:
# apt-get install libusb-1.0-0-dev - Next, we will grab the RTL-SDR library and configure and compile it with make. The last command here will take a few minutes to complete:
# git clone git://git.osmocom.org/rtl-sdr.git # cd rtl-sdr # cmake ./ -DINSTALL_UDEV_RULES=ON # make
- Now, install it with the following command:
# make install - Head back up to the root directory, where we need to bring the aircraft scanner-specific package on board. This requires another series of downloading, setting up, and installing ingredients, which goes as follows:
# cd # git clone https://github.com/antirez/dump1090.git # cd dump1090 # make
- Configure the path for the shared libraries:
# echo "/usr/local/lib/" >> /etc/ld.so.conf - Let's run a test, ensuring that we are in the
dump1090directory:# cd /home/debian/dump1090 # ./dump1090
If your RTL dongle/scanner is operating as it should, the command will begin quickly dumping any nearby aircraft to standard output. If you use the small antenna that came with your dongle, its range will be very limited. Press Ctrl + C to interrupt the command.
- The last step is to put this galloping data in an easier-to-read format. In the terminal window, paste the following command:
$ ./dump1090 --interactive --net --net-http-port 8081This last command and its options tell
dump1090to begin outputting data in a more viewable form. One version of this output is immediately visible in your terminal window, with the data refreshed continuously and sorted into tidy columns by flight number, altitude, speed of aircraft, latitude, and so on.Even more interesting is the
--net-http-port 8081option, which sends the data via HTTP to a specified port—in this case, the 8081 port. With this option enabled, we can open a browser and access a web page with some JavaScript, and the Google Map API is available as part of the installed package. - So, open a browser and paste the following address into the window using one of the following:
http://beaglebone.local:8081/http://192.168.7.2:8081/http://your_bbb_ip:8081/You will immediately see a Google Map along with a sidebar window showing a rollup of the data. Move the map around until it is positioned at your current location, and you should see plane icons appearing. Clicking on an icon pulls this particular flight's data into the frame.
Watch the icons closely to see what kind of general range your receiver and antenna are getting before the aircraft disappears from the screen.
- To quit the program, type Ctrl + C in the BBB's terminal window.
- Check out the Raspberry Pi version of RTL-SDR used as a portable SDR scanner at https://learn.adafruit.com/freq-show-raspberry-pi-rtl-sdr-scanner?view=all.
- Public Lab has a wonderful write up describing how plane tracking using RTL-SDR yielded information about FBI's surveillance aircraft at http://publiclab.org/notes/ajawitz/06-11-2015/raspberry-pi-as-marine-traffic-radar.
There's more…
- Check out the Raspberry Pi version of RTL-SDR used as a portable SDR scanner at https://learn.adafruit.com/freq-show-raspberry-pi-rtl-sdr-scanner?view=all.
- Public Lab has a wonderful write up describing how plane tracking using RTL-SDR yielded information about FBI's surveillance aircraft at http://publiclab.org/notes/ajawitz/06-11-2015/raspberry-pi-as-marine-traffic-radar.
SatNOGS is an open source initiative to build a network of ground stations around the world to track satellites. Thousands of low Earth orbit (LEO) satellites are its principal focus. Its goal is to provide a toolset and tech stack (hardware and software) that is low cost and easy to build.
The project supports VHF and UHF bands for satellite reception with the default configuration. Its software automatically tracks, receives, and records satellites as they pass overhead while automatically scheduling observations and recording them to an online database shared among other participating ground observers.
For the purpose of simplicity, we will not cover how to build the whole hardware part of the system, which includes a high gain antenna, tracking motors, and a standard RTL-SDR dongle as a receiver. In our recipes, we will only use the dongle and a low-cost antenna. You are welcome to get more ambitious with the hardware. More details are at the SatNogs website (https://satnogs.org/).
Setting up the software stack requires two pieces: a satellite tracker and a ground station.
Satellite tracker
For the tracking software, they suggest one of two packages: either GPredict, a popular and venerable open source solution for satellite tracking and orbit prediction, or a custom open source client that the SatNogs team built in Python. The latter is more robust and interoperates more easily with the antenna and rotor mechanism. However, since we will not illustrate the build out of the rotor and the hardware parts of the system, we will do a recipe around GPredict.
Ground Station
On the ground station side, you could again use GPredict, which includes this kind of functionality. However, in our recipe we will build the SatNogs Network custom client as it lets us taste some new coding flavors. Once installed, the tool gives operators an efficient way to both plan their observations and combine their tracking data with multiple ground stations around the world.
GPredict
SatNogs suggests two tools for satellite tracking: their own custom package and GPredict. We will only look at how to use GPredict as this package is more widely used and can serve as a jumping off point for satellite tracking beyond just the SatNogs initiative.
Gpredict is a real-time satellite tracking and orbit prediction application that can track an unlimited number of satellites and display the data in tables and numerous graphical views. The application actually exists for more than just Linux distributions; it includes the Windows and Mac OS X versions. However, unlike the commercial OS versions, we will build a recipe set on our open source microcomputer that gives us greater flexibility on several fronts, such as the following:
- Dedicated device: A BBB SatNogs platform gives you the ability to create a dedicated satellite tracking device in lieu of turning over your desktop or laptop exclusively to satellite tracking.
- Optimal placement: The position of your ground station's antenna is critical as it impacts the quality of your data and experience. Creating a device that can be enclosed, protected, and positioned in a location optimized for better satellite tracking is a better long-term strategy than leaving your laptop on the roof of a building.
- Custom alerts and signals: A device that can deliver a custom signal indicating when the satellites are approaching opens up numerous possibilities for physical computing, IoT-enablement, and a more indelible user experience.
The following are the materials needed:
- An RTL-SDR dongle.
- An antenna—For the recommended low-cost antenna that we are using, see the Diamond antenna in the prior recipe on plane tracking (http://www.aesham.com/glass/magnet/diamond-antenna-mr-75s/). Attach the antenna to the RTL-SDR dongle via the uSML adapter.
- An antenna adapter—If you use an antenna other than the small one that often comes with the dongle, such as the one mentioned before, you will need to buy a separate adapter. Don't worry! They're cheap too, and ours was only about USD $6.00 (http://amzn.to/1WoB7Lq).
- Powered USB.
- Ethernet or Wi-Fi connectivity.
Here are the steps that you need to perform:
- Install package dependencies through the following commands:
$ sudo apt-get install automake build-essential make $ sudo apt-get install intltool libgoocanvas-dev $ sudo apt-get install libgtk2.0-dev libcurl4-openssl-dev
- Grab the source file and untar it as follows:
$ wget http://downloads.sourceforge.net/project/gpredict/Gpredict/1.3/gpredict-1.3.tar.gz $ tar -zxvf gpredict-x.y.z.tar.gz
- Navigate to the new directory created with this command:
$ cd gpredict-1.x - Run the usual steps to compile and install, as follows:
$ sudo ./autogen.sh $ sudo ./configure $ sudo make && sudo make install
Note
We recommend downloading the GPredict manual at http://sourceforge.net/projects/gpredict/files/Gpredict/1.3/gpredict-user-manual-1.3.pdf/download.
- Once you've got GPredict installed, you will want to use its graphical interface as it enjoys a robust GUI and is easier to operate than the command line. If you don't have an external monitor connected to your BBB, power down and then attach it. Alternatively, just continue headless and run GPredict via vncserver:
$ vncserver - Open up GPredict. Then, update the two-line element (TLE) files. TLE is a format originated by NASA to display Keplerian elements. Commonly called Keps, these are sets of numbers allowing satellite tracking programs to calculate a satellite's position in space while giving us specific information about its orbit at a specific moment. Keps must be updated, however, which is easy to do in the Update menu.
- GPredict uses the term "module" for what you use as your dataset of the satellites you want to track. So, create one by navigating to File | Create New Module | MODULE NAME | .XX.
- From the little down arrow button in the upper-right corner of the screen, select Clone. This will create a clone of the module that you will customize and configure for this recipe.
- Next, go to Configure | Ground Station + and give yours a name. Mine is
NYCbecause that's where I live. - Determine your location, either using a preset value from the Select option or by filling in the Latitude and Longitude fields. I've done the latter to get a more precise location. Various websites can provide you with GPS coordinates. I used http://mygeoposition.com/ as it includes elevation as a variable.
- Now, we want to choose our satellites. Although there are countless "birds" up there in the heavens, for simplicity's sake, we will stick with our touchstone, the ISS. If you cloned the module as described in the preceding steps, you will only need to remove the nonISS satellites as the ISS is already in the list. However, you may also choose from the more than 1200 satellites listed in the GPredict database.
- Once you make your selection, the main window will begin populating the data with the ISS's position. There are numerous options to customize the views of your modules, which you can learn from the very thorough user manual.

The Gpredict user interface
What a beautiful view you've got on your BBB!
- To learn more about TLEs, the venerable Radio Amateur Satellite Organization, aka AMSAT, explains it well at http://www.amsat.org/amsat-new/tools/keps_tutorial.php.
- Other amateur and educational satellite tracking projects can be found at http://funcube.org.uk/.
Getting ready
The following are the materials needed:
- An RTL-SDR dongle.
- An antenna—For the recommended low-cost antenna that we are using, see the Diamond antenna in the prior recipe on plane tracking (http://www.aesham.com/glass/magnet/diamond-antenna-mr-75s/). Attach the antenna to the RTL-SDR dongle via the uSML adapter.
- An antenna adapter—If you use an antenna other than the small one that often comes with the dongle, such as the one mentioned before, you will need to buy a separate adapter. Don't worry! They're cheap too, and ours was only about USD $6.00 (http://amzn.to/1WoB7Lq).
- Powered USB.
- Ethernet or Wi-Fi connectivity.
Here are the steps that you need to perform:
- Install package dependencies through the following commands:
$ sudo apt-get install automake build-essential make $ sudo apt-get install intltool libgoocanvas-dev $ sudo apt-get install libgtk2.0-dev libcurl4-openssl-dev
- Grab the source file and untar it as follows:
$ wget http://downloads.sourceforge.net/project/gpredict/Gpredict/1.3/gpredict-1.3.tar.gz $ tar -zxvf gpredict-x.y.z.tar.gz
- Navigate to the new directory created with this command:
$ cd gpredict-1.x - Run the usual steps to compile and install, as follows:
$ sudo ./autogen.sh $ sudo ./configure $ sudo make && sudo make install
Note
We recommend downloading the GPredict manual at http://sourceforge.net/projects/gpredict/files/Gpredict/1.3/gpredict-user-manual-1.3.pdf/download.
- Once you've got GPredict installed, you will want to use its graphical interface as it enjoys a robust GUI and is easier to operate than the command line. If you don't have an external monitor connected to your BBB, power down and then attach it. Alternatively, just continue headless and run GPredict via vncserver:
$ vncserver - Open up GPredict. Then, update the two-line element (TLE) files. TLE is a format originated by NASA to display Keplerian elements. Commonly called Keps, these are sets of numbers allowing satellite tracking programs to calculate a satellite's position in space while giving us specific information about its orbit at a specific moment. Keps must be updated, however, which is easy to do in the Update menu.
- GPredict uses the term "module" for what you use as your dataset of the satellites you want to track. So, create one by navigating to File | Create New Module | MODULE NAME | .XX.
- From the little down arrow button in the upper-right corner of the screen, select Clone. This will create a clone of the module that you will customize and configure for this recipe.
- Next, go to Configure | Ground Station + and give yours a name. Mine is
NYCbecause that's where I live. - Determine your location, either using a preset value from the Select option or by filling in the Latitude and Longitude fields. I've done the latter to get a more precise location. Various websites can provide you with GPS coordinates. I used http://mygeoposition.com/ as it includes elevation as a variable.
- Now, we want to choose our satellites. Although there are countless "birds" up there in the heavens, for simplicity's sake, we will stick with our touchstone, the ISS. If you cloned the module as described in the preceding steps, you will only need to remove the nonISS satellites as the ISS is already in the list. However, you may also choose from the more than 1200 satellites listed in the GPredict database.
- Once you make your selection, the main window will begin populating the data with the ISS's position. There are numerous options to customize the views of your modules, which you can learn from the very thorough user manual.
The Gpredict user interface
What a beautiful view you've got on your BBB!
- To learn more about TLEs, the venerable Radio Amateur Satellite Organization, aka AMSAT, explains it well at http://www.amsat.org/amsat-new/tools/keps_tutorial.php.
- Other amateur and educational satellite tracking projects can be found at http://funcube.org.uk/.
How to do it…
Here are the steps that you need to perform:
- Install package dependencies through the following commands:
$ sudo apt-get install automake build-essential make $ sudo apt-get install intltool libgoocanvas-dev $ sudo apt-get install libgtk2.0-dev libcurl4-openssl-dev
- Grab the source file and untar it as follows:
$ wget http://downloads.sourceforge.net/project/gpredict/Gpredict/1.3/gpredict-1.3.tar.gz $ tar -zxvf gpredict-x.y.z.tar.gz
- Navigate to the new directory created with this command:
$ cd gpredict-1.x - Run the usual steps to compile and install, as follows:
$ sudo ./autogen.sh $ sudo ./configure $ sudo make && sudo make install
Note
We recommend downloading the GPredict manual at http://sourceforge.net/projects/gpredict/files/Gpredict/1.3/gpredict-user-manual-1.3.pdf/download.
- Once you've got GPredict installed, you will want to use its graphical interface as it enjoys a robust GUI and is easier to operate than the command line. If you don't have an external monitor connected to your BBB, power down and then attach it. Alternatively, just continue headless and run GPredict via vncserver:
$ vncserver - Open up GPredict. Then, update the two-line element (TLE) files. TLE is a format originated by NASA to display Keplerian elements. Commonly called Keps, these are sets of numbers allowing satellite tracking programs to calculate a satellite's position in space while giving us specific information about its orbit at a specific moment. Keps must be updated, however, which is easy to do in the Update menu.
- GPredict uses the term "module" for what you use as your dataset of the satellites you want to track. So, create one by navigating to File | Create New Module | MODULE NAME | .XX.
- From the little down arrow button in the upper-right corner of the screen, select Clone. This will create a clone of the module that you will customize and configure for this recipe.
- Next, go to Configure | Ground Station + and give yours a name. Mine is
NYCbecause that's where I live. - Determine your location, either using a preset value from the Select option or by filling in the Latitude and Longitude fields. I've done the latter to get a more precise location. Various websites can provide you with GPS coordinates. I used http://mygeoposition.com/ as it includes elevation as a variable.
- Now, we want to choose our satellites. Although there are countless "birds" up there in the heavens, for simplicity's sake, we will stick with our touchstone, the ISS. If you cloned the module as described in the preceding steps, you will only need to remove the nonISS satellites as the ISS is already in the list. However, you may also choose from the more than 1200 satellites listed in the GPredict database.
- Once you make your selection, the main window will begin populating the data with the ISS's position. There are numerous options to customize the views of your modules, which you can learn from the very thorough user manual.
The Gpredict user interface
What a beautiful view you've got on your BBB!
- To learn more about TLEs, the venerable Radio Amateur Satellite Organization, aka AMSAT, explains it well at http://www.amsat.org/amsat-new/tools/keps_tutorial.php.
- Other amateur and educational satellite tracking projects can be found at http://funcube.org.uk/.
There's more…
- To learn more about TLEs, the venerable Radio Amateur Satellite Organization, aka AMSAT, explains it well at http://www.amsat.org/amsat-new/tools/keps_tutorial.php.
- Other amateur and educational satellite tracking projects can be found at http://funcube.org.uk/.
In the previous recipe, we compiled and installed the part that actually tracks the satellite. Now, we need to add the piece of the system that allows us to manage the potential flood of data, share it with others, and have them share their data back with us.
Note that this has been tested successfully on Debian Wheezy (3.8) and Debian Jessie (13.4).
The materials needed are as follows:
- An RTL-SDR dongle.
- An antenna—for the recommended low-cost antenna that we are using, refer to the Diamond Antenna in the prior recipe on plane tracking (http://www.aesham.com/glass/magnet/diamond-antenna-mr-75s/).
- An antenna adapter—if you use an antenna other than the small one that often comes with the dongle, such as the one mentioned before, you will need to buy a separate adapter. Don't worry! They're cheap too, and ours was only about USD $6.00 (http://amzn.to/1WoB7Lq). Attach the antenna to the RTL-SDR dongle via the uSML adapter.
- Powered USB.
- Ethernet or Wi-Fi connectivity.
Here are the steps you need to perform:
- Check that
pipis installed and the package management system used to install and manage packages is written in Python through the following command:$ pip listAs Python 2.7.9 and later versions (on the Python2 series) and Python 3.4 and later versions include
pipby default, you may have pip already. If not, you can install it this way: - Download
get-pip.pyat https://bootstrap.pypa.io/get-pip.py. - Then, run the following:
$ sudo python get-pip.py - Install package dependencies via the following command:
$ sudo pip install virtualenvwrapperNote
virtualenv is a tool designated to address the problem of dealing with packages' dependencies while maintaining different versions for different projects. For example, if you work on two Python Django websites, one that uses Django 1.2 and another 0.96, there is no way to keep both versions if you install them into the standard
/usr/lib/python2/site-packages. virtualenv creates two isolated environments.vitualenvwrappertakes virtualenv a step further by providing commands that can be invoked from the terminal window. - So that your program knows where to find
virtualenvwrapper, modify your bash profile with the following command:$ sudo nano ~/.bashrc - At the end of the open file, append it with the following:
export WORKON_HOME=$HOME/.virtualenvs source /usr/local/bin/virtualenvwrapper.sh
- Reload the bash script with the following command:
$ sudo source ~/.bashrc - Time to install the dependencies. Use the following commands:
$ sudo apt-get install libxml2-dev libxslt1-dev python-dev $ sudo pip install django $ sudo pip install django-dotenv
- Now, it's time to get the custom package created by the SatNogs team. First, we will clone the source code from the repository as follows:
$ git clone https://github.com/satnogs/satnogs-network.git - Set up the virtual environment. On the first run, you should create it and link it to your project path. The following commands will do this:
$ cd satnogs-network $ mkvirtualenv satnogs-network -a .
(Note the
.symbol at the end of the command, and don't usesudo.) - Set your environmental variables as follows:
(satnogs-network)debian@beaglebone:~/satnogs-network$ cp .env-dist .env - Activate your python virtual environment with the following command:
$ workon satnogs-network - Install the local development requirements as follows:
$ pip install -r requirements/dev.txtThis step may take a while and consume most of your BBB's resources as it downloads, compiles, and installs the development platform to share your SatNog tracking data.
- Create and set up the database with the following command:
$ sudo ./manage.py migrate - We are nearly there now. Create a superuser using this command:
$ ./manage.py createsuperuserFollow the prompts to input a username, e-mail address, and password.
- Next, we will add some demo data into the database so that there is something to look at the end of the road as follows:
$ ./manage.py initialize - Whew! Time to run the server. Use the following command:
$ sudo ./manage.py runserver your_ip_address_here:8000If you experience problems getting the browser to resolve an address, shut down the server (by pressing Ctrl + C), and rerun the command with the following network address:
$ sudo ./manage.py runserver 0.0.0.0:8000The address,
0.0.0.0, allows you to reach the server from any machine in your network. - And now the last stop: open up a browser on your desktop machine to the IP address and the port you used in the previous step. The SatNogs Network web-based GUI should open with a variety of functions for starting a satellite tracking project.
You can sign up as a Ground Station operator by first confirming your user credentials. Look in the terminal window for the following output, which contains a verification link:
User <NAME> at example.com has given this as an email address. To confirm this is correct, go to http://your_ip_address_here:8000/accounts/confirm-email/generated_string_here/
- Once you've validated your email address, you can add a Ground station on the SatNog Network (https://network-dev.satnogs.org/) similar to the ones in the following screenshot:

Now, the next time you reboot or shut down the server and the
virtualenvenvironment and want to run SatNogs again, just jump right to the following three main steps, and you will be off to the races:$ cd satnogs-network $ workon satnogs-network $ sudo ./manage.py runserver your_ip_address:8000
Getting ready
The materials needed are as follows:
- An RTL-SDR dongle.
- An antenna—for the recommended low-cost antenna that we are using, refer to the Diamond Antenna in the prior recipe on plane tracking (http://www.aesham.com/glass/magnet/diamond-antenna-mr-75s/).
- An antenna adapter—if you use an antenna other than the small one that often comes with the dongle, such as the one mentioned before, you will need to buy a separate adapter. Don't worry! They're cheap too, and ours was only about USD $6.00 (http://amzn.to/1WoB7Lq). Attach the antenna to the RTL-SDR dongle via the uSML adapter.
- Powered USB.
- Ethernet or Wi-Fi connectivity.
Here are the steps you need to perform:
- Check that
pipis installed and the package management system used to install and manage packages is written in Python through the following command:$ pip listAs Python 2.7.9 and later versions (on the Python2 series) and Python 3.4 and later versions include
pipby default, you may have pip already. If not, you can install it this way: - Download
get-pip.pyat https://bootstrap.pypa.io/get-pip.py. - Then, run the following:
$ sudo python get-pip.py - Install package dependencies via the following command:
$ sudo pip install virtualenvwrapperNote
virtualenv is a tool designated to address the problem of dealing with packages' dependencies while maintaining different versions for different projects. For example, if you work on two Python Django websites, one that uses Django 1.2 and another 0.96, there is no way to keep both versions if you install them into the standard
/usr/lib/python2/site-packages. virtualenv creates two isolated environments.vitualenvwrappertakes virtualenv a step further by providing commands that can be invoked from the terminal window. - So that your program knows where to find
virtualenvwrapper, modify your bash profile with the following command:$ sudo nano ~/.bashrc - At the end of the open file, append it with the following:
export WORKON_HOME=$HOME/.virtualenvs source /usr/local/bin/virtualenvwrapper.sh
- Reload the bash script with the following command:
$ sudo source ~/.bashrc - Time to install the dependencies. Use the following commands:
$ sudo apt-get install libxml2-dev libxslt1-dev python-dev $ sudo pip install django $ sudo pip install django-dotenv
- Now, it's time to get the custom package created by the SatNogs team. First, we will clone the source code from the repository as follows:
$ git clone https://github.com/satnogs/satnogs-network.git - Set up the virtual environment. On the first run, you should create it and link it to your project path. The following commands will do this:
$ cd satnogs-network $ mkvirtualenv satnogs-network -a .
(Note the
.symbol at the end of the command, and don't usesudo.) - Set your environmental variables as follows:
(satnogs-network)debian@beaglebone:~/satnogs-network$ cp .env-dist .env - Activate your python virtual environment with the following command:
$ workon satnogs-network - Install the local development requirements as follows:
$ pip install -r requirements/dev.txtThis step may take a while and consume most of your BBB's resources as it downloads, compiles, and installs the development platform to share your SatNog tracking data.
- Create and set up the database with the following command:
$ sudo ./manage.py migrate - We are nearly there now. Create a superuser using this command:
$ ./manage.py createsuperuserFollow the prompts to input a username, e-mail address, and password.
- Next, we will add some demo data into the database so that there is something to look at the end of the road as follows:
$ ./manage.py initialize - Whew! Time to run the server. Use the following command:
$ sudo ./manage.py runserver your_ip_address_here:8000If you experience problems getting the browser to resolve an address, shut down the server (by pressing Ctrl + C), and rerun the command with the following network address:
$ sudo ./manage.py runserver 0.0.0.0:8000The address,
0.0.0.0, allows you to reach the server from any machine in your network. - And now the last stop: open up a browser on your desktop machine to the IP address and the port you used in the previous step. The SatNogs Network web-based GUI should open with a variety of functions for starting a satellite tracking project.
You can sign up as a Ground Station operator by first confirming your user credentials. Look in the terminal window for the following output, which contains a verification link:
User <NAME> at example.com has given this as an email address. To confirm this is correct, go to http://your_ip_address_here:8000/accounts/confirm-email/generated_string_here/
- Once you've validated your email address, you can add a Ground station on the SatNog Network (https://network-dev.satnogs.org/) similar to the ones in the following screenshot:
Now, the next time you reboot or shut down the server and the
virtualenvenvironment and want to run SatNogs again, just jump right to the following three main steps, and you will be off to the races:$ cd satnogs-network $ workon satnogs-network $ sudo ./manage.py runserver your_ip_address:8000
How to do it…
Here are the steps you need to perform:
- Check that
pipis installed and the package management system used to install and manage packages is written in Python through the following command:$ pip listAs Python 2.7.9 and later versions (on the Python2 series) and Python 3.4 and later versions include
pipby default, you may have pip already. If not, you can install it this way: - Download
get-pip.pyat https://bootstrap.pypa.io/get-pip.py. - Then, run the following:
$ sudo python get-pip.py - Install package dependencies via the following command:
$ sudo pip install virtualenvwrapperNote
virtualenv is a tool designated to address the problem of dealing with packages' dependencies while maintaining different versions for different projects. For example, if you work on two Python Django websites, one that uses Django 1.2 and another 0.96, there is no way to keep both versions if you install them into the standard
/usr/lib/python2/site-packages. virtualenv creates two isolated environments.vitualenvwrappertakes virtualenv a step further by providing commands that can be invoked from the terminal window. - So that your program knows where to find
virtualenvwrapper, modify your bash profile with the following command:$ sudo nano ~/.bashrc - At the end of the open file, append it with the following:
export WORKON_HOME=$HOME/.virtualenvs source /usr/local/bin/virtualenvwrapper.sh
- Reload the bash script with the following command:
$ sudo source ~/.bashrc - Time to install the dependencies. Use the following commands:
$ sudo apt-get install libxml2-dev libxslt1-dev python-dev $ sudo pip install django $ sudo pip install django-dotenv
- Now, it's time to get the custom package created by the SatNogs team. First, we will clone the source code from the repository as follows:
$ git clone https://github.com/satnogs/satnogs-network.git - Set up the virtual environment. On the first run, you should create it and link it to your project path. The following commands will do this:
$ cd satnogs-network $ mkvirtualenv satnogs-network -a .
(Note the
.symbol at the end of the command, and don't usesudo.) - Set your environmental variables as follows:
(satnogs-network)debian@beaglebone:~/satnogs-network$ cp .env-dist .env - Activate your python virtual environment with the following command:
$ workon satnogs-network - Install the local development requirements as follows:
$ pip install -r requirements/dev.txtThis step may take a while and consume most of your BBB's resources as it downloads, compiles, and installs the development platform to share your SatNog tracking data.
- Create and set up the database with the following command:
$ sudo ./manage.py migrate - We are nearly there now. Create a superuser using this command:
$ ./manage.py createsuperuserFollow the prompts to input a username, e-mail address, and password.
- Next, we will add some demo data into the database so that there is something to look at the end of the road as follows:
$ ./manage.py initialize - Whew! Time to run the server. Use the following command:
$ sudo ./manage.py runserver your_ip_address_here:8000If you experience problems getting the browser to resolve an address, shut down the server (by pressing Ctrl + C), and rerun the command with the following network address:
$ sudo ./manage.py runserver 0.0.0.0:8000The address,
0.0.0.0, allows you to reach the server from any machine in your network. - And now the last stop: open up a browser on your desktop machine to the IP address and the port you used in the previous step. The SatNogs Network web-based GUI should open with a variety of functions for starting a satellite tracking project.
You can sign up as a Ground Station operator by first confirming your user credentials. Look in the terminal window for the following output, which contains a verification link:
User <NAME> at example.com has given this as an email address. To confirm this is correct, go to http://your_ip_address_here:8000/accounts/confirm-email/generated_string_here/
- Once you've validated your email address, you can add a Ground station on the SatNog Network (https://network-dev.satnogs.org/) similar to the ones in the following screenshot:
Now, the next time you reboot or shut down the server and the
virtualenvenvironment and want to run SatNogs again, just jump right to the following three main steps, and you will be off to the races:$ cd satnogs-network $ workon satnogs-network $ sudo ./manage.py runserver your_ip_address:8000
It's time to make the dog talk. Or, at least, make BeagleBone Black a little more verbal. Here, we will show you the ingredients to have the board tell us—instead of showing us—when the International Space Station is getting close.
The materials needed are:
- A USB Audio dongle—We will use an inexpensive, low-profile version (http://bit.ly/1KxQatr), though any USB version is fine
- An audio speaker with a mini jack that plugs into the audio dongle
- A USB-powered hub
- A 5V power supply
- An Internet connection, Ethernet or Wi-Fi
Power up your BBB via the 5V supply, open a terminal window on your client box, then SSH into the board.
There are five parts to this recipe:
- Audio setup and testing
- Installing Text to Speech (TTS) and testing
- Python coding to calculate the ISS's current distance from you
- Bash scripting
- Doing a
cronjob to automatically run all of these
Part I: Audio Setup and testing
- Although you may have some of these tools on board your BBB already, we should check to make sure. The following commands will be useful:
$ sudo apt-get update $ sudo apt-get install alsa-base alsa-utils $ sudo apt-get install mplayer
- Check that the system sees your audio dongle with this command:
$ lsusb Bus 001 Device 002: ID 1a40:0201 Terminus Technology Inc. FE 2.1 7-port Hub Bus 001 Device 001: ID 1d6b:0002 Linux Foundation 2.0 root hub Bus 002 Device 001: ID 1d6b:0002 Linux Foundation 2.0 root hub Bus 001 Device 003: ID 0d8c:013c C-Media Electronics, Inc. CM108 Audio Controller
- Take a look at which audio devices are available through the following command:
$ aplay -l **** List of PLAYBACK Hardware Devices **** card 0: Black [TI BeagleBone Black], device 0: HDMI hdmi-hifi-0 [] Subdevices: 0/2 Subdevice #0: subdevice #0 card 1: Device [USB PnP Sound Device], device 1: USB Audio [USB Audio] Subdevices: 1/2 Subdevice #1: subdevice #1
- On the BBB, ALSA gives preference to the HDMI port's audio channel, which we need to change to the USB sound dongle. First, we have to disable the HDMI audio output with this command:
$ sudo nano /boot/uEnv.txtEdit the following line:
##Disable HDMI #cape_disable=capemgr.disable_partno=BB-BONELT-HDMI,BB-BONELT-HDMIN
After editing, the preceding line should look similar to this:
##Disable HDMI cape_disable=capemgr.disable_partno=BB-BONELT-HDMI,BB-BONELT-HDMIN
- Save the open file (by pressing Ctrl + O) and then enter and exit
nano(by pressing Ctrl + X). - Next, we will modify the ALSA configuration file so that it recognizes our audio dongle as the default device:
$ sudo nano /etc/modprobe.d/alsa-base.conf - Duplicate the following line:
# Keep snd-usb-audio from being loaded as first soundcard options snd-usb-audio index=-2
- Then, comment out one of the lines and change
-2to0in the uncommented line:# Keep snd-usb-audio from being loaded as first soundcard #options snd-usb-audio index=-2 options snd-usb-audio index=0
- Save the open file (by pressing Ctrl + O) and then enter and exit
nano(by pressing Ctrl + X). - Reboot your BBB with this line:
$ sudo reboot - Verify that the HDMI audio is no longer present and that only the USB dongle appears by pasting this command:
$ aplay –l^s **** List of PLAYBACK Hardware Devices **** card 0: Device [USB PnP Sound Device], device 0: USB Audio [USB Audio] Subdevices: 1/1 Subdevice #0: subdevice #0
- Confirm that it loaded properly and is available to ALSA with this command:
$ cat /proc/asound/cards 0 [Device ]: USB-Audio - USB PnP Sound Device C-Media Electronics Inc. USB PnP Sound Device at usb-musb-hdrc.1.auto-1.5, full
- Open up
alsamixerso that we can tweak the volume settings. You should see your sound dongle as the default device in the upper-left corner of the GUI:$ alsamixerChoose the Speaker option and use the up arrow to increase the volume:

The Alsamixer window
- Close the window with the Esc key.
- Do a simple test to check audio output with the following command:
$ aplay /usr/share/sounds/alsa/Front_Center.wav -D sysdefault:CARD=0You should hear the nice lady say in English "Front. Center."
Whew! Not exactly Plug and Play, but that's open source for you….
Part II: Installing TTS
Let's move along to making the BBB speak using the text-to-speech (TTS) engine, SVOX Pico. Although there are other TTS options available, such as E-Speak, Festival, and Google Voice (referenced at the end of this recipe), Pico's quality is better than most and does not require a cloud connection:
- As it is not available in the Debian repos for ARM devices, we need to install SVOX Pico from source. First, however, we need to ensure that we have all dependencies with these commands:
$ sudo apt-get update $ sudo apt-get install automake libtool libpopt-dev
- Now, we can install the source files using these commands. It is not too lengthy an install; it takes perhaps around five minutes to complete:
$ git clone -b upstream+patches git://git.debian.org/collab-maint/svox.git svox-pico $ cd svox-pico $ cd pico $ automake $ sudo automake $ ./autogen.sh $ ./configure $ sudo make all $ sudo make install $ sudo ldconfig
- Run a sample text to speech test using two different audio playback tools,
mplayer, which we just installed, oraplay, which is already on our system:$ pico2wave -w test.wav "This is Ground Control" | mplayer -ao alsa:device=hw=0 test.wavTake note of the various settings and options needed to run the package properly. Pico2wave uses wav files, so we will first use the
-woption and then the filename that we will create. This will be followed by the actual text that will be recorded and spoken. The last options are those to choose a playback tool (in this case,mplayer), set the right device, and then call the filename just recorded.Alternatively, we can use another audio package:
aplay. Although it is not as full featured asmplay, it is easier to use as it requires fewer settings. Run the following command for this:$ pico2wave -w test.wav "This is Ground Control" && aplay test.wavRegardless of the player you use, you should get a female speaker saying
This is Ground Controlin the English language out of your speaker. You can change the output, of course, including the speaker's language, as long as it is English (UK or US), German, Italian, French, or Spanish.
Part III: Python coding to calculate the ISS's current distance from your location
Next, we will use some Python code to track the International Space Station.
- If you did the earlier recipe in this book with GPredict to track the ISS, you would already have the repo downloaded. If not, get it from our GitHub repo and then browse the directory as follows:
$ git clone https://github.com/HudsonWerks/space-satellite.git $ cd space-satellite
- Let's take a look at what the code does. You can open it up in a
nanoeditor window by running this command:$ sudo nano ISS_current_distance.pyAlternatively, you can copy and paste the code into a new Cloud9 file.
Note
For simplicity's sake, we will use a different set of code to track the ISS than we did an earlier recipe in this chapter. Here, we do not want to run an X-session as in the previous example; instead, we want to focus on an alternative user interface. However, a good exercise would be to combine the two pieces of code into one so that you can exploit both TTS and a graphical rendering of the ISS location in the same script.
The code is heavily commented and pared down to only output the current distance from the latitude and longitude coordinates you set and stop once the task is completed. . In fact, before moving on, you must input your home latitude and longitude coordinates in the designated code blocks in order for the script to run:
home_lat = HOME_LATITUDE home_long = HOME_LONGITUDE
- After inputting your coordinates, save the modified code then run it:
$ sudo python ISS_current_distance.pyYou should see a multidecimal number showing the current kilometer distance from your coordinates (your number will vary, naturally):
3631.37279398
The output is a little underwhelming, isn't it? However, this is by design; it does not keep updating the number as we run the script according to specified intervals, and we want the TTS engine to capture a snapshot in real time of the ISS's location relative to where you are.
Part IV: Creating a bash script
To create a more interesting experience, we will have a bash script run the Python code, stamp the time, and tell us all about it via the TTS engine:
- Open up a
nanoeditor window and create a new file, as follows:$ sudo nano timeTTS-ISS.sh - Copy and paste the following bash code in the open window:
#!/bin/bash # Create a variable that will run the Python script ISS=$(sudo python /home/debian/ISS-current-distance.py) # Create a variable that will grab the current UTC time, combine it with the output from the Python script, and include the text that we want the TTS engine to speak NOW=$(date +"Ground Control time is %M minutes past %l %p U T C with current distance to the International Space Station $ISS miles") echo $NOW # Run the TTS against the variable we created, and then play it back pico2wave -w GroundControlTime-ISS.wav "$NOW" aplay GroundControlTime-ISS.wav
The comments are pretty self-explanatory; two variables are created: one to run the Python file and the other to do a current timestamp. After this, combine the variables together into a TTS audio file that is played back.
- Make the file executable with the following command:
$ sudo chmod +x timeTTS-ISS.sh
Part V: Setting up a cron job
We want to automate the use of the bash and python scripts so that we can get continuous readings and feedback without having to manually start them:
- Set up a
cronjob so that the script will run on a schedule. We have not done this for several chapters, so here is what we will do:$ sudo crontab -e - Copy and paste the following line at the bottom of the open window:
*/30 * * * * sudo bash /home/debian/timeTTS-ISS.shThis will run our script at 30-minute intervals. Change
30to1in order to test it right away.
We've done it! A talking BeagleBone Black that captures dynamically generated tracking data and tells us when the International Space Station gets within striking distance!
Text to Speech
- The TTS options on Rpi, most of which can be ported to the BBB, can be found at http://elinux.org/RPi_Text_to_Speech_(Speech_Synthesis).
- E-Speak—For install and setup instructions, refer to http://hudsonwerks.com/beaglebone-black-recipes/voice-recognition-tts/.
- Festival—This is a quick and easy option, commonly used on Rpi, with various tutorials available.
- Google Voice—This is a great reference for higher quality voices and variety. However, the engine is cloud-based, so you need continuous internet access to use it. Additionally, Google will often throttle usage from scripts by pinging the service, so you may encounter difficulties using it.
Voice recognition
The other leg of a voice user interface is voice recognition, which is beyond the scope of this book. However, several tutorials are out there for both the BBB and the RPi that can take you down the path of voice-actuated device control.
Take a look at the Jasper project through the following links:
Blogger and technologist Steve Hickson has also made great strides in getting voice recognition on board the RPi at http://stevenhickson.blogspot.com/.
Other space-related Projects
A variety of other projects using the BeagleBone Black for space-related purposes are underway. Here are a few:
- NASA's ice rovers and the BeagleBone Black: NASA's Jet Propulsion Lab is using the BBB in an early prototype for a rover that could be used on Jupiter's icy moon, Europa. Being tested in icy conditions in Alaska, the rover actually crawls on the under side of the ice as if it's on the ground (https://youtu.be/sY5WQG3-3mo). Here is a close-up of BeagleBone Black inside the ice rover:

Credit: NASA/JPL.
Here, you can see an ice rover about to descend underneath the ice.

Credit: NASA/JPL.
Here is the BBB-powered rover crawling under the ice.

Credit: NASA/JPL.
- BeagleSat: This is an excellent Google Summer of Code (GSOC) project developed by Niko Visnjic. The objective of this work-in-progress is to send a BBB-driven sensor payload into space aboard a CubeSat, the small form factor satellite payload specification (http://nvisnjic.com/beaglesat/). Code for the project is also available on Github at https://github.com/nvisnjic/BeagleSat.
- NASA's CubeQuest challenge: For more information, refer to http://www.nasa.gov/cubequest/details/.
Getting ready
The materials needed are:
- A USB Audio dongle—We will use an inexpensive, low-profile version (http://bit.ly/1KxQatr), though any USB version is fine
- An audio speaker with a mini jack that plugs into the audio dongle
- A USB-powered hub
- A 5V power supply
- An Internet connection, Ethernet or Wi-Fi
Power up your BBB via the 5V supply, open a terminal window on your client box, then SSH into the board.
There are five parts to this recipe:
- Audio setup and testing
- Installing Text to Speech (TTS) and testing
- Python coding to calculate the ISS's current distance from you
- Bash scripting
- Doing a
cronjob to automatically run all of these
Part I: Audio Setup and testing
- Although you may have some of these tools on board your BBB already, we should check to make sure. The following commands will be useful:
$ sudo apt-get update $ sudo apt-get install alsa-base alsa-utils $ sudo apt-get install mplayer
- Check that the system sees your audio dongle with this command:
$ lsusb Bus 001 Device 002: ID 1a40:0201 Terminus Technology Inc. FE 2.1 7-port Hub Bus 001 Device 001: ID 1d6b:0002 Linux Foundation 2.0 root hub Bus 002 Device 001: ID 1d6b:0002 Linux Foundation 2.0 root hub Bus 001 Device 003: ID 0d8c:013c C-Media Electronics, Inc. CM108 Audio Controller
- Take a look at which audio devices are available through the following command:
$ aplay -l **** List of PLAYBACK Hardware Devices **** card 0: Black [TI BeagleBone Black], device 0: HDMI hdmi-hifi-0 [] Subdevices: 0/2 Subdevice #0: subdevice #0 card 1: Device [USB PnP Sound Device], device 1: USB Audio [USB Audio] Subdevices: 1/2 Subdevice #1: subdevice #1
- On the BBB, ALSA gives preference to the HDMI port's audio channel, which we need to change to the USB sound dongle. First, we have to disable the HDMI audio output with this command:
$ sudo nano /boot/uEnv.txtEdit the following line:
##Disable HDMI #cape_disable=capemgr.disable_partno=BB-BONELT-HDMI,BB-BONELT-HDMIN
After editing, the preceding line should look similar to this:
##Disable HDMI cape_disable=capemgr.disable_partno=BB-BONELT-HDMI,BB-BONELT-HDMIN
- Save the open file (by pressing Ctrl + O) and then enter and exit
nano(by pressing Ctrl + X). - Next, we will modify the ALSA configuration file so that it recognizes our audio dongle as the default device:
$ sudo nano /etc/modprobe.d/alsa-base.conf - Duplicate the following line:
# Keep snd-usb-audio from being loaded as first soundcard options snd-usb-audio index=-2
- Then, comment out one of the lines and change
-2to0in the uncommented line:# Keep snd-usb-audio from being loaded as first soundcard #options snd-usb-audio index=-2 options snd-usb-audio index=0
- Save the open file (by pressing Ctrl + O) and then enter and exit
nano(by pressing Ctrl + X). - Reboot your BBB with this line:
$ sudo reboot - Verify that the HDMI audio is no longer present and that only the USB dongle appears by pasting this command:
$ aplay –l^s **** List of PLAYBACK Hardware Devices **** card 0: Device [USB PnP Sound Device], device 0: USB Audio [USB Audio] Subdevices: 1/1 Subdevice #0: subdevice #0
- Confirm that it loaded properly and is available to ALSA with this command:
$ cat /proc/asound/cards 0 [Device ]: USB-Audio - USB PnP Sound Device C-Media Electronics Inc. USB PnP Sound Device at usb-musb-hdrc.1.auto-1.5, full
- Open up
alsamixerso that we can tweak the volume settings. You should see your sound dongle as the default device in the upper-left corner of the GUI:$ alsamixerChoose the Speaker option and use the up arrow to increase the volume:
The Alsamixer window
- Close the window with the Esc key.
- Do a simple test to check audio output with the following command:
$ aplay /usr/share/sounds/alsa/Front_Center.wav -D sysdefault:CARD=0You should hear the nice lady say in English "Front. Center."
Whew! Not exactly Plug and Play, but that's open source for you….
Part II: Installing TTS
Let's move along to making the BBB speak using the text-to-speech (TTS) engine, SVOX Pico. Although there are other TTS options available, such as E-Speak, Festival, and Google Voice (referenced at the end of this recipe), Pico's quality is better than most and does not require a cloud connection:
- As it is not available in the Debian repos for ARM devices, we need to install SVOX Pico from source. First, however, we need to ensure that we have all dependencies with these commands:
$ sudo apt-get update $ sudo apt-get install automake libtool libpopt-dev
- Now, we can install the source files using these commands. It is not too lengthy an install; it takes perhaps around five minutes to complete:
$ git clone -b upstream+patches git://git.debian.org/collab-maint/svox.git svox-pico $ cd svox-pico $ cd pico $ automake $ sudo automake $ ./autogen.sh $ ./configure $ sudo make all $ sudo make install $ sudo ldconfig
- Run a sample text to speech test using two different audio playback tools,
mplayer, which we just installed, oraplay, which is already on our system:$ pico2wave -w test.wav "This is Ground Control" | mplayer -ao alsa:device=hw=0 test.wavTake note of the various settings and options needed to run the package properly. Pico2wave uses wav files, so we will first use the
-woption and then the filename that we will create. This will be followed by the actual text that will be recorded and spoken. The last options are those to choose a playback tool (in this case,mplayer), set the right device, and then call the filename just recorded.Alternatively, we can use another audio package:
aplay. Although it is not as full featured asmplay, it is easier to use as it requires fewer settings. Run the following command for this:$ pico2wave -w test.wav "This is Ground Control" && aplay test.wavRegardless of the player you use, you should get a female speaker saying
This is Ground Controlin the English language out of your speaker. You can change the output, of course, including the speaker's language, as long as it is English (UK or US), German, Italian, French, or Spanish.
Part III: Python coding to calculate the ISS's current distance from your location
Next, we will use some Python code to track the International Space Station.
- If you did the earlier recipe in this book with GPredict to track the ISS, you would already have the repo downloaded. If not, get it from our GitHub repo and then browse the directory as follows:
$ git clone https://github.com/HudsonWerks/space-satellite.git $ cd space-satellite
- Let's take a look at what the code does. You can open it up in a
nanoeditor window by running this command:$ sudo nano ISS_current_distance.pyAlternatively, you can copy and paste the code into a new Cloud9 file.
Note
For simplicity's sake, we will use a different set of code to track the ISS than we did an earlier recipe in this chapter. Here, we do not want to run an X-session as in the previous example; instead, we want to focus on an alternative user interface. However, a good exercise would be to combine the two pieces of code into one so that you can exploit both TTS and a graphical rendering of the ISS location in the same script.
The code is heavily commented and pared down to only output the current distance from the latitude and longitude coordinates you set and stop once the task is completed. . In fact, before moving on, you must input your home latitude and longitude coordinates in the designated code blocks in order for the script to run:
home_lat = HOME_LATITUDE home_long = HOME_LONGITUDE
- After inputting your coordinates, save the modified code then run it:
$ sudo python ISS_current_distance.pyYou should see a multidecimal number showing the current kilometer distance from your coordinates (your number will vary, naturally):
3631.37279398
The output is a little underwhelming, isn't it? However, this is by design; it does not keep updating the number as we run the script according to specified intervals, and we want the TTS engine to capture a snapshot in real time of the ISS's location relative to where you are.
Part IV: Creating a bash script
To create a more interesting experience, we will have a bash script run the Python code, stamp the time, and tell us all about it via the TTS engine:
- Open up a
nanoeditor window and create a new file, as follows:$ sudo nano timeTTS-ISS.sh - Copy and paste the following bash code in the open window:
#!/bin/bash # Create a variable that will run the Python script ISS=$(sudo python /home/debian/ISS-current-distance.py) # Create a variable that will grab the current UTC time, combine it with the output from the Python script, and include the text that we want the TTS engine to speak NOW=$(date +"Ground Control time is %M minutes past %l %p U T C with current distance to the International Space Station $ISS miles") echo $NOW # Run the TTS against the variable we created, and then play it back pico2wave -w GroundControlTime-ISS.wav "$NOW" aplay GroundControlTime-ISS.wav
The comments are pretty self-explanatory; two variables are created: one to run the Python file and the other to do a current timestamp. After this, combine the variables together into a TTS audio file that is played back.
- Make the file executable with the following command:
$ sudo chmod +x timeTTS-ISS.sh
Part V: Setting up a cron job
We want to automate the use of the bash and python scripts so that we can get continuous readings and feedback without having to manually start them:
- Set up a
cronjob so that the script will run on a schedule. We have not done this for several chapters, so here is what we will do:$ sudo crontab -e - Copy and paste the following line at the bottom of the open window:
*/30 * * * * sudo bash /home/debian/timeTTS-ISS.shThis will run our script at 30-minute intervals. Change
30to1in order to test it right away.
We've done it! A talking BeagleBone Black that captures dynamically generated tracking data and tells us when the International Space Station gets within striking distance!
Text to Speech
- The TTS options on Rpi, most of which can be ported to the BBB, can be found at http://elinux.org/RPi_Text_to_Speech_(Speech_Synthesis).
- E-Speak—For install and setup instructions, refer to http://hudsonwerks.com/beaglebone-black-recipes/voice-recognition-tts/.
- Festival—This is a quick and easy option, commonly used on Rpi, with various tutorials available.
- Google Voice—This is a great reference for higher quality voices and variety. However, the engine is cloud-based, so you need continuous internet access to use it. Additionally, Google will often throttle usage from scripts by pinging the service, so you may encounter difficulties using it.
Voice recognition
The other leg of a voice user interface is voice recognition, which is beyond the scope of this book. However, several tutorials are out there for both the BBB and the RPi that can take you down the path of voice-actuated device control.
Take a look at the Jasper project through the following links:
Blogger and technologist Steve Hickson has also made great strides in getting voice recognition on board the RPi at http://stevenhickson.blogspot.com/.
Other space-related Projects
A variety of other projects using the BeagleBone Black for space-related purposes are underway. Here are a few:
- NASA's ice rovers and the BeagleBone Black: NASA's Jet Propulsion Lab is using the BBB in an early prototype for a rover that could be used on Jupiter's icy moon, Europa. Being tested in icy conditions in Alaska, the rover actually crawls on the under side of the ice as if it's on the ground (https://youtu.be/sY5WQG3-3mo). Here is a close-up of BeagleBone Black inside the ice rover:
Credit: NASA/JPL.
Here, you can see an ice rover about to descend underneath the ice.
Credit: NASA/JPL.
Here is the BBB-powered rover crawling under the ice.
Credit: NASA/JPL.
- BeagleSat: This is an excellent Google Summer of Code (GSOC) project developed by Niko Visnjic. The objective of this work-in-progress is to send a BBB-driven sensor payload into space aboard a CubeSat, the small form factor satellite payload specification (http://nvisnjic.com/beaglesat/). Code for the project is also available on Github at https://github.com/nvisnjic/BeagleSat.
- NASA's CubeQuest challenge: For more information, refer to http://www.nasa.gov/cubequest/details/.
How to do it…
There are five parts to this recipe:
- Audio setup and testing
- Installing Text to Speech (TTS) and testing
- Python coding to calculate the ISS's current distance from you
- Bash scripting
- Doing a
cronjob to automatically run all of these
Part I: Audio Setup and testing
- Although you may have some of these tools on board your BBB already, we should check to make sure. The following commands will be useful:
$ sudo apt-get update $ sudo apt-get install alsa-base alsa-utils $ sudo apt-get install mplayer
- Check that the system sees your audio dongle with this command:
$ lsusb Bus 001 Device 002: ID 1a40:0201 Terminus Technology Inc. FE 2.1 7-port Hub Bus 001 Device 001: ID 1d6b:0002 Linux Foundation 2.0 root hub Bus 002 Device 001: ID 1d6b:0002 Linux Foundation 2.0 root hub Bus 001 Device 003: ID 0d8c:013c C-Media Electronics, Inc. CM108 Audio Controller
- Take a look at which audio devices are available through the following command:
$ aplay -l **** List of PLAYBACK Hardware Devices **** card 0: Black [TI BeagleBone Black], device 0: HDMI hdmi-hifi-0 [] Subdevices: 0/2 Subdevice #0: subdevice #0 card 1: Device [USB PnP Sound Device], device 1: USB Audio [USB Audio] Subdevices: 1/2 Subdevice #1: subdevice #1
- On the BBB, ALSA gives preference to the HDMI port's audio channel, which we need to change to the USB sound dongle. First, we have to disable the HDMI audio output with this command:
$ sudo nano /boot/uEnv.txtEdit the following line:
##Disable HDMI #cape_disable=capemgr.disable_partno=BB-BONELT-HDMI,BB-BONELT-HDMIN
After editing, the preceding line should look similar to this:
##Disable HDMI cape_disable=capemgr.disable_partno=BB-BONELT-HDMI,BB-BONELT-HDMIN
- Save the open file (by pressing Ctrl + O) and then enter and exit
nano(by pressing Ctrl + X). - Next, we will modify the ALSA configuration file so that it recognizes our audio dongle as the default device:
$ sudo nano /etc/modprobe.d/alsa-base.conf - Duplicate the following line:
# Keep snd-usb-audio from being loaded as first soundcard options snd-usb-audio index=-2
- Then, comment out one of the lines and change
-2to0in the uncommented line:# Keep snd-usb-audio from being loaded as first soundcard #options snd-usb-audio index=-2 options snd-usb-audio index=0
- Save the open file (by pressing Ctrl + O) and then enter and exit
nano(by pressing Ctrl + X). - Reboot your BBB with this line:
$ sudo reboot - Verify that the HDMI audio is no longer present and that only the USB dongle appears by pasting this command:
$ aplay –l^s **** List of PLAYBACK Hardware Devices **** card 0: Device [USB PnP Sound Device], device 0: USB Audio [USB Audio] Subdevices: 1/1 Subdevice #0: subdevice #0
- Confirm that it loaded properly and is available to ALSA with this command:
$ cat /proc/asound/cards 0 [Device ]: USB-Audio - USB PnP Sound Device C-Media Electronics Inc. USB PnP Sound Device at usb-musb-hdrc.1.auto-1.5, full
- Open up
alsamixerso that we can tweak the volume settings. You should see your sound dongle as the default device in the upper-left corner of the GUI:$ alsamixerChoose the Speaker option and use the up arrow to increase the volume:
The Alsamixer window
- Close the window with the Esc key.
- Do a simple test to check audio output with the following command:
$ aplay /usr/share/sounds/alsa/Front_Center.wav -D sysdefault:CARD=0You should hear the nice lady say in English "Front. Center."
Whew! Not exactly Plug and Play, but that's open source for you….
Part II: Installing TTS
Let's move along to making the BBB speak using the text-to-speech (TTS) engine, SVOX Pico. Although there are other TTS options available, such as E-Speak, Festival, and Google Voice (referenced at the end of this recipe), Pico's quality is better than most and does not require a cloud connection:
- As it is not available in the Debian repos for ARM devices, we need to install SVOX Pico from source. First, however, we need to ensure that we have all dependencies with these commands:
$ sudo apt-get update $ sudo apt-get install automake libtool libpopt-dev
- Now, we can install the source files using these commands. It is not too lengthy an install; it takes perhaps around five minutes to complete:
$ git clone -b upstream+patches git://git.debian.org/collab-maint/svox.git svox-pico $ cd svox-pico $ cd pico $ automake $ sudo automake $ ./autogen.sh $ ./configure $ sudo make all $ sudo make install $ sudo ldconfig
- Run a sample text to speech test using two different audio playback tools,
mplayer, which we just installed, oraplay, which is already on our system:$ pico2wave -w test.wav "This is Ground Control" | mplayer -ao alsa:device=hw=0 test.wavTake note of the various settings and options needed to run the package properly. Pico2wave uses wav files, so we will first use the
-woption and then the filename that we will create. This will be followed by the actual text that will be recorded and spoken. The last options are those to choose a playback tool (in this case,mplayer), set the right device, and then call the filename just recorded.Alternatively, we can use another audio package:
aplay. Although it is not as full featured asmplay, it is easier to use as it requires fewer settings. Run the following command for this:$ pico2wave -w test.wav "This is Ground Control" && aplay test.wavRegardless of the player you use, you should get a female speaker saying
This is Ground Controlin the English language out of your speaker. You can change the output, of course, including the speaker's language, as long as it is English (UK or US), German, Italian, French, or Spanish.
Part III: Python coding to calculate the ISS's current distance from your location
Next, we will use some Python code to track the International Space Station.
- If you did the earlier recipe in this book with GPredict to track the ISS, you would already have the repo downloaded. If not, get it from our GitHub repo and then browse the directory as follows:
$ git clone https://github.com/HudsonWerks/space-satellite.git $ cd space-satellite
- Let's take a look at what the code does. You can open it up in a
nanoeditor window by running this command:$ sudo nano ISS_current_distance.pyAlternatively, you can copy and paste the code into a new Cloud9 file.
Note
For simplicity's sake, we will use a different set of code to track the ISS than we did an earlier recipe in this chapter. Here, we do not want to run an X-session as in the previous example; instead, we want to focus on an alternative user interface. However, a good exercise would be to combine the two pieces of code into one so that you can exploit both TTS and a graphical rendering of the ISS location in the same script.
The code is heavily commented and pared down to only output the current distance from the latitude and longitude coordinates you set and stop once the task is completed. . In fact, before moving on, you must input your home latitude and longitude coordinates in the designated code blocks in order for the script to run:
home_lat = HOME_LATITUDE home_long = HOME_LONGITUDE
- After inputting your coordinates, save the modified code then run it:
$ sudo python ISS_current_distance.pyYou should see a multidecimal number showing the current kilometer distance from your coordinates (your number will vary, naturally):
3631.37279398
The output is a little underwhelming, isn't it? However, this is by design; it does not keep updating the number as we run the script according to specified intervals, and we want the TTS engine to capture a snapshot in real time of the ISS's location relative to where you are.
Part IV: Creating a bash script
To create a more interesting experience, we will have a bash script run the Python code, stamp the time, and tell us all about it via the TTS engine:
- Open up a
nanoeditor window and create a new file, as follows:$ sudo nano timeTTS-ISS.sh - Copy and paste the following bash code in the open window:
#!/bin/bash # Create a variable that will run the Python script ISS=$(sudo python /home/debian/ISS-current-distance.py) # Create a variable that will grab the current UTC time, combine it with the output from the Python script, and include the text that we want the TTS engine to speak NOW=$(date +"Ground Control time is %M minutes past %l %p U T C with current distance to the International Space Station $ISS miles") echo $NOW # Run the TTS against the variable we created, and then play it back pico2wave -w GroundControlTime-ISS.wav "$NOW" aplay GroundControlTime-ISS.wav
The comments are pretty self-explanatory; two variables are created: one to run the Python file and the other to do a current timestamp. After this, combine the variables together into a TTS audio file that is played back.
- Make the file executable with the following command:
$ sudo chmod +x timeTTS-ISS.sh
Part V: Setting up a cron job
We want to automate the use of the bash and python scripts so that we can get continuous readings and feedback without having to manually start them:
- Set up a
cronjob so that the script will run on a schedule. We have not done this for several chapters, so here is what we will do:$ sudo crontab -e - Copy and paste the following line at the bottom of the open window:
*/30 * * * * sudo bash /home/debian/timeTTS-ISS.shThis will run our script at 30-minute intervals. Change
30to1in order to test it right away.
We've done it! A talking BeagleBone Black that captures dynamically generated tracking data and tells us when the International Space Station gets within striking distance!
Text to Speech
- The TTS options on Rpi, most of which can be ported to the BBB, can be found at http://elinux.org/RPi_Text_to_Speech_(Speech_Synthesis).
- E-Speak—For install and setup instructions, refer to http://hudsonwerks.com/beaglebone-black-recipes/voice-recognition-tts/.
- Festival—This is a quick and easy option, commonly used on Rpi, with various tutorials available.
- Google Voice—This is a great reference for higher quality voices and variety. However, the engine is cloud-based, so you need continuous internet access to use it. Additionally, Google will often throttle usage from scripts by pinging the service, so you may encounter difficulties using it.
Voice recognition
The other leg of a voice user interface is voice recognition, which is beyond the scope of this book. However, several tutorials are out there for both the BBB and the RPi that can take you down the path of voice-actuated device control.
Take a look at the Jasper project through the following links:
Blogger and technologist Steve Hickson has also made great strides in getting voice recognition on board the RPi at http://stevenhickson.blogspot.com/.
Other space-related Projects
A variety of other projects using the BeagleBone Black for space-related purposes are underway. Here are a few:
- NASA's ice rovers and the BeagleBone Black: NASA's Jet Propulsion Lab is using the BBB in an early prototype for a rover that could be used on Jupiter's icy moon, Europa. Being tested in icy conditions in Alaska, the rover actually crawls on the under side of the ice as if it's on the ground (https://youtu.be/sY5WQG3-3mo). Here is a close-up of BeagleBone Black inside the ice rover:
Credit: NASA/JPL.
Here, you can see an ice rover about to descend underneath the ice.
Credit: NASA/JPL.
Here is the BBB-powered rover crawling under the ice.
Credit: NASA/JPL.
- BeagleSat: This is an excellent Google Summer of Code (GSOC) project developed by Niko Visnjic. The objective of this work-in-progress is to send a BBB-driven sensor payload into space aboard a CubeSat, the small form factor satellite payload specification (http://nvisnjic.com/beaglesat/). Code for the project is also available on Github at https://github.com/nvisnjic/BeagleSat.
- NASA's CubeQuest challenge: For more information, refer to http://www.nasa.gov/cubequest/details/.
There's more…
Text to Speech
- The TTS options on Rpi, most of which can be ported to the BBB, can be found at http://elinux.org/RPi_Text_to_Speech_(Speech_Synthesis).
- E-Speak—For install and setup instructions, refer to http://hudsonwerks.com/beaglebone-black-recipes/voice-recognition-tts/.
- Festival—This is a quick and easy option, commonly used on Rpi, with various tutorials available.
- Google Voice—This is a great reference for higher quality voices and variety. However, the engine is cloud-based, so you need continuous internet access to use it. Additionally, Google will often throttle usage from scripts by pinging the service, so you may encounter difficulties using it.
Voice recognition
The other leg of a voice user interface is voice recognition, which is beyond the scope of this book. However, several tutorials are out there for both the BBB and the RPi that can take you down the path of voice-actuated device control.
Take a look at the Jasper project through the following links:
Blogger and technologist Steve Hickson has also made great strides in getting voice recognition on board the RPi at http://stevenhickson.blogspot.com/.
Other space-related Projects
A variety of other projects using the BeagleBone Black for space-related purposes are underway. Here are a few:
- NASA's ice rovers and the BeagleBone Black: NASA's Jet Propulsion Lab is using the BBB in an early prototype for a rover that could be used on Jupiter's icy moon, Europa. Being tested in icy conditions in Alaska, the rover actually crawls on the under side of the ice as if it's on the ground (https://youtu.be/sY5WQG3-3mo). Here is a close-up of BeagleBone Black inside the ice rover:
Credit: NASA/JPL.
Here, you can see an ice rover about to descend underneath the ice.
Credit: NASA/JPL.
Here is the BBB-powered rover crawling under the ice.
Credit: NASA/JPL.
- BeagleSat: This is an excellent Google Summer of Code (GSOC) project developed by Niko Visnjic. The objective of this work-in-progress is to send a BBB-driven sensor payload into space aboard a CubeSat, the small form factor satellite payload specification (http://nvisnjic.com/beaglesat/). Code for the project is also available on Github at https://github.com/nvisnjic/BeagleSat.
- NASA's CubeQuest challenge: For more information, refer to http://www.nasa.gov/cubequest/details/.