
After going through these steps, it's a good time to try it out to see if everything is working. Let's start with three simple tasks, involving an image, a sound, and a video on a forum, respectively.
Note
For further help and tutorials, go to http://www.musicforaneverydaylife.com/getting-ready
1. Go to the Flickr Creative Commons (CC) licensed content at http://www.flickr.com/creativecommons/by-2.0 and search for a photo under an Attribution license (when an image is termed as CC attribution it means that we can use these images without any restrictions, except for needing to cite the author—we will have a look at copyright issues in Chapter 8).
2. On the results page, choose an image. Next, right-click on the image (if you are a Mac user and have a one-button mouse, click on it while pressing the CTRL key on the keyboard), and save the picture to your computer.
3. Finally, upload the image as an attachment to a new forum post, citing the source.
You should be able to see a screenshot similar to the following:
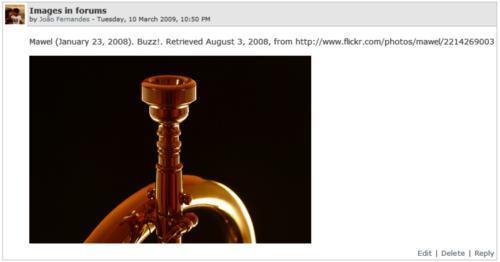
In this case, Moodle has automatically inserted the image for us. It has a width that will fit well in the screen. Sometimes, when the image has a width above say, 800 or 1024 pixels (depending on the monitor on which it is displayed), we will have to resize it, preferably before we upload it to Moodle. You don't have to worry about that for now.
Pictures are sometimes better than a thousand words. We can use them in specific cases of the forum to:
Share photos and report study visits
Share and discuss a painting, a drawing, or a cartoon
Create a collaborative photo story, where each post is an element of the story
Share screen captures of works made with software
1. Select a song from the Wired CD (http://creativecommons.org/wired).
2. Download it to your computer, again by right-clicking on the link to the music, and saving the target of the link to your computer.
3. Write a forum post in Moodle citing the source of the music (never forget the sources—the license of the music of this CD allows non-commercial sharing).
4. Upload the sound file as an attachment on the forum post.
If everything works as expected you should see a screen similar to the following:

Moodle's multimedia plugin is automatically inserting a Flash Player for our MP3 file. The multimedia plugin processes the page, looking for links to multimedia files, and when it finds one, it tries to insert a player.
Note
In the case of MP3 files, we should ensure that we have the Flash Player plugin installed on our browser. We can go to http://www.adobe.com/shockwave/welcome and check this (if we don't have the Shockwave Player installed, that's not a problem). Flash Player allows the playing of multimedia content, such as audio, video, or animations inside browsers and nowadays it has become almost a standard on the Web.
We should also have the necessary players for file formats such as Quicktime Movie (*.mov files) and Windows Media Video (*.wmv files) installed on our computer and working inside our browser—for example, a Quicktime Player, available at http://www.apple.com/quicktime/download/.
There are many uses for audio in other Moodle activities (such as the quiz or the assignment), but we'll just focus on the forum for now. We could:
Share an interview or comment, and vote and comment on it
Make a class selection of music themes
Do a roleplay activity in which each student plays a character
Ask for a poetry selection and declamation by students
Start a collaborative and iterative composition of a musical theme, where each new post builds on the one before
Generate a podcast through the conversion of the forum's RSS Feed
Host a Q&A between the teacher, invited experts, and students
Use a text-to-speech tool to create fictitious dialogues
Do some ear training exercises
Do a show-and-tell exercise
1. Go to TeacherTube (http://www.teachertube.com) and search for a video. In the results page, choose one and click on it.
2. Copy the URL shown in the Embeddable w/out Video Search field that you will see to the right of the video.
3. Open a new forum post and write something about it. Do not forget to mention the source of the video.
4. In the HTML editor, use the Enter key after the source and then click on the< > button to switch to HTML mode. Paste the code after the HTML tag<br /> (which corresponds to a line break in the text), as shown in the following screenshot:

5. Post your message, and the result will look similar to the following screenshot:

This embed procedure is very helpful, and you should keep these very simple steps in mind:
1. Copy the embed code.
2. Click on the< > button in the HTML editor.
3. Paste the embed code.
In a post, the size of the video (width and height) will fit well in the screen, but if we were embedding it in a Moodle block, we will have to change something in the code used "as is". We will leave that for later, when it's needed.
Using forums with videos is a great way to start a discussion, and it can also be used to:
Comment on a video excerpt
Create a collaborative video selection
Broadcast a live event
Post a video to add subtitles and comments
Post a silent video for students to submit a soundtrack
Post a video tutorial capturing procedures for a software application
We have just tried three simple examples of using content that was not made by us. Creating our own multimedia content is another story; but nowadays it can be quite easy, with the price of equipment going down, software interfaces getting simpler to use, and a wide variety of free software being available for multimedia editing. We now don't have any excuses for not using it, except for a lack of time. The subsequent chapters in this book will deal with this multimedia production, explaining and showing how to create these resources for delivery and active learning, not just as products, but also as activities for your students to participate in.
To give you just a flavor of what the course will be, here is a list of some examples that will be developed either for the course by the teachers, or during the course activities by the students:
Produce video tutorials explaining some tasks in music software and exploring some web sites
Add a soundtrack and remix a video
Broadcast a live video through Moodle
Create an interactive timeline of the history of music
Create a collective world map with multimedia place marks of world instruments
Design a music studio floor plan
Draw a cartoon strip about a scene in the life of a musician
Direct a stop-motion animation
Create a collaborative multimedia music styles glossary
Create interactive diagrams and charts
Use multimedia Moodle quizzes, lessons, and assignments with multimedia
And many other such exciting activities!