Book Image

Blender 3D 2.49 Incredible Machines

Book Image

Blender 3D 2.49 Incredible Machines

Overview of this book

Blender 3D provides all the features you need to create super-realistic 3D models of machines for use in artwork, movies, and computer games. Blender 3D 2.49 Incredible Machines gives you step-by-step instructions for building weapons, vehicles, robots, and more. This book will show you how to use Blender 3D for mechanical modeling and product visualization. Through the pages of the book, you will find a step-by-step guide to create three different projects: a fantasy weapon, a spacecraft, and a giant robot. Even though these machines are not realistic, you will be able to build your own sensible and incredible machines with the techniques that you will learn in this book along with the exercises and examples. All the three sections of this book, which cover three projects, are planned to have an increasing learning curve. The first project is about a hand weapon, and with that we can image a small-sized object with tiny details. This first part of the book will show you how to deal with these details and model them in Blender 3D. In the second project, we will create a spacecraft, adding a bit of scale to the project, and new materials and textures as well. With this project, we will be working with metal, glass, and other elements that make the spacecraft. Along with the object, a new space environment will be created in the book too. At the end we have a big and complex object, which is the transforming robot. This last part of the book will cover the modeling of two objects and show how you can make one transform into the other. The scale and number of objects in this project are quite big, but the same principles as in the other projects are applied here with a step-by-step guide on how to go through the workflow of the project.
Table of Contents (21 chapters)
Blender 3D 2.49 Incredible Machines
Credits
About the Author
About the Reviewers
Preface

Creating the bottom of the spacecraft


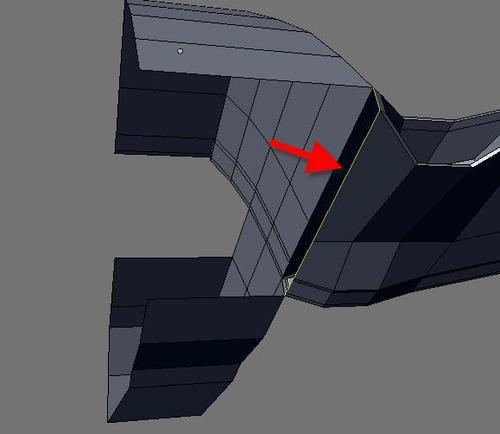
In the previous sections of the modeling process, we created a lot of small parts and finishing touches for the spacecraft, but we still have more to do. The next part of the model that will receive a few extra faces is the bottom, where the new wing parts will be useful now to help create the bottom faces. Before we do anything, rotate the view to see the bottom part of the spacecraft, and select the edges pointed in the following image:

Note that we need only one extrusion to create the new faces and close the bottom. But, to make the placement of the new faces easier, we will use the snap tool of Blender. Before hitting the E key, turn on the snap tool.

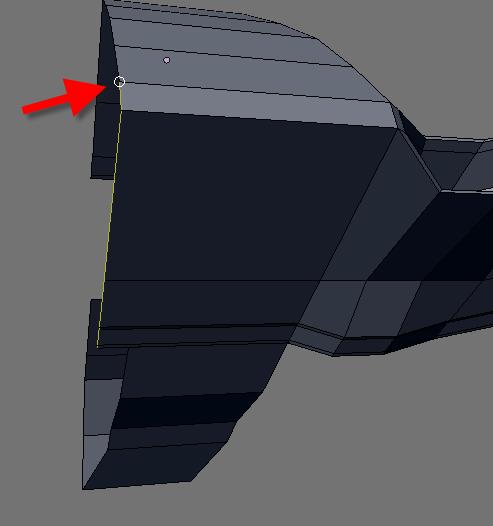
Create an extrusion and hold down the Ctrl key to create the new faces and place them at the right position, shown as a small white circle in the following image:

This will be a good time to align all of the faces at the bottom of the model and all edges. We must select the front edges that were...