
Users trying Inkscape for the first time are sometimes confused when they don't find a special tool that creates lines. Such a tool isn't necessary because every object in Inkscape can be made to look like a line: remove the fill, adjust the stroke to your desired look and you've got a line. This means that all tools in Inkscape can be used to create lines, although some of them are more straightforward and better suited for what most users expect in that area.
In this recipe we will explore how to create freehand and straight lines.
Follow these steps to draw freehand and straight lines:
1. Select the Pencil tool
 (F6 or P) and draw the letter "O", dragging with your mouse on the Canvas as if you were using a pencil on a sheet of paper.
2. Switch to the Selector tool (Space, F1 or S).The information in the Status bar notification area will tell you how many nodes are present in the object.
3. Switch back to the Pencil tool (Space, F6 or P), set Smoothing: slider on the Pencil toolbar to 50 and create another "O".
4. Switch to the Selector tool (Space, F1 or S) again and read the information in the Status bar notification area. Notice that there are fewer nodes this time and the line is smoother.
5. Select the Pen (Bezier) tool
 (Shift + F6 or B) and change its mode on the toolbar to Create a sequence of straight line segments
  so we can create a shape similar to the musical instrument, the triangle.
6. Click on the Canvas to draw the starting point of a line. Move the mouse to the right and you will see a red helper line. Hold Ctrl to keep the angle 0° and look at the Status bar to adjust the line width. Click when the distance is roughly 500 px.
7. Move the mouse to the top-left holding Ctrl to set the angle to 120° and, when you reach approximately a distance of 500 px, click to create the top triangle corner.
8. Release the Ctrl key and move your mouse downwards and to the left. Click to create a point when you reach roughly -123° and a distance of 480 px. The Status bar will report the current values as you move your mouse pointer.
9. Right-click anywhere or press Enter to finish the object.

With the Pencil tool it is important to adjust the Smoothing: slider in order to obtain the desired smoothness in our curved lines, as it determines how sensitive the line is to our mouse movements.
The easiest way to create straight lines is to use one of the modes of the Pen (Bezier) tool (named after the French mathematician Pierre Étienne Bézier) that disables the feature to draw curved segments and creates a sequence of straight line segments.
The objects we created have default styles applied to make them look like lines, but they can also take fill color.
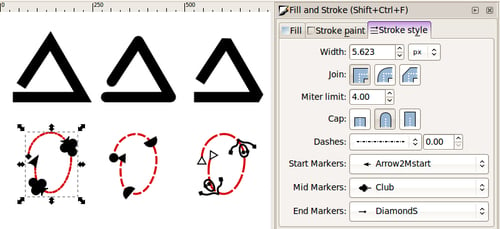
Stroke styles can affect the look of our "lines," and can be set in the Fill and Stroke dialogue (Shift + Ctrl + F) under the Stroke style tab. Joins can be Miter, Round, and Bevel, and Caps can be Butt, Round, and Square. Individual nodes (control points) of the path can be styled with a custom marker. The marker can be different for start, end, and middle nodes:
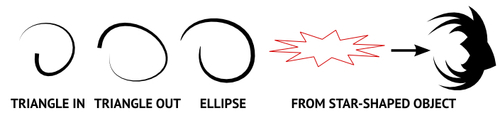
Both Pencil and Pen tools come with the option to automatically draw tapered lines. This can make creating lines more interesting, especially when using a graphics tablet. Before drawing a line we simply select a shape from the toolbar and the shape gets applied to the line when we finish drawing. Readymade shapes are Triangle in, Triangle out, Ellipse, and a custom shape that can be used by copying it and using the From clipboard option.
The following are some examples (they can be found in the Lines.svg file accompanying this chapter) where we used the Pencil with Smoothing: set to 50 and drew the letter "O":
In Inkscape, lines created by the Calligraphy tool  are actually objects with a fill and no stroke. Although we can't bend them easily like we would with lines, they still are quite valuable in a lot of situations, especially when created with a graphics tablet — a highly recommended purchase for any artist interested in creating freehand computer graphics.
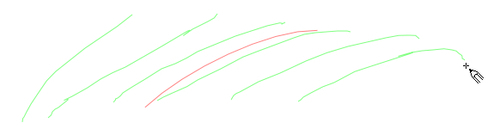
Sketch mode is a special mode provided by the Pencil tool when holding the Alt key. This will treat all strokes as an attempt to draw one line, by computing the average and rendering the final result. Our various attempts are displayed in green as we keep drawing and a red line displays the current average, so we can keep tweaking the path until we are satisfied. The following example has been exaggerated to clarify the process; usually strokes are drawn closer together:
You might have guessed that the Pencil and modes of the Pen tool we used in this recipe can't create dots by simply clicking on canvas. However, there is a shortcut that simulates dots by drawing circles of a certain size, by holding Ctrl and clicking with Pencil and straight line modes of the Pen tool. Dot size can be adjusted in Inkscape Preferences (Shift + Ctrl + P). Using Shift + Ctrl will double the dot size and Ctrl + Alt will make it random.
For more information, refer to the recipes Creating calligraphic shapes and Creating smooth paths with Spiro Spline in this chapter, also refer to Chapter 5, Live Path Effects.