
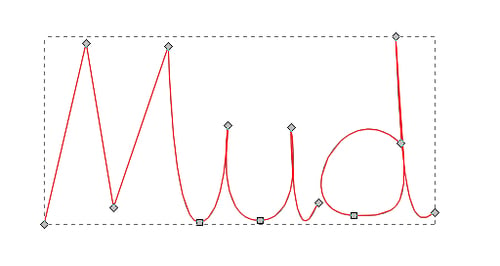
The Pen (Bezier) tool is generally considered somewhat difficult to master but after some practice it can become a valuable tool when we need precision while drawing or tracing something along the edges. In this recipe we will write out the word "Mud" using the Pen tool. Our object will be composed of 2 sub-paths, one for the letters "Mu" and the other for the letter "d".
The following steps will show how to write words using the Pen tool:
1. Select the Pen (Bezier) tool (Shift + F6 or B) and make sure the selected mode on the toolbar is Create regular Bezier path

2. Clicking without dragging creates a cusp (corner) node, so click four times to create the first four points of the letter "M" (at this point it will look like an "N").
3. The fifth and final point of the letter "M" will be a smooth transition into the letter "u". Choose a place where we want the "M" to finish, click, and slightly drag the pointer horizontally without releasing the mouse button to create a smooth node.
4. Click where you want the first point of the letter "u" to be.
5. Click and drag horizontally, where you want the bottom of the letter "u" to be, to create a smooth node. If you're not satisfied with the result, press Del to delete the last node and try again.
6. Click to create the third, top right "u" node.
7. Create the last "u" node by moving to the bottom right, clicking and dragging slightly towards top right until the red helper line partially fits over the previous segment.
8. Right-click or press Enter to finish the first path.
9. Hold Shift while creating the first node of "d", to add the path we are about to create to the first one. Click and drag upwards and to the left.
10. Click and drag downwards and to the right to create the second node of "d" (consult with the screenshot that follows).
11. Click where you want the highest point of "d" to be and drag upwards to adjust the ascenders as you see fit. Don't release the mouse yet.
12. Press Shift while still holding down the mouse button. Move the pointer downwards until you almost reach the baseline of the text; release both the Shift key and the mouse button to create the handle.
13. Click where you want the "d" terminal to end and drag upwards and to the right to adjust the last segment.
14. Right-click or press Enter to complete the path.

A simple click on the canvas will create a cusp (corner) node, while clicking and dragging will create handles of smooth nodes that control the path curvature. When we are creating a cusp node that comes after a curved segment that needs adjusting, we need to use Shift so we can reposition the second handle to create a cusp node. This procedure isn't very intuitive so some users don't think cusp nodes can even be created in such a case, as we have seen, the "d" ascender example proved differently.
We only used some of the keyboard shortcuts and options available for the Pen (Bezier) tool. Look for more under Help | Keys and Mouse Reference. For example, if you want to fine-tune the position of the last node you've drawn, you can move it using the arrow keys. If you don't like the last node you've created, you can quickly delete it using the Backspace or Del keys. Esc or Ctrl + Z will undo the entire path we are drawing, and holding down Ctrl will conveniently snap the rotation handles.
Finally, use the Node tool to make any extra adjustments to the path you've just created.