
Inkscape is often used to produce leaflets, brochures, and User Interface themes, so a tool for creating text objects is obviously necessary. In this recipe we will explore what the Text tool has to offer.
The following steps will show you how to use the Text tool:
1. Select the Text tool
 (F8 or T) and create a text object by clicking on canvas (without dragging). Type "FUNstack" but place the "stack" on the next line.
2. Select your favorite font family from the drop-down list in the Text toolbar. The example in this book uses 'Doulos SIL'.
3. Increase the text size to 144 by selecting it from the Font size (px) drop-down box.
4. Make the text bold by clicking on the Bold
 button. This will work only if the bold variant of the font exists.
5. Center the text using the center toolbar button.
6. Reduce the spacing between lines (line-height or leading) by using the toolbar button or Alt + Up Arrow when the text cursor is positioned before the letter "s".
7. Select the letters "FUN" dragging with the Text tool across them and increase the spacing between letters by using Alt +> or the toolbar box.
8. Select the "t" letter and shift it upwards by using the vertical shift box or Alt + Up Arrow.
9. Rotate the "t" letter by using Alt + [ or by using the toolbar button.
10. Select the letter "a" and move it to the left by using the Alt + Left Arrow or the toolbar button.

Clicking on the Canvas with the Text tool creates a normal text object. The alternative is to click and drag to create a frame into which text will be written (a flowed text frame). Not all formatting options are available in flowed text frames (kerning for example) so we might use it to enter text into a predefined rectangle area and then convert it to a normal text object using the Convert to text option  from the Text menu.
The Text and Font dialogue (Shift + Ctrl + T) can be used to preview any font changes before applying them, and it is also possible to choose the default settings for some of the text editing options.
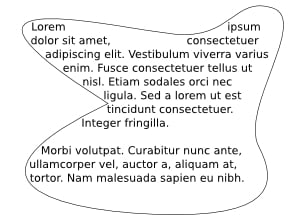
A flowed text frame can be used when we need to have our text fit a rectangle shape, but if we need it to fill something more exotic we need to use the Flow into Frame option (Alt + W). Both the text object and the shape need to be selected before calling this option.
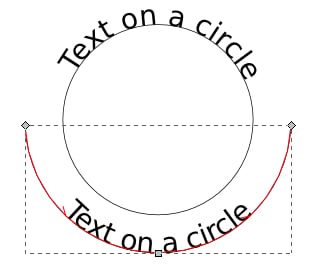
Putting text on paths is commonly used when we need to put text on a circle or some other shape. The direction of the path is important because it determines the text direction. Shift + R changes the path direction. You can visualize the path direction by enabling it in Inkscape Preferences  (Shift + Ctrl + P) under Tools | Node and turning on the path outline using the button on the Node toolbar. To place the text on the shape, select both objects and then choose Text | Put on Path
  from the menu.