Book Image

Inkscape 0.48 Illustrator's Cookbook

Book Image

Inkscape 0.48 Illustrator's Cookbook

Overview of this book

Inkscape is an open source vector graphics editor with an intuitive user interface that has enough depth to make quality graphic designs with an attractive layout comparable to what you would make using Illustrator or CorelDraw. But choosing the right tool and the best approach to creating the desired effect can be challenging. Inkscape 0.48 Illustrator's Cookbook makes it super-easy for you to make your own vector-based graphics with the powerful Inkscape editor. Inkscape 0.48 Illustrator's Cookbook provides you with the latest recipes to quickly create scalable vector graphics. Recipes in this book teach you about some of the most useful time-saving features in Inkscape accompanied by a list of keyboard shortcuts that you can easily memorize. In addition to covering use of Inkscape tools and their advanced features, examples from the recipes uncover solutions to common graphics problems. The book starts off with familiarizing you with the tools and techniques in Inkscape that you can use to draw 2D shapes, calligraphic shapes, and 3D boxes easily. It then guides you through the most common color-changing steps performed in Inkscape along with some convenient procedures that can save your time when dealing with colors. It explains drawing using linear and radial gradients, which are irreplaceable, usage of clones to create interesting effects in illustrations, and live-path effects that can help you speed up constructing a shape and make the process more natural. You will learn how to make those tweaks on some of the ready-made filters, and in the final recipe we will create a filter from scratch. This practical book also contains recipes showing how to use Inkscape as a raster editor and how to achieve photo-realistic effects in Inkscape. For each important technique and skill, you'll see some simple recipes, then some more advanced recipes followed by an explanation of how Inkscape works to produce the desired effects in your illustrations. By the end of this book you will be confident enough to create your own vector-based graphics with Inkscape.
Table of Contents (18 chapters)
Inkscape 0.48 Illustrator's Cookbook
Credits
About the Authors
About the Reviewer
www.PacktPub.com
Preface

Masking


In this recipe we will see how to make certain areas of a drawing transparent without applying permanent changes to the elements of the drawing itself, thanks to the use of masking objects.

How to do it...

The following steps show you how to create an object masking:

  1. 1. Select the Star tool (Shift + F9 or *) and create an upright star by dragging upwards while holding Ctrl key. This is the object we want to mask.

  2. 2. Select the Ellipse tool (F5 or E) and create a circle by holding Ctrl while dragging. Make the circle a bit smaller than the star and position it above the star. The circle will be our masking object.

  3. 3. Make the circle fill color White by clicking on the white colored chip in the color swatch under the canvas.

  4. 4. Create a radial gradient by selecting the Gradient tool choosing the radial gradient, clicking in the center of our circle, and then dragging outwards. Increase the stroke width (10 worked in my case) and set its color to White.

  5. 5. Select both of our objects (Ctrl + A) and apply the masking by using the Object | Mask | Set command. The star will appear to be clipped, but if we read the Status bar notification area tip, we will see that the star is actually labeled as masked.

  6. 6. Select the Star tool (Shift + F9 or *) and move the star handles to change the star shape.

  7. 7. Select the Node tool (F2 or N) and enable the Show mask(s) of selected object(s) toolbar button. You will now see the outline of the masking object in blue.

  8. 8. Edit the masking circle by using the ellipse handles.

How it works...

The masking object, in addition to acting as a clip path, will use its colors to make parts of an object opaque or transparent. In parts where the masking object is white, the masked object will be visible, and in parts where the masking object is black or transparent, the masked object will be transparent. Mask colors aren't limited to black and white though, any color can be used and the masking will be determined by the color lightness and opacity.

The masked object can be edited while being masked or it can be released from the mask by using the Object | Mask | Release option.

Note

Editing shapes used as masking objects

As of writing this book the option to edit masking objects that are shapes (rectangle, ellipse, star) doesn't work, so if this is important to you convert the masking object into a path (Shift + Ctrl + C) before doing the masking.

There's more...

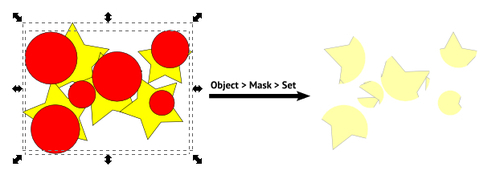
As with clipping, masking can also be performed on groups and by groups. The following are the two groups from the clipping recipe, only now we have used masking:

Note

Masking and automatic grouping

Masked objects can be automatically grouped before masking to make future editing easier. Read more about it in the Clipping recipe.

See also

For more information, refer to the Making objects partially transparent and Creating linear gradients in Chapter 2.