
The ability to create bones that deform a mesh is great, but that alone doesn't solve all our rigging problems. Some may argue that it's possible to create perfect deformations in every movement of your character just with lots of extra bones and even more detailed weight painting, but that's too time consuming. We want our rigs ready to be animated in a short amount of time. We care about our character looking good on screen, not the purity of the technique.
That's why we can solve some trickier rigging problems with corrective Shape Keys. Shape Keys are saved states of our character's mesh, with the position of each vertex stored in the computer's memory. We're going to create some custom deformations in our character to correct specific issues caused by our rig. The example will take care of one of the most common source of deformation problems: the bending of arms.
Open up the file 001-ShapeKeys.blend from this book's support files. You'll see an arm with two bones already set to deform the mesh. Try rotating the forearm on its X local axis for 130o. You'll notice that the vertices located near the elbow don't deform like a real arm would: there are noticeable intersections and the biceps should be contracted.
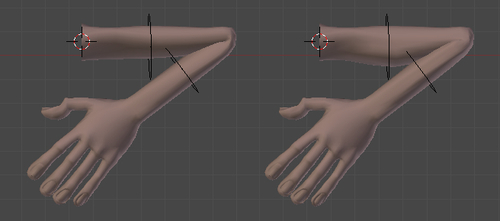
Even with the feature called Preserve Volume in the Armature modifier panel that uses the dual quaternion method to deform meshes in a more realistic way, some things such as muscles and specific skin deformations still need to be fixed manually. We're going to create a Shape Key here to act as the extreme deformation of this mesh when the character bends its arm to the maximum angle of 130o. Look at the next screenshot to see the before (left) and after the driven corrective Shape Key, where the biceps muscle gets contracted and the skin gets compressed between the arm and forearm.
Keep the forearm bone rotated on its X axis for 130o. Select the mesh and enter Edit Mode (Tab). You'll see that the arm goes back to its original position, as seen in the next screenshot:

We can tell Blender to keep the armature's deformation on the mesh while we edit its vertices, so that it's easier to create the corrective Shape Key.
Go to the Modifiers tab under the Properties window and locate the armature modifier. Next to the eye button, enable the one with the tooltip Use modifier while in edit mode. It will bring us another button next to it. Enable it too. Now we can edit the mesh after the deformation performed by the armature. The following screenshot shows the arm with our desired behavior and the Armature modifier panel with the highlighted options:

Go back to Object Mode (Tab), go to the Object Data panel under the Properties window, and find the section called Shape Keys. Click twice on the plus sign to create two Shape Keys: one called Basis, which is the base state of our mesh, and other called Key 1, which is the one we will work on.
Change the last Shape Key name to
Arm_Left. This is important when dealing with complete characters and lots of Shape Keys.We're going to use both the sculpting tool and the Edit Mode to build our corrective shape. In order to be able to work on a Shape Key in Sculpt Mode, we have to pin this shape.
With the Arm_Left key selected, click on the pin icon, just below the Shape Keys list. You should disable it when you're done sculpting. The next screenshot shows the Shape Keys section and the pin button highlighted:

Sculpting in Blender is pretty straightforward: select the mesh, pick Sculpt Mode in the 3D view mode list on the window header, and start sculpting the mesh. Under the Tool Shelf (T) you can select the appropriate mode of sculpting, such as Inflate, Grab, or Smooth, for instance. Use the Inflate tool for growing the biceps, such as in the following screenshot:

Since not everything will look right just with sculpting, disable the Pin button for the Shape Key you've enabled at step 5, enter into Edit Mode, and tweak the vertices until you're happy with the result of the arm bending shape. Go back to Object Mode when you're done.
Now comes the magic part: now that you have two shapes for your arm, we need to set a driver, so the rotation of the forearm bone on its X local axis triggers the morphing between those keys.
Below the Shape Key's name in the Object Data tab is a slider called Value. Right-click on it and select Add Driver. This will turn the slider into a pink color, which is how Blender shows you that this channel is driven by another object, expression, or property. The next screenshot demonstrates that:

Open a Graph Editor window to set up the forearm bone as the driver for this shape. Select Drivers from the Modes list in the header.
On the left panel, click in Value (Arm_Left) in order to see the pink line in the editor. On the Properties (N) panel, leave the driver type as Scripted Expression and change the Expr value to
var.In the box just below the Add Variable Button, leave Transform Channel on the first item; select Armature from the Ob/Bone selector and also the bone forearm in the box that will appear after choosing the armature; select X Rotation in the last list and check the Local Space box. This will tell Blender to take into account the local X rotation of the forearm bone to control the blending between the Basis and Arm_Left shape keys.
Rotate the forearm bone on its X axis to see the transformation. The biceps and skin get changed when you rotate the forearm, but the transformation happens earlier than we would expect.
To fix that, look for the Generator box inside the Modifiers section on the Properties panel. Change the Y value to
-1so that the blending between the Shape Keys starts only when the arm bending is closer to its final position. The next screenshot shows the driver and its values set:
The file 001-ShapeKeys-complete.blend
has this finished recipe for your reference.
Using a basic rig as starting point, you move the bones around and look for strange deformations, which would occur mostly in joints. When you find such deformations, its time to use them as a base to build new Shape Keys that correct the mesh in such situations. By using drivers, you can use the same bone values that caused the bad deformations to trigger the corrective Shape Key.
In this recipe you've learned how to create simple drivers in Blender. You'll notice throughout this book that most rigging features rely on them at some point. Fortunately they are not difficult to create.
The use of drivers in Blender 2.5 changed significantly from previous versions. Now, almost every property in Blender can be animated, driven, and used as a driver for other properties. It's just a matter of right-clicking over the property that you want to control and selecting Add Driver, then setting it up on the Graph Editor window. You can even make complex drivers using scripted expressions that can take into account more than one property and math expressions, for example.
Chapter 4: Adding expressions using Shape Keys