
When you interact with a computer, you'll probably use a mouse. This is a standard input device on all computers that use a graphical user interface (GUI). The mouse became popular in the 1980s when Apple released the Macintosh. Most people know how to use a mouse, or trackpad, so you can easily use this to create art for people to interact with.
This is the full code for the sketch.
Note
Here, the draw() function is empty, as we'll do all the drawing with the mouse functions. We do need to add the draw function though, as it is used to make our app run continuously. If we leave it out of the code, the code in setup() will only run once and the app won't be interactive.
void setup()
{
size( 640, 480 );
smooth();
background( 255 );
}
void draw()
{
// empty, but we need it to create an app that runs in the continuous mode.
}
void mousePressed()
{
if ( mouseButton == RIGHT ) {
background( 255 );
}
}
void mouseMoved()
{
stroke( 0, 64 );
strokeWeight( 1 );
fill( 255, 32 );
float d = dist( mouseX, mouseY, pmouseX, pmouseY );
constrain( d, 8, 100 );
ellipse( mouseX, mouseY, d, d );
}
void mouseDragged()
{
stroke( 0 );
float d = dist( mouseX, mouseY, pmouseX, pmouseY );
constrain( d, 0, 100 );
float w = map( d, 0, 100, 1, 10 );
strokeWeight( w );
line( mouseX, mouseY, pmouseX, pmouseY );
}
void mouseReleased()
{
noStroke();
fill( 255, 16 );
rect( 0, 0, width, height );
}
void mouseClicked()
{
fill( 255, 0, 0, 128 );
float d = random( 20, 200 );
ellipse( mouseX, mouseY, d, d );
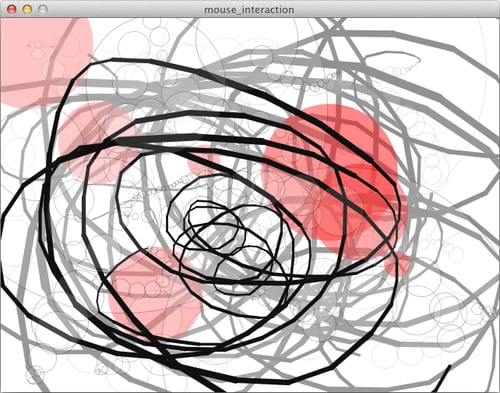
}After typing this code, you can run your sketch by clicking the run button or using the shortcut Cmd + R on the Mac or Ctrl + R on Windows and Linux. You can now start drawing with your mouse. When you move your mouse, you'll leave a trail of circles. When you press the mouse button and release it, you'll draw a red circle. When you move the mouse while pressing the left mouse button, you'll draw a black stroke. You can use the right mouse button to erase the screen and start all over again. The output of the application might look similar to the following screenshot:
There are five functions and six system variables you can use to track mouse interaction in your sketch:
The
mouseClicked()function is executed when you click a mouse button. This means pressing the button and releasing it. In the application you just made, this function was used to draw the transparent red circle.The
mouseDragged()function is executed when you press a mouse button and move the mouse while the button is pressed. This function is used to draw the lines in our sketch.The
mouseMoved()function is called every time the mouse is moved while no buttons are pressed. In our sketch, this leaves a trail of white transparent circles with a transparent black border.The
mousePressed()function is called when you press the button on your mouse. We use this function, together with the system variable mouseButton, to clear the screen if the right mouse button was pressed.The
mouseReleased()function is called when you release the mouse button. We used this function in our sketch to draw a transparent white rectangle with the size of the window on top of everything.The system variable
mouseXcontains the current x coordinate of the mouse within the sketch window. This variable is updated every frame.The system variable
mouseYcontains the current y coordinate of the mouse within the sketch window. This variable is updated every frame.The system variable
pmouseXcontains the x coordinate of the mouse in the previous frame. This variable is updated every frame.The system variable
pmouseYcontains the y coordinate of the mouse in the previous frame. This variable is updated every frame.The system variable
mousePressedis a boolean variable that keeps track if a mouse button is pressed or not. The value of this variable is true if a mouse button is pressed and false if no buttons are pressed.The system variable
mouseButtonis a variable used to keep track of which mouse button is pressed. The value of this variable can beLEFT,RIGHT, orCENTER.